Page summary
- Login with email
- Login with scanner badge
- Is data refreshed on login?
- Shift Management
- On Login
- On Logout
- At any time
- Previous versions
- Download data (only available for offline mode)
- What is it downloaded?
- Select trips view (only available for trip selection workflow)
- Search bar
- Trips list pagination
- Visible trips
- Redeeming trip selection workflow
- What must be satisfied to enter scanning mode?
- How to enter scanning mode?
- What can be redeemed?
- Was a successful scan?
- What should be selected for a successful NFC read?
- Was a successful NFC read?
- Can the scanning app handle redemptions based on scanning a code and reading with NFC in the same scanning session?
- Redeeming simple workflow
- How to enter scanning mode?
- What can be redeemed?
- Was a successful scan?
- Scan errors
- Synchronize (only available for offline mode)
- What does it mean to synchronize?
- Settings per device
- Settings per account
- Delete data
- Fallback codes
- Enabling Location on Android
- Features using Location Tracking
- Parcel tracking
- Pre-select station based on current location
- Scanner app location tracking (premium feature)
- Troubleshooting
- Data usage
- Login
- Synchronization
- Scan
- Scanner app sales
- Associate an square terminal to the device (only needed if you need Square payment method)
- Sales flow
- Station manifest
- Parcel Tracking Status Flow
- Display Passenger Phone Number
- Trip Selection: Show Only Assigned Trips Option
Using the scanner app
Login with email
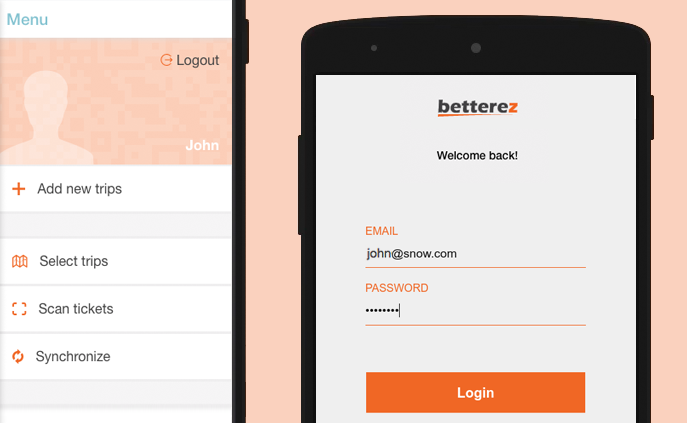
Just enter your email and password, please check your Internet connection is on.
Login with scanner badge
Starting with v5.10.8 the login page now has the option to use an scanner badge for login. After scanning his/her badge the user has to enter the password.
There is a badge per user and it can be printed from back-office (user --> options --> print/email scanner badge).
On your scanner click on the Scan badge button.
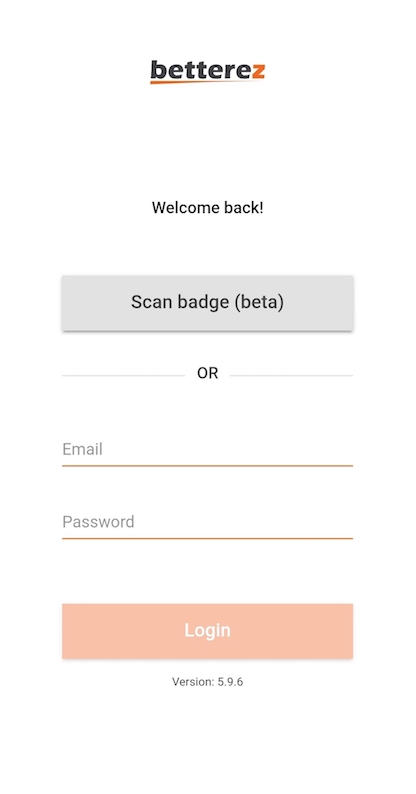
When the user scans the barcode the following screen will show up:
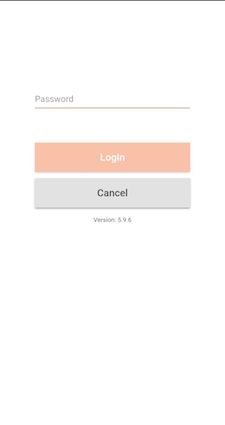
Enter your password and login.
Is data refreshed on login?
Yes, only if the trip selection workflow is selected then the following data will be updated according to the selected mode:
- For offline mode: Stations, Fares and Products. This mean that if any station, fare or product is added/modified/removed then to see these changes you should logout and login again.
- For online mode: Stations, Products, Trips, Fallback codes. This mean that if any station, product, trip or fallback code is added/modified/removed then to see these changes you should logout and login again.
To logout, go to the app menu and tap on Logout.
Shift Management
Available since v5.28.1
For those users whose role uses shifts, it is mandatory to have an open shift in order to scan.
On Login
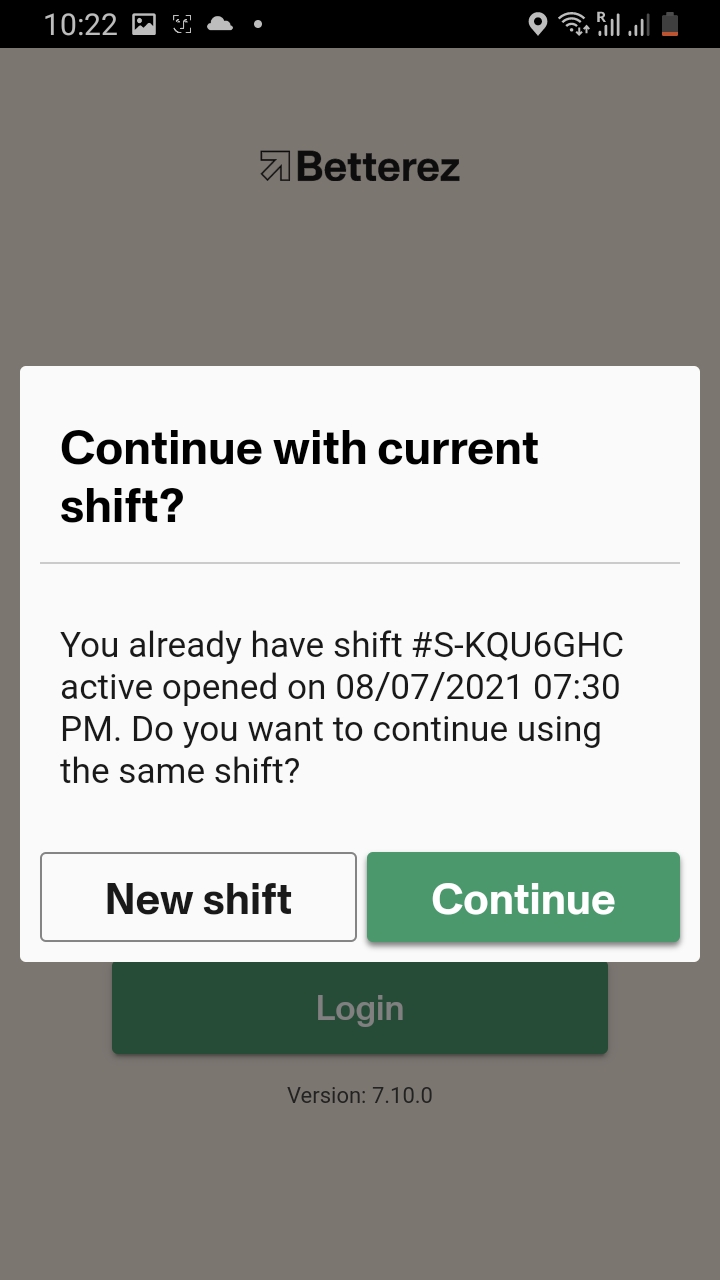
After logging in the user will be prompt with two options:
- Continue using the current shift
- Open a new shift
If the user decides to use the current shift, the scanning process will start as usual.
If a users selects to start a new shift, then the app will show the current shift summary (if any) that must be closed before starting a new one. In case no shift was open it will show the open shift page directly.
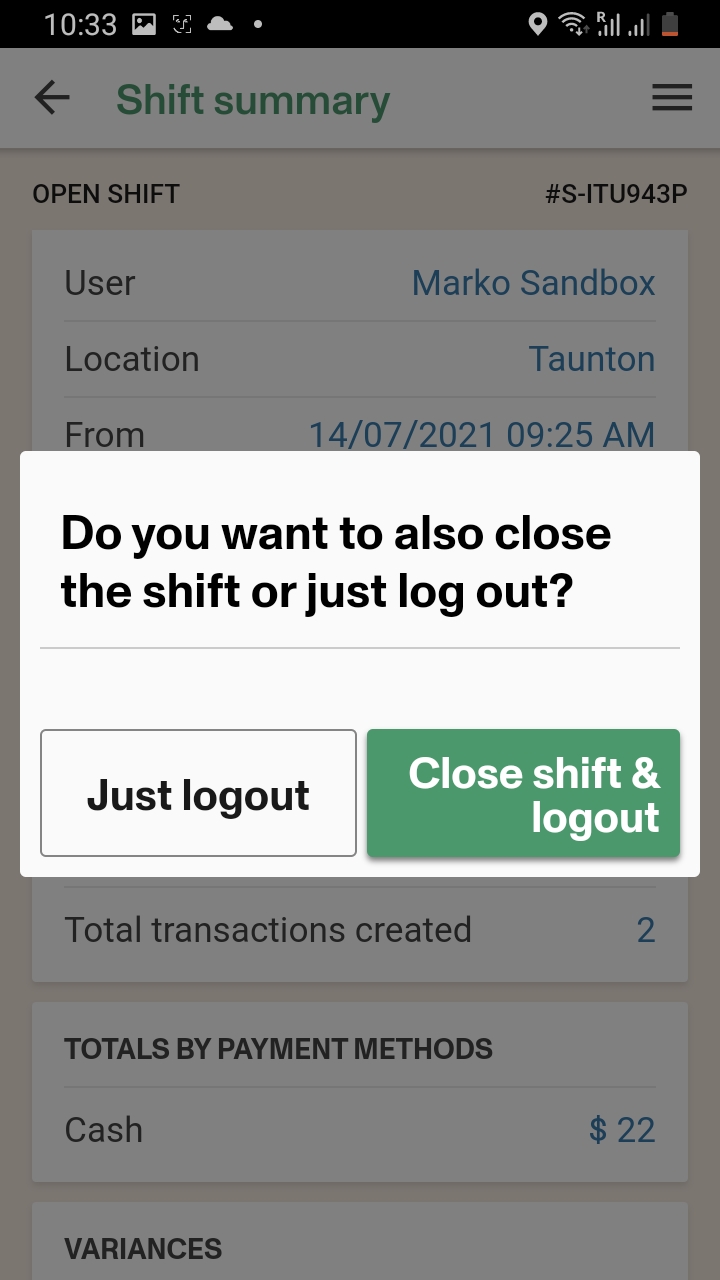
On Logout
User has these choices
- Just logout
- Close shift and logout
At any time
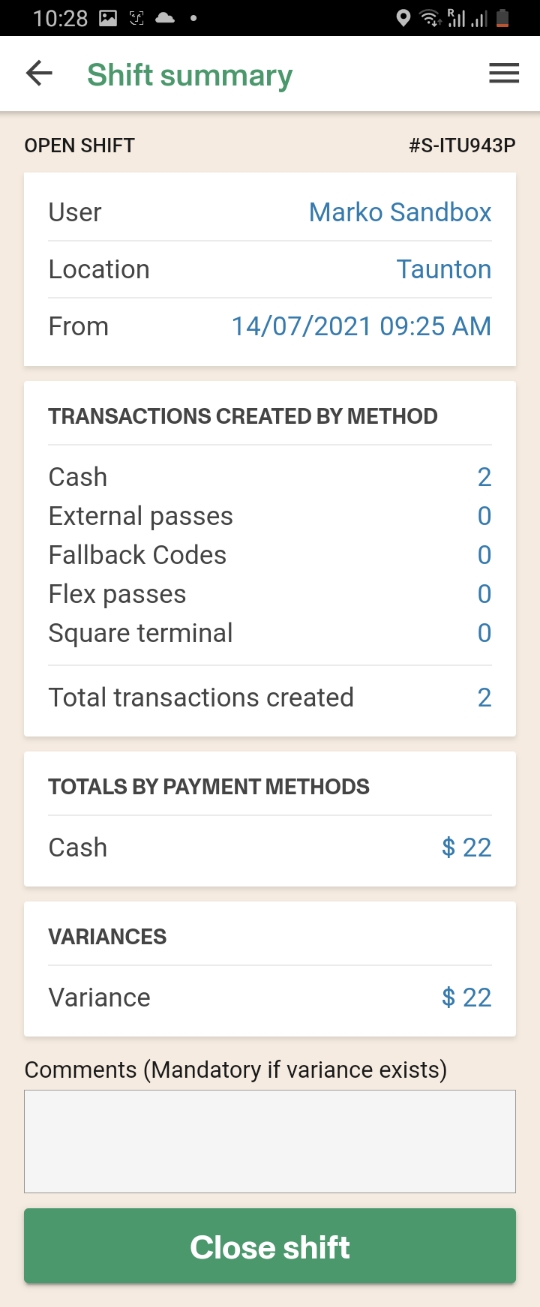
The user can use the side menu to navigate to the shift summary page.
Previous versions
Before v5.28.1 users whose needs to open a shift will be shown an error on the login page in order to open the shift in back-office first
Download data (only available for offline mode)
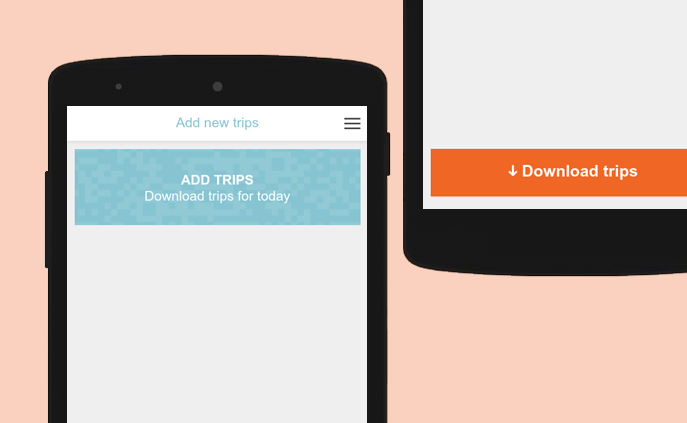
To start using the scanning app it is necessary to download data. To do so you should go to the app menu and tap on + Add new trips. A new screen will be displayed, press the Download trips button to start the download process. The first time it might take longer than in the next ones, after the first download only the differences will be downloaded. Once the process is finished a toaster will show the number of tickets and trips that were downloaded.
What is it downloaded?
During the download process the app will download:
- Trips: all the trips for today until tomorrow at 6 AM.
- Tickets: all the tickets for today until tomorrow at 6AM. However, if the Expand download date range setting is enabled the date range will be modified according to the product.
- External Passes: all the passes that were ever uploaded using the CSV file in the Admin -> External Passes section in back office.
- Fallback codes: all the enabled fallback codes created in Admin -> Scanning.
Select trips view (only available for trip selection workflow)
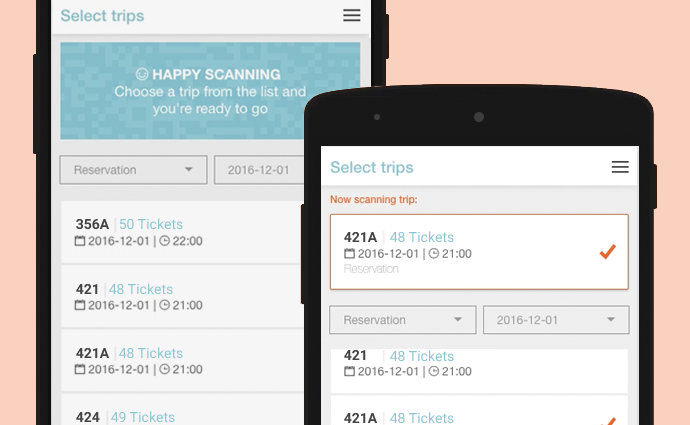
This is the main view in the app. In this view it is possible to select a trip to start scanning. To select a trip just tap on the desired trip and it will appear at the top of the page. In this view it is also possible to filter trips by product and date by using the dropdown lists at the top. The products in this dropdown list are the ones that were automatically downloaded during the scanning app login. The dates in the dropdown list are all the different dates for each downloaded trip.
Search bar
Available since v5.26.3.
The user will have a search bar on top of the trip list, so that he/she can find an specific trip easily.
In the seach bar, several words separated by spaces can be used to filter trips. The scanner will search by:
- Schedule name
- Assigned bus
- Departure time (to look for a departure time, use this format hh:mm or just hh:)
Some characteristics to take into account when searching:
- Accents are ignored
- Search is case-insensitive
- Partial matches are enabled (the user can write just one part of the word)
- When filtering by several words, trips needs to match all of them in order to appear in the list.
Important: All the times showed are in the timezone set in the account.
Trips list pagination
Available since v5.26.3.
The trip list is divided in pages and we show one page with 50 trips at a time. The user can navigate the pages with the Previous and Next buttons.
In the initial load the app will auto-select a page based on the current time (in account's timezone) so the user can find quickly the trips that are about to departure.
When using the search bar it will go to the page 1.
Visible trips
The trips availables for selection will be all the trips for the current day and trips for the next day with departure time up to 6:00 am.
In case the user needs to select trips that started the day before, it can be configured under admin/scanning in back-office (scanner version 5.12.1 or greater is needed).
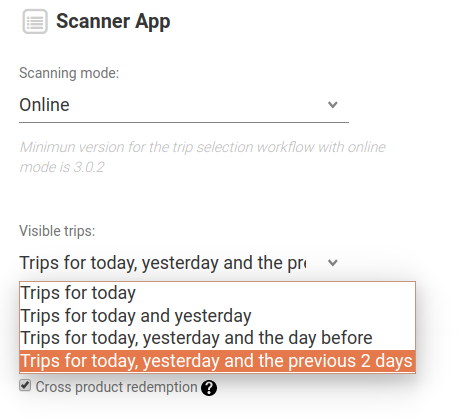
Also the driver can see this setting on the scanner app by going to the Settings page (read only)
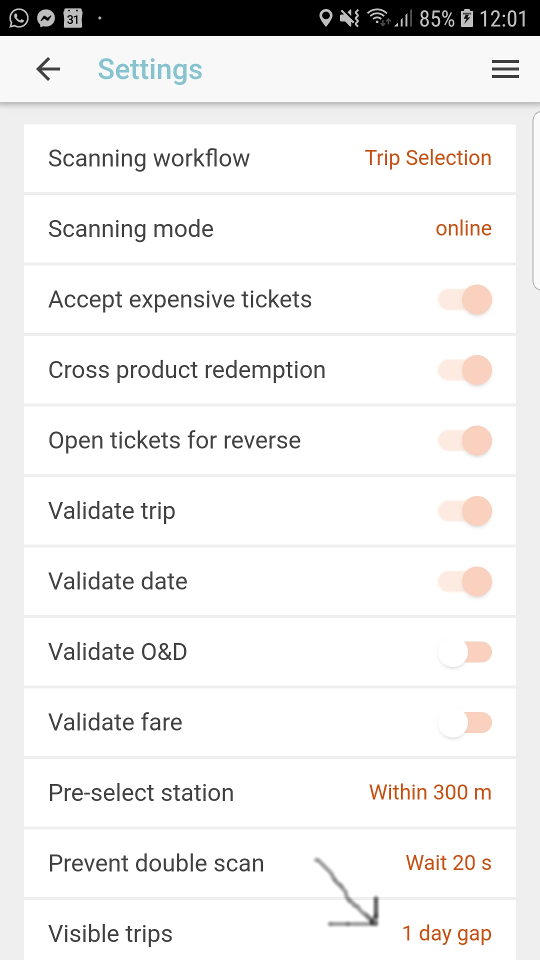
Here 1 day gap means trips for today, 2 days gap means trips for today and yesterday and so on.
Redeeming trip selection workflow
A redemption can be made by scanning a code or reading an NFC tag, in both cases the app must be in scanning mode, being in scanning mode implies all the requirements to redeem are satisfied. Redemption by NFC is only available for Passes.
What must be satisfied to enter scanning mode?
- A trip must be selected.
- A station must be selected.
How to enter scanning mode?
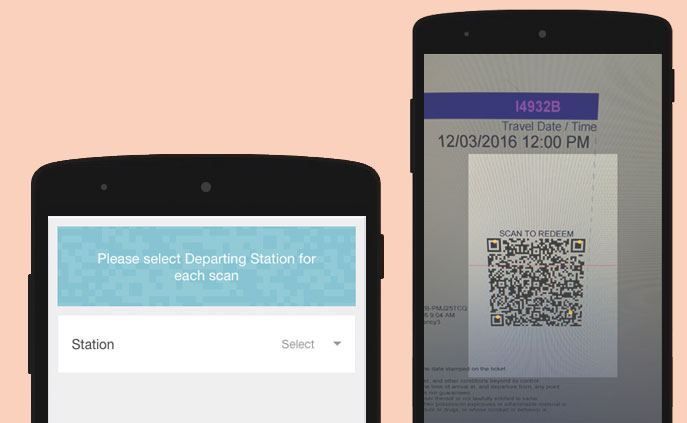
A trip must be selected to enter scanning mode. If Scan is tapped, either from the select trips view or in the app menu, then a new view to select the station that the app will be scanning for will be displayed. Select the station from the dropdown list and tap on the Select button to start scanning. The stations that are displayed in the stations dropdown list are the ones related to the selected trip.
What can be redeemed?
The scanning app is capable of redeeming:
- Tickets from reservations type products.
- Tickets from ticket type products that have trips in common with a reservation product.
- External passes.
- Fallback codes.
- Flex passes.
- Redeemable items.
Was a successful scan?
If a scan is successful then green points in the scanned code will be displayed and a beep will ring in the device. It is important to note that if the scan was successful then the device will stay in scanning mode, it will only leave scanning mode if either there is an error or there is a warning or the user presses the device back button.
What should be selected for a successful NFC read?
For a NFC redemption can take place the following requirements must be satisfied:
1- The user must be logged in.
If the user is not logged in then on a NFC read the login view will be displayed.
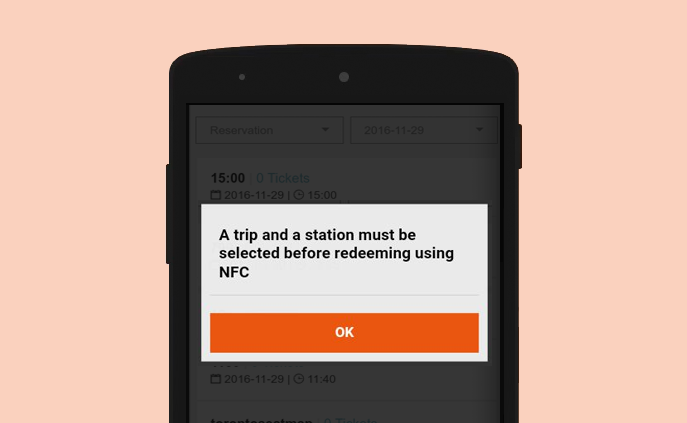
2- A trip must be selected.
If a trip is not selected then on a NFC read the "select trip" view will be displayed along with this message: "A trip and a station must be selected before redeeming using NFC".
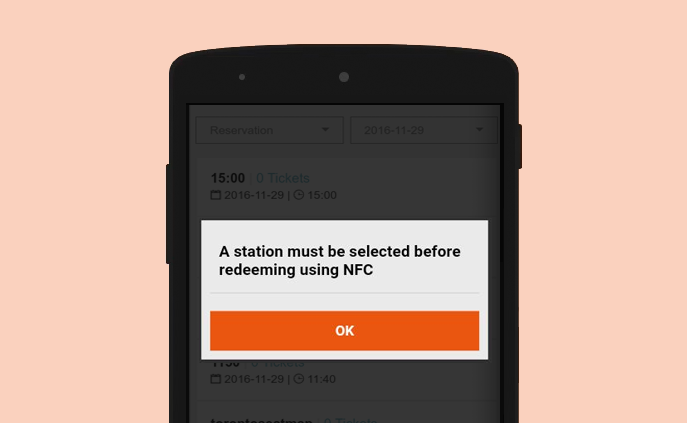
3- A station must be selected.
If a station is not selected then on a NFC read the "select station" view will be displayed along with this message: "A station must be selected before redeeming using NFC".
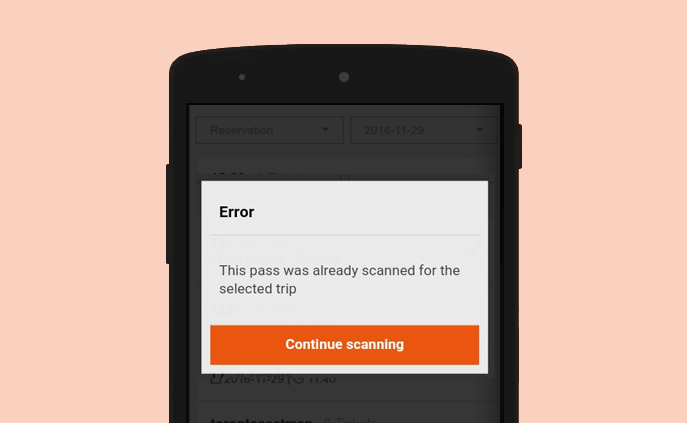
4- All the validations for the Pass that is read must pass ok.
If the validations do not pass an error message will be displayed in the same way it happens on redemption based on scanning a code.
Was a successful NFC read?
A NFC read can be triggered in different scenarios:
- The scanning app is closed and a NFC read is performed.
For this case Android will open the scanning app, if all the redemption requirements are satisfied then the redemption will take place, a "beep" will ring in the device and the device will stay in scanning mode. If any of the requirements is not satisfied then the related view will be displayed.
- The scanning app is opened in background and a NFC read is performed.
For this case Android will set the the scanning app as active, if all the redemption requirements are satisfied then the redemption will take place, a "beep" will ring in the device and the device will stay in scanning mode. If any of the requirements is not satisfied then the related view will be displayed.
- The scanning app is opened and active.
If all the redemption requirements are satisfied then the redemption will take place, a "beep" will ring in the device and the device will stay in scanning mode. If any of the requirements is not satisfied then the related view will be displayed.
Can the scanning app handle redemptions based on scanning a code and reading with NFC in the same scanning session?
Yes. This would be a valid example:
1- The user goes to scanning mode (this implies a trip and a station are selected)
2- A Ticket is successfully scanned (the app stays in scanning mode).
3- A successful NFC read for a Pass is performed (the app stays in scanning mode).
4- A Pass is successfully scanned (the app stays in scanning mode).
5- A Fallback Code is successfully scanned (the app stays in scanning mode).
6- A successful NFC read for a Pass is performed (the app stays in scanning mode).
Redeeming simple workflow
A redemption can be made by scanning a code. To scan the app must be in scanning mode.
How to enter scanning mode?
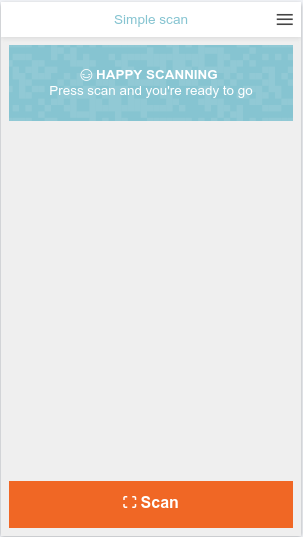
After login you just need to tap in the Scan button to go to scanning mode and start scanning.
What can be redeemed?
The scanning app in simple mode is capable of redeeming:
- tickets from the ticket type product.
- tickets from the reservation type product.
- tickets from the event type product.
- tickets from the commuter pass type product.
Was a successful scan?
If a scan is successful then green points in the scanned code will be displayed and a beep will ring in the device. It is important to note that if the scan was successful then the device will stay in scanning mode, it will only leave scanning mode if either there is an error or there is a warning or the user presses the device back button.
Scan errors
Errors will be displayed in a popup after a scan with the button Continue scanning. If continue scanning is pressed the app will go to scanning mode again. It is important to note that if there was an error then the redemption was not processed.

Possible ticket scan Errors
- Ticket was not found.
- Ticket is expired.
- Ticket cannot be redeemed as it does not have available uses.
- Ticket was already redeemed.
- Ticket from or to are invalid based on the selected trip station.
Possible pass scan Errors
- Ticket was not found (it is a generic error). It means the pass was not found.
- Pass was already scanned for the trip.
- Pass max scans per day have been reached.
- Pass max scans have been reached.
- Pass invalid fare (fare was not downloaded during login in the scanning app or it was disabled from back office).
- Pass invalid station.
- Pass invalid destination.
- Reservation could not be created since v5.0.0 - online mode only
Possible fallback code scan Errors
- Ticket was not found (it is a generic error). It means the fallback code was not found.
- Wrong selected product since v5.0.0
- Wrong fare since v5.0.0
- Reservation could not be created since v5.0.0 - online mode only
Synchronize (only available for offline mode)
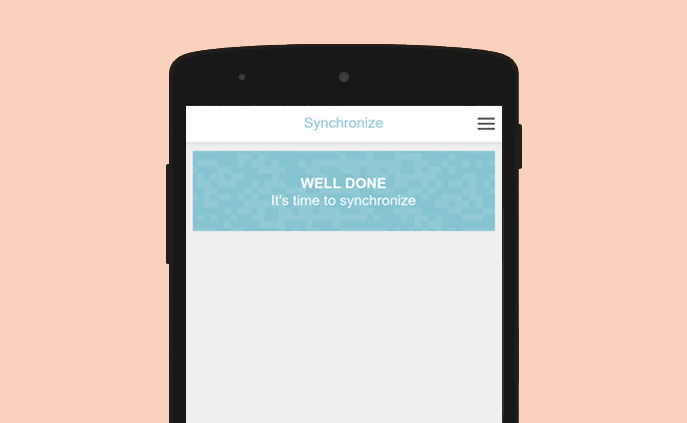
What does it mean to synchronize?
It means all the new redemptions will be uploaded and new tickets/trips/passes will be downloaded. New redemptions are the ones that were created after the last synchronization. If the tickets/trips/passes already exist in the app then they will be updated if necessary. The app provides two options to synchronize data: manual synchronization and auto-synchronization.
Manual Synchronization
To run the manual synchronization go to the app menu -> Synchronize -> and press the Manual sync button. Once it finishes a notification will be shown in the screen. The notification shows the last time synchronization ran and also the number of tickets that were uploaded and downloaded, these numbers are cumulative and will be reset if you close the notification by pressing on the x.
In this screen it is also shown a list of redemptions that were not uploaded yet. These redemptions are a consequence of tickets scans and will disappear once synchronization runs.
Auto-synchronization
To enable this you should set a Sync interval in the Admin -> Scanning section in back office. By default it is set as never. Go to the app menu -> Settings to check the current selection.
Settings per device
To see the current settings in the app go to the app menu -> Settings and the settings view will be shown.
Currently the modifiable settings in the scanner are:
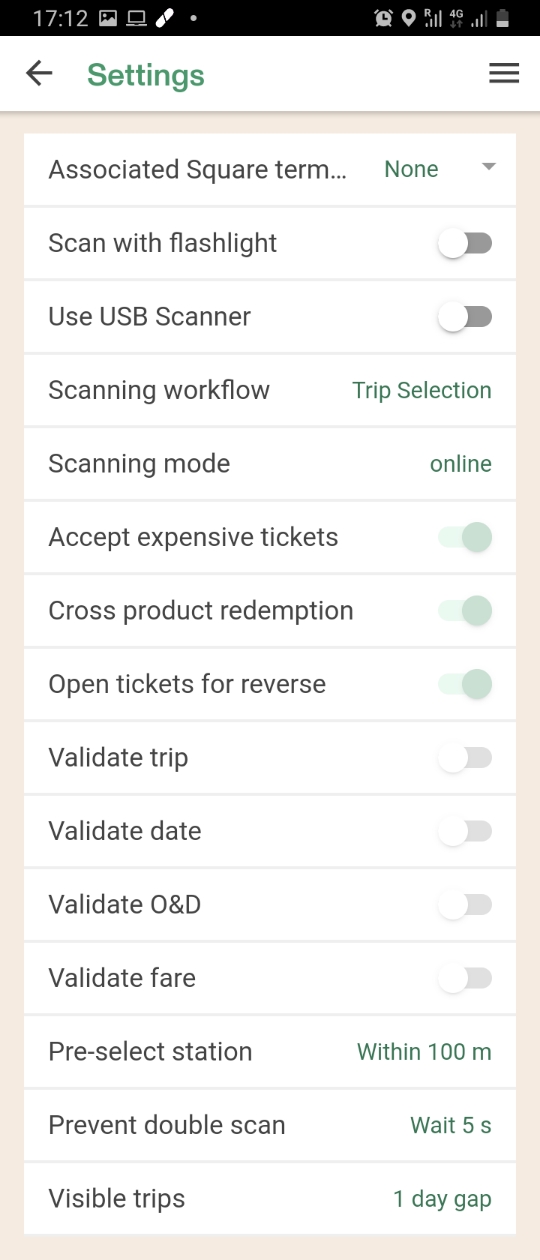
- Associated Square terminal: If selling from the app with Square payment method, you must set the terminal here.
- Scan with flashlight: Users that needs more light during the scanning session can use the flashlight while the camera is open to scan.
- Scan with sounds: (since v7.6.0) When enabled the app will emit a sound for successful scans and a different sound for scan results that requires driver's action, like warnings and errors. Make sure to adjust the "media" volume of android for this setting.
- Show success confirmation after scan: (since v7.6.0) When using this setting, the app will show a green notification after each successful scan.
- Show passenger info on scan: (since v7.21.2) When scanning a ticket with the camera it will show the passenger information before redeeming the ticket.
- Display usages left on Flex Passes: (since v7.9.0) Will show expiration date and usages left (if applies).
- Display usages left on Open Tickets: (since v7.9.0) Will show usages left (if it has multiple uses).
- Use usb scanner: Enable this if you are using an external scanner connected via USB cable to the phone.
- Open menu when autoselecting stations: (since v7.7.0) If auto-select station is enabled for the account, by enabling this setting the app will open the stations menu after switching stations automatically.
Note: Flashlight is available since v5.17.1 for Trip Selection and since v5.21.0 for Simple workflow

Settings per account
The rest of these settings cannot be modified from the app, they can only be changed from back office.
Delete data
For Trip Selection - Offline mode however, in the settings page we can delete all the tickets, trips, passes and fallback codes that were ever downloaded. To do this just tap on DELETE and tap OK on the confirmation popup.
Fallback codes
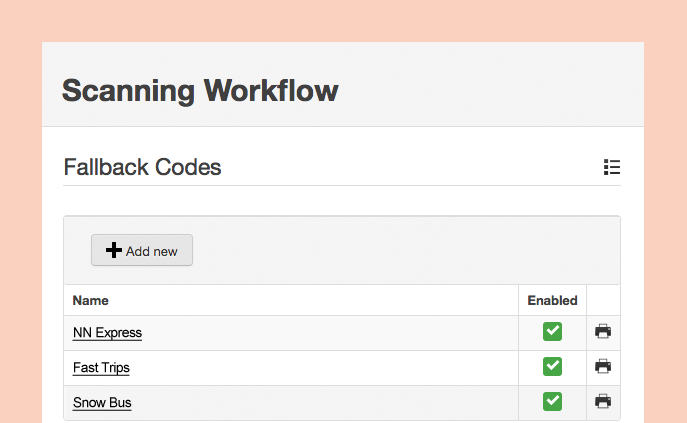
To create fallback codes go to Admin -> scanning -> Fallback Codes section in back office. In this section it is possible to create/modify/print fallback codes.
It is important to note will get the fallback codes differently depending on the selected mode:
- For online mode: the scanning app will get the fallback codes on login so if a created fallback code is not available in the scanning app it must be needed to logout and login again to get the latest created/modified ones.
- For offline mode: the scanning app will get the fallback codes on download data and they will be also updated with each synchronization.
Enabling Location on Android
We use location tracking to provide some features like parcel tracking, auto-select station and scanner app tracking. So the user should make sure that Location is enabled on the Device if some of this features are needed.
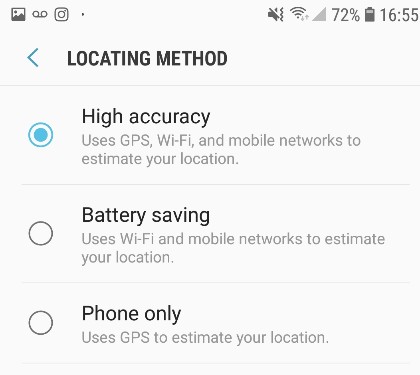
Usually, when enabling Location on Android, the user is presented with 3 choices for the Location mode:
- High accuracy
- Battery saving
- Phone only
High accuracy is the best scenario for the scanner app.
With battery saving mode the location provided has low accuracy meaning that if stations are too close it may be not clear in which station is the user.
Phone only mode should be avoided if possible, as it uses just the GPS of the phone so if the signal is weak (inside a building for example) the scanner won't be able to get the current location.
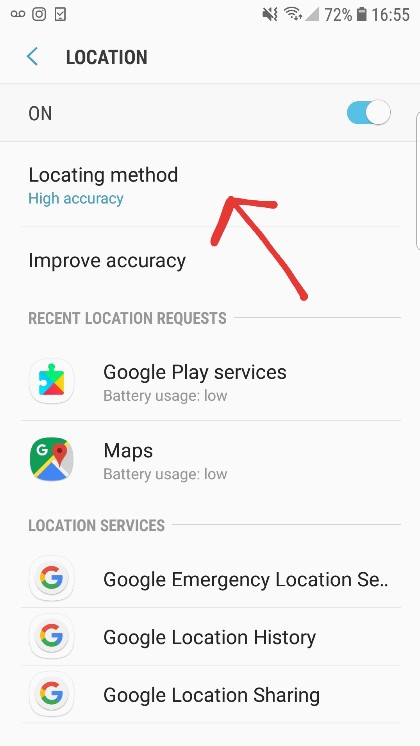
The following screenshots shows where to find the location mode (it may vary according to the Android version)
Features using Location Tracking
Prerequisites: In order to use Location Tracking, it must be enabled as explained in Enabling Location on Android section.
Currently we use Location Tracking to support the following features:
- Parcels tracking
- Pre-select station on the stations selector
- Scanner app location tracking (premium feature)
Location updates may work with less frequency than the one set when the mobile app is in background (closed or another app is on the screen). That happens when Android or iOS needs to save device's resources.
Parcel tracking
Parcel tracking is enabled by default when using Parcel products.
Pre-select station based on current location
When working on trip selection workflow the station selector will pre-select the station based on the current location of the device.
If it does not preselect the station it can be for the following reasons:
- The radius that it uses to look for near stations is too short (or none has been set). It can be changed from back-office under admin --> scanning --> Pre-select station based on GPS.
- The device could not retrieve the current location. In general this error is temporal.
Visual indicator
Starting with v7.7.0 when the app detects the driver is near a different station than the one selected on the app, then it will show a message to the user telling that is going to change the selected station. The message will dissapear after a couple of seconds and the user has the option to cancel the change during that period.
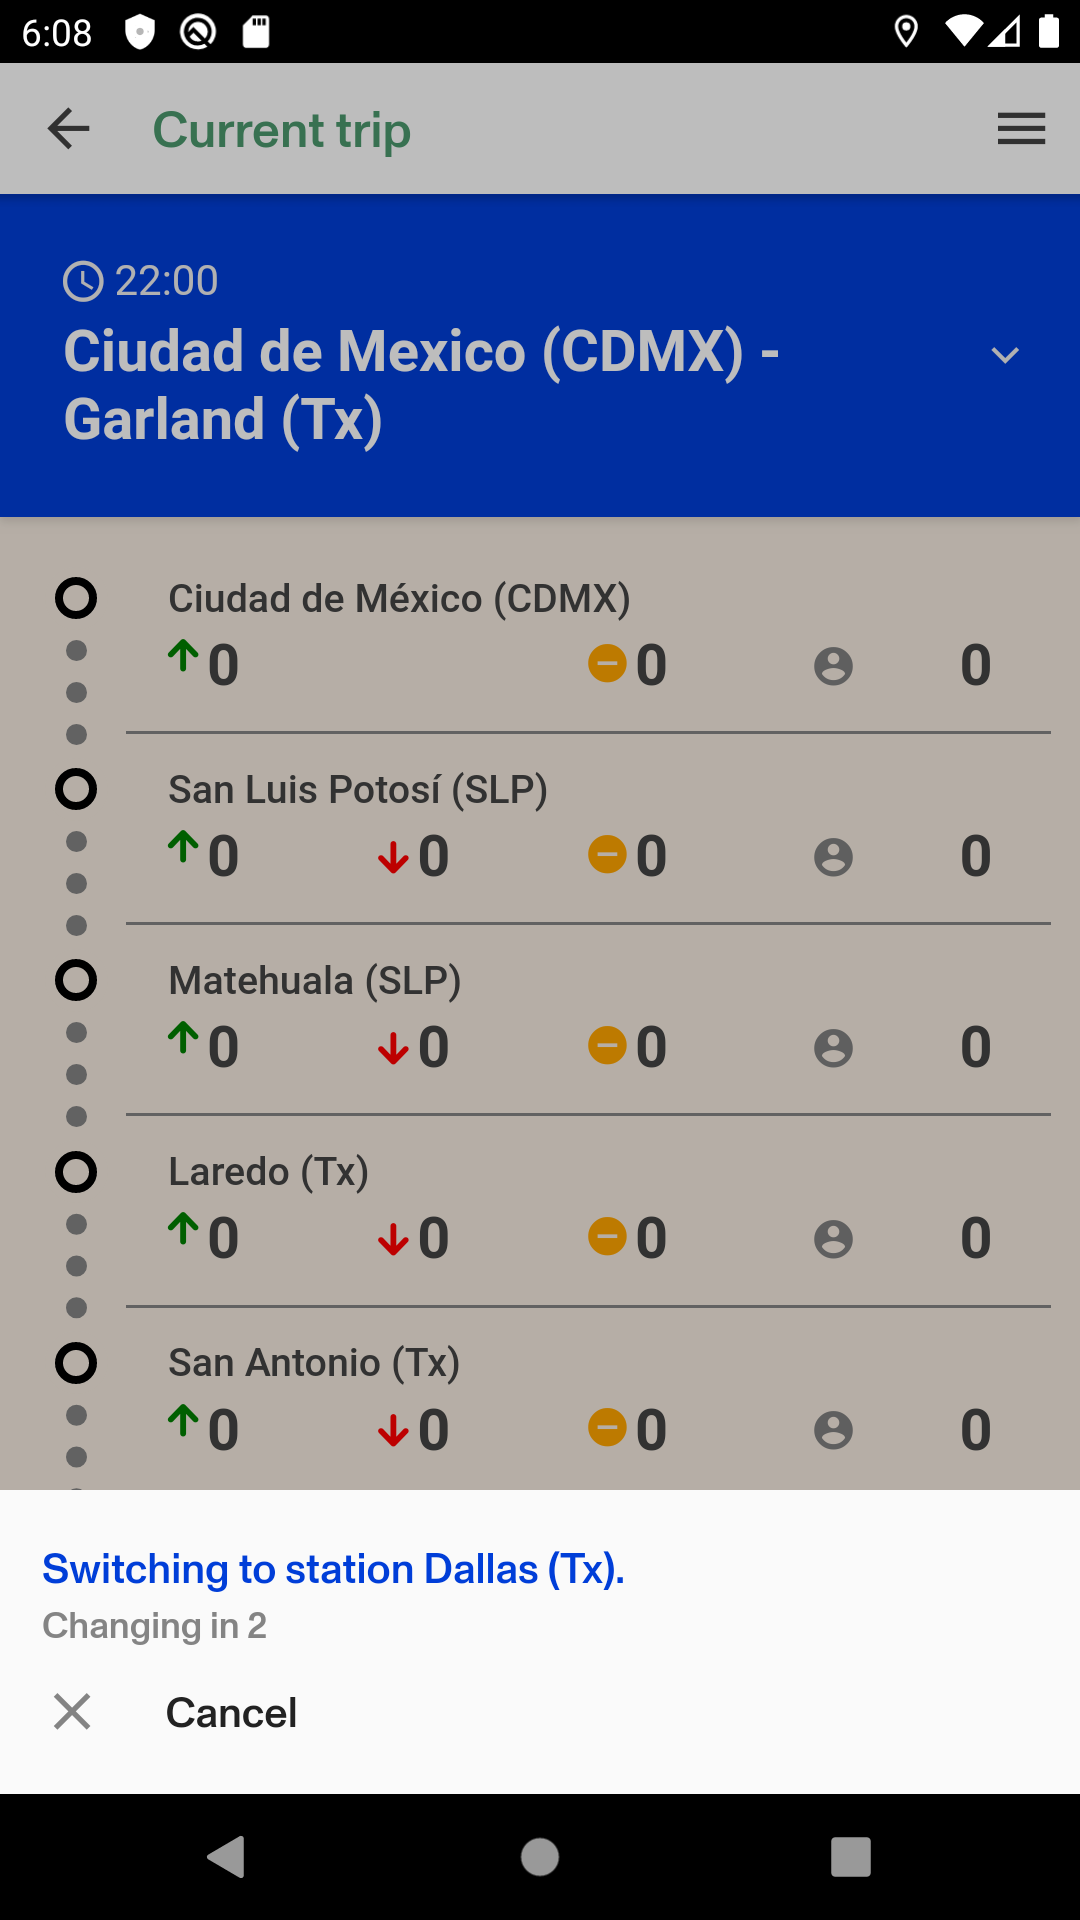
Also if "Open menu when auto select station" setting is enabled, everytime the app changes the station automatically it will open the station options menu.
Scanner app location tracking (premium feature)
This feature is available since v7.13.0. The app can transfer location updates to any server configured with the following information:
- Latitude
- Longitude
- Speed
- Heading
To start using it, please follow this steps:
- Configure the feature in backoffice as explained here.
- In the scanner app, select a trip as usual. This feature only works with a selected trip.
- In the Current trip page you will have a toggle to start the live tracking and send the location updates to the configured server.
NOTE: Since v9.24.4 is not possible to start/stop tracking from the device. That is handled at the admin level in backoffice under admin/scanning/Scanner app location tracking.
![]()
Now anyone will be able to see the bus position by using the Betterez Map in a website. Please, contact support for more details on how to use Betterez Map.
Location retrieval only works when the app is in foreground, i.e, If the user switch to other app, or the screen goes off, Android may pause the scanner app to free device's resources. Also if the scanner app is closed by the user it will stop sending location updates.
Troubleshooting
The screen goes off, and the scanner stops sending location
To prevent the screen from going off, there are a few options in Android:
Option 1 - Stay awake while charging To see that option, first, you need to enable developer options. Please, follow this steps:
- Go to Settings (Android settings)
- Look for Developer options, if you already see it go to step 6 directly. If you don't see the option, please continue with step 3.
- Go to About phone --> Software information
- Tap 7 times in Build number
- Now if you go back to settings, you should see Developer options at the bottom
- Enter Developer options and enable Stay awake while charging Note: The name of the settings may be sightly differently depending on your Android version.
Option 2 - Using a 3rd party app There are some apps in Android to prevent the screen from going off. Keep in mind that this solution will consume a lot of battery and as a result you will need to keep the phone charging all the time.
So, we prefer the Stay awake while charging option because it doesn't need to install and run an extra app.
The scanner app can't get the current location
Whenever the scanner app needs location but has found some issues with that, an indicator will appear to warning the user. That should be either because location is disabled on the device or the location permission has not been granted.
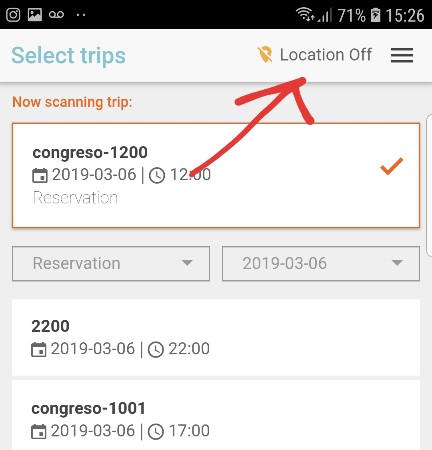
Tapping the indicator will lead the user to the proper action to fix location tracking.
Users can continue scanning without solving the location-tracking issue, but keep in mind that some features that depends on location may not work until the issue is manually fixed by the user. For example: location tracking for parcels or auto-select station feature.
Data usage
On a normal flow, the scanner apps (approximately) presents the data usage listed below, i.e., the data transferred from/to the server.
Login
- Authentication: 28.7 KB
- Stations download: 10.54 KB / 20 stations
- Products download: 12 KB / 10 products
- Fares download: 67 KB / 5 fares
Synchronization
- External Passes: 94 KB / 100 passes (only offline mode)
- Monthly Passes: 94 KB / 100 passes (only offline mode)
- Fallback Codes: 70 KB / 100 codes
- Schedules: 25 KB / 20 schedules
- Tickets: 3 MB / 1000 tickets (only offline mode)
Scan
- Online mode: 268 B per item scanned (one item per request, at scanning time)
- Offline mode: No data is transferred at scanning time. The items are uploaded at sync time (several items per request). So here the values listed in "Synchronization" applies.
Note: When working in offline mode, normally the first download will consume much more data than the requests done at synchronization time.
Scanner app sales
Note: Version 7.2.0 or higher is required in order to sell from the app.
Associate an square terminal to the device (only needed if you need Square payment method)
Go to the settings page and select a terminal from "Associated Square terminal" option!
Sales flow
Once the Sales configuration is ready, you can sell from the app by tapping on the current station and selecting "Sell tickets from here".
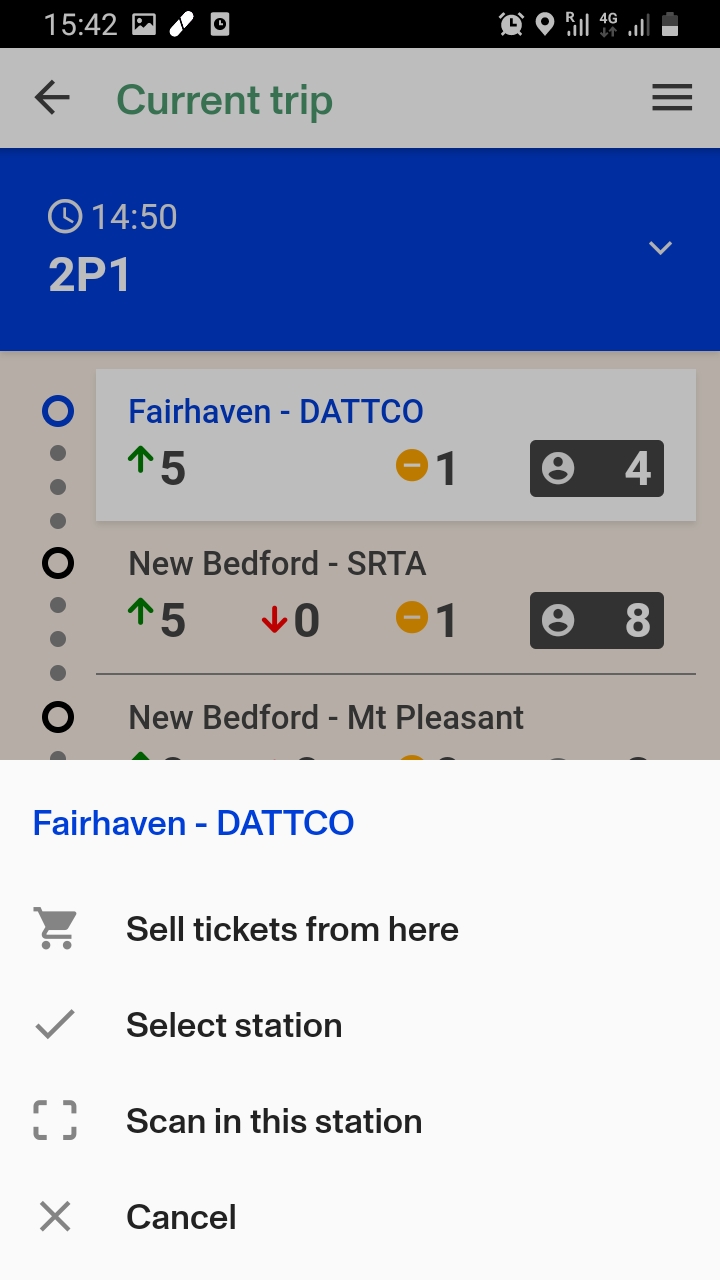
Select Origin, Destination and the Fares for the passengers.
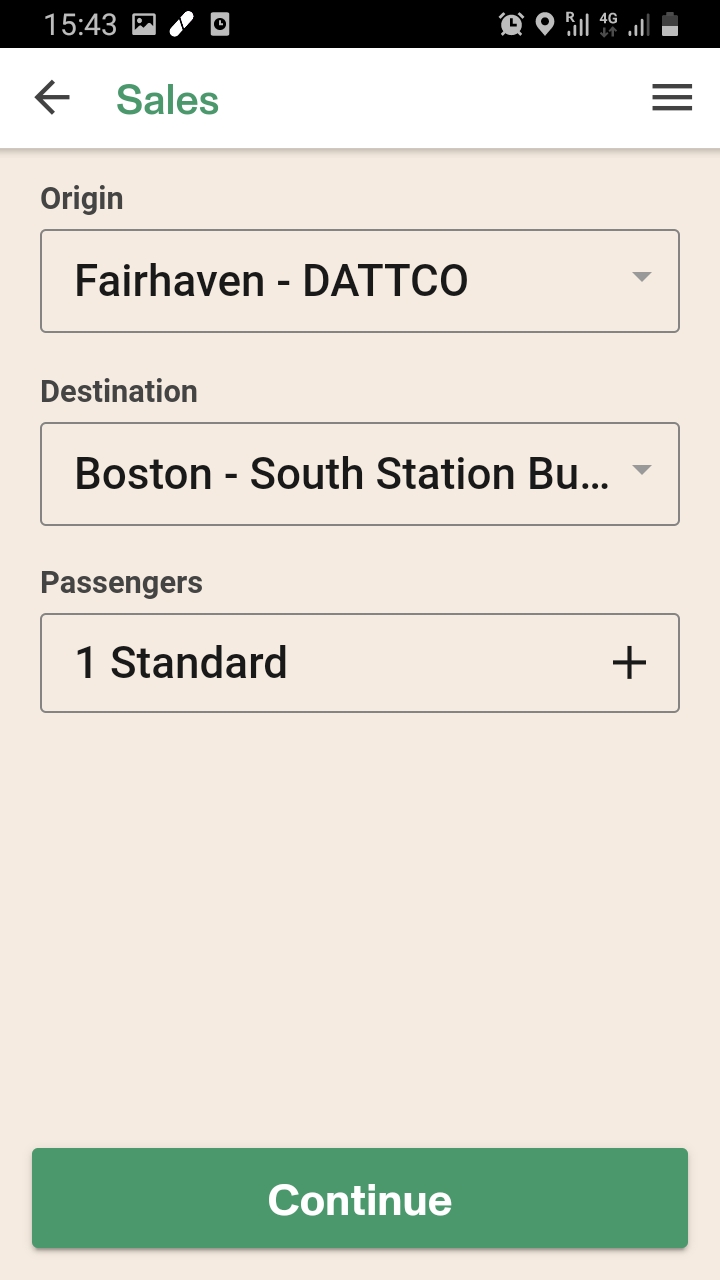
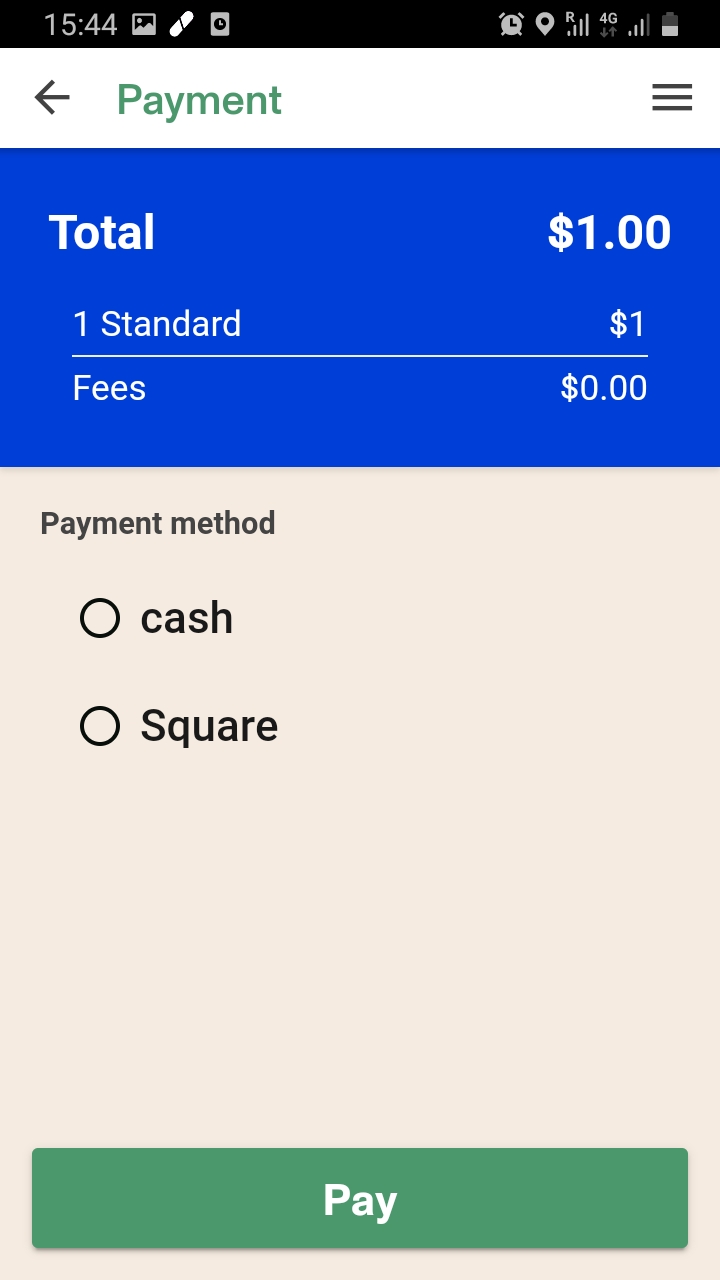
Review that the summary is ok, select the payment method and proceed to pay.
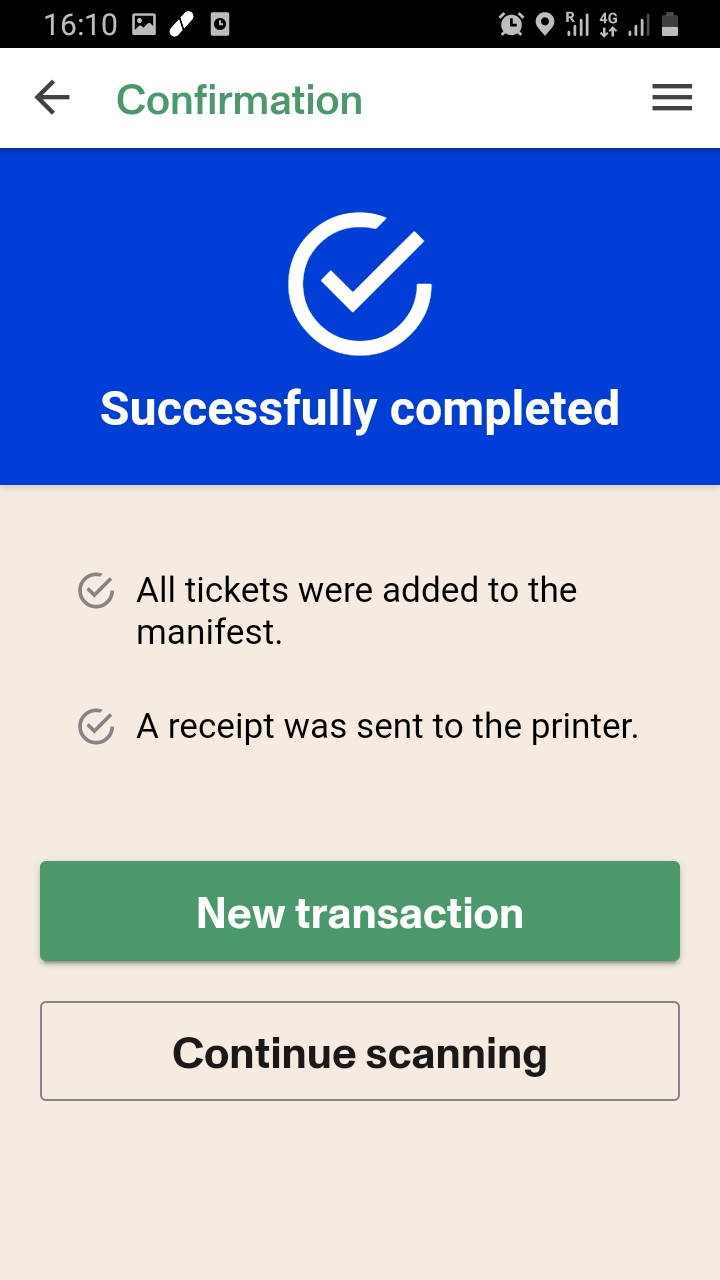
If the purchase is successful you should see the confirmation page.
Station manifest
since v7.20.0
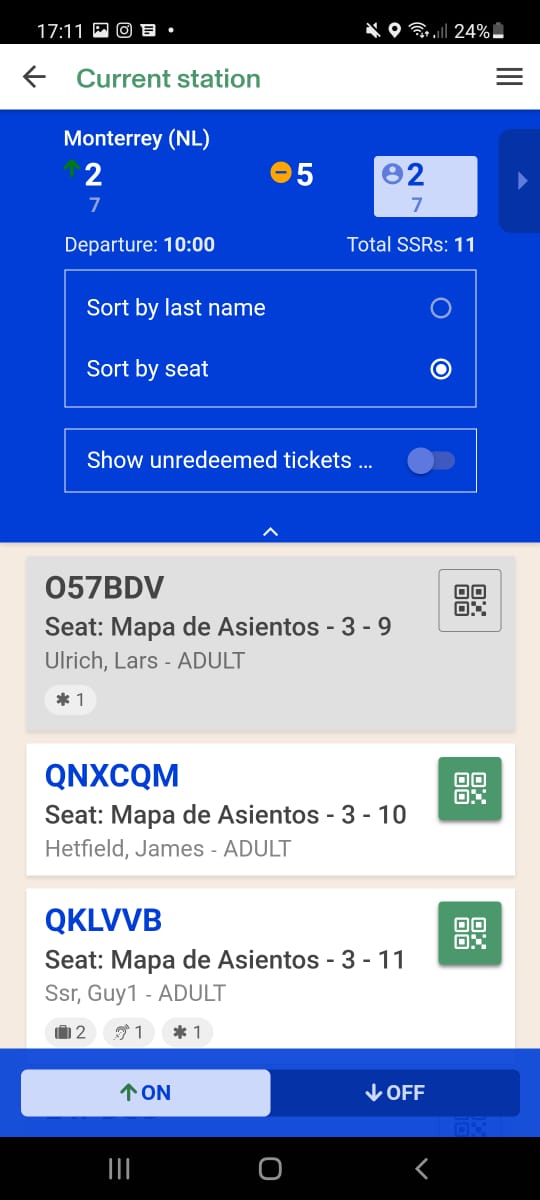
Station manifest let the user check the passenger's list for each station, organized by embarking (ON) and disembarking (OFF).
The list can be sorted by Last Name or Seat and also it has a toggle to show un-redeemed tickets first (while keeping the selected sorting option).
To access this manifest, please tap the desired station and select "Show tickets" option.
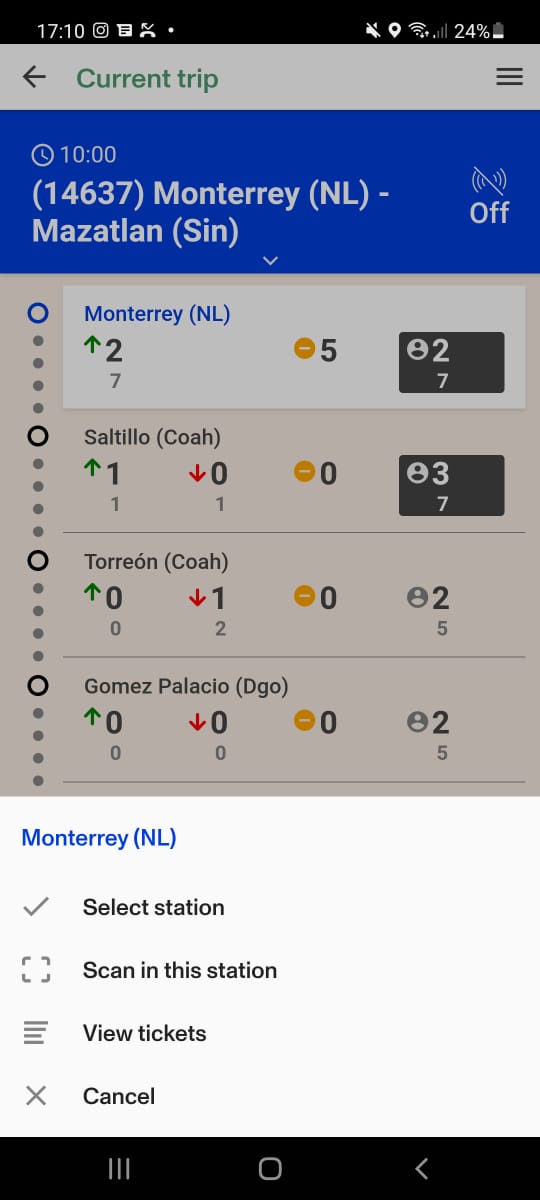
Another useful feature of the manifest is the users can redeem/un-redeem tickets by tapping the square button.
Parcel Tracking Status Flow
since v8.4.1
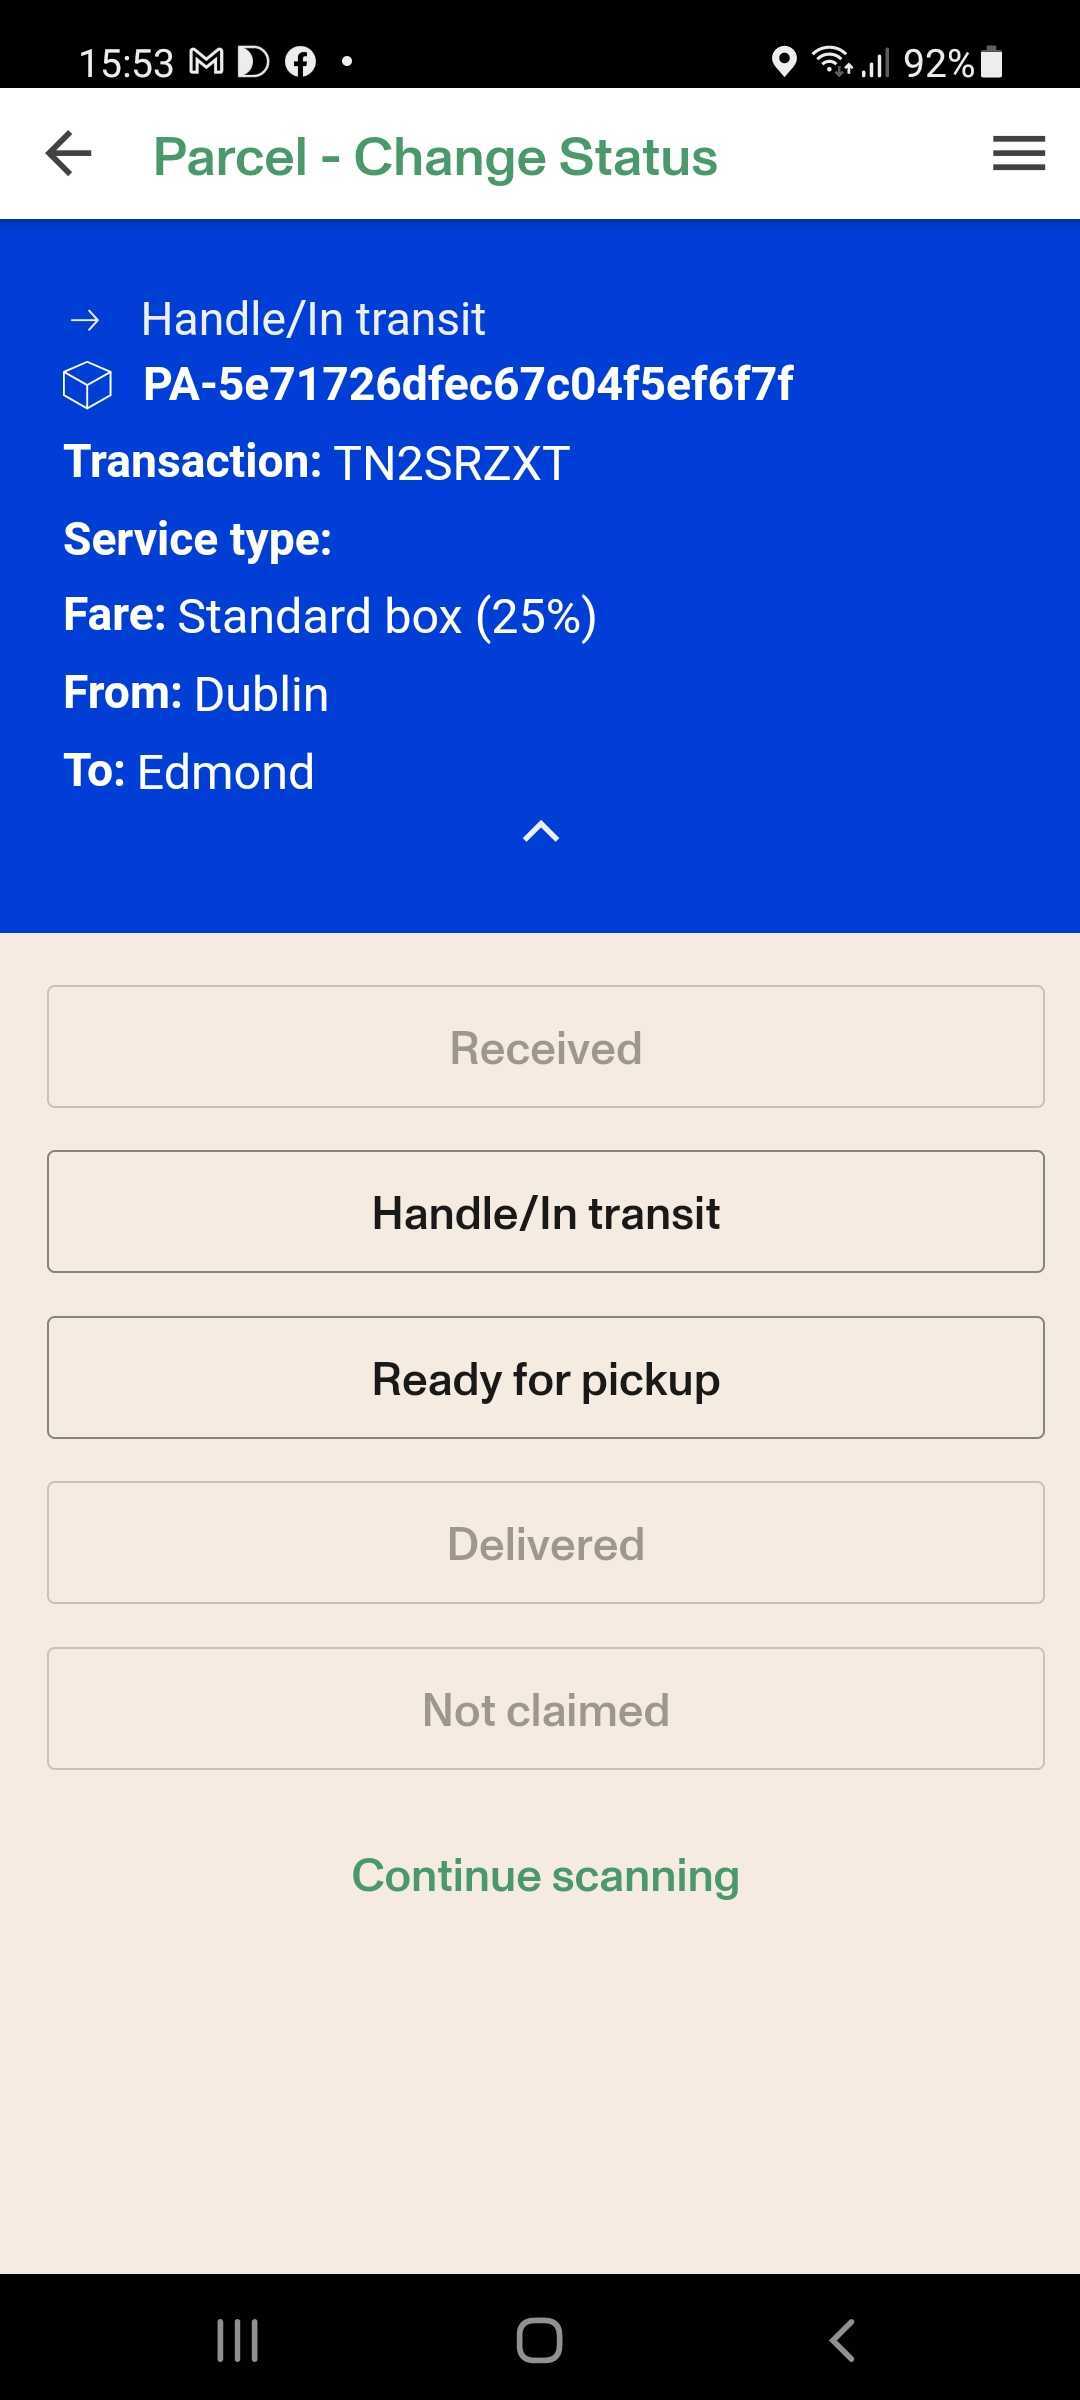
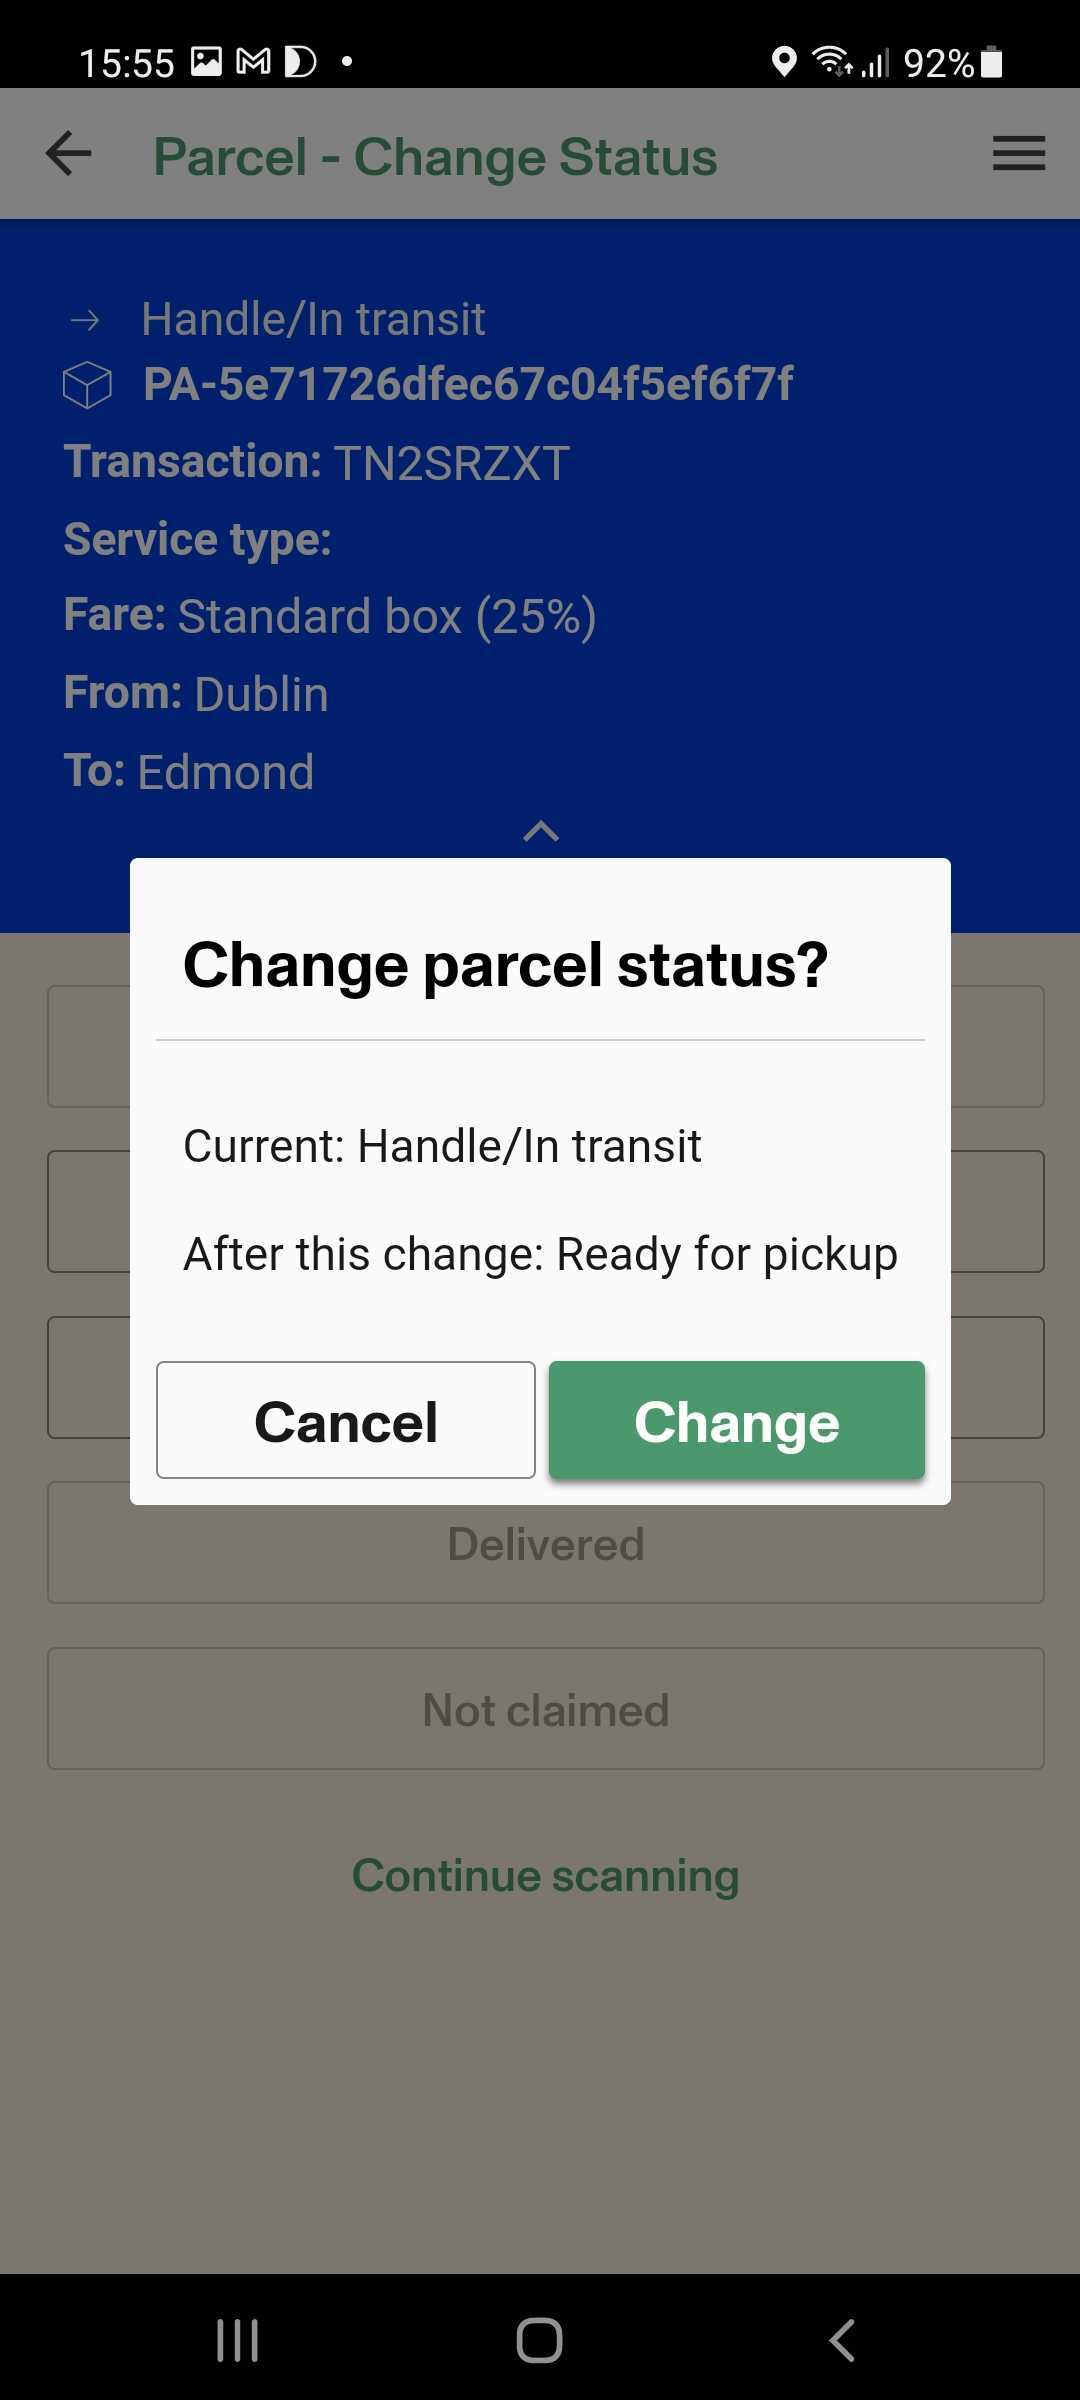
The parcels flow must first be enabled under Admin/Scanning/Parcels/Allow tracking status changes on backoffice. When scanning a Parcel, the scanner will show the user the parcels details and the available actions for that parcel. Which actions are available will depend on the current status of the parcel.
Display Passenger Phone Number
since v9.29
Setup: To enable the display of a passenger’s phone number during scanning, navigate to:
Admin → Scanning
Under this section, you can activate the “Show passenger phone number” option. Once enabled, the driver or agent using the scanning app will be able to see the customer’s registered phone number when scanning a ticket or Flex pass.
Purpose: This feature allows operators and drivers to quickly identify and contact passengers if needed — for example, in case of boarding delays, forgotten items, or trip clarifications.
Trip Selection: Show Only Assigned Trips Option
since v9.29
A new option is available under Administration ➝ Scanning ➝ Trip Selection Settings to improve trip visibility control for drivers and staff.
Use case: Ensures users only see trips assigned to them, reducing confusion and minimizing selection errors when managing manifests.
Configuration: Navigate to Admin ➝ Scanning ➝ Trip Selection Settings.
- Enable “Only show trips assigned to the user.”
- When active, users will only see their assigned trips.
- Users with admin permissions who can view all manifests are not affected by this restriction.
Note: This configuration enhances accuracy in trip handling and prevents users from accessing or scanning tickets for trips they’re not assigned to.