Page summary
- 1. Payment setup
- 2: Holiday setup
- 3: Taxes setup
- 4: Fee Setup
- EXAMPLE:
- 5: Special service request setup
- 6: Connections Setup
- 7: Amenity setup
- Setting up connections settings in stations
- Setting up connections
- 8: Amenity group setup
- 9: Network operator setup
- Creating new network accounts
- 10: Notifications setup
- 11: Voucher setup
- 12: Gift certificate product setup
- Gift certificate payment setup
- 13: Operating company setup
- 14: Operation messages setup
- 15: Promotion Setup
- 16: Product Lines
Optional admin configuration
1. Payment setup
In addition to having a product to sell, it is also necessary to configure the forms of payment that you wish to accept at both the back office and websales sales channels.
In order to select that payment methods that you would like to accept, navigate to Admin > Payments for a review of all of the different payment methods that the Betterez platform can accept.
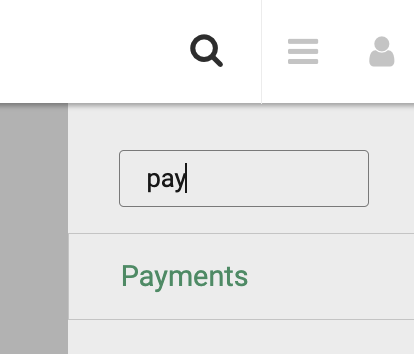
Clicking on any method of payment from the list will enter the Edit Payment Provider screen where you will now configure the payment method.
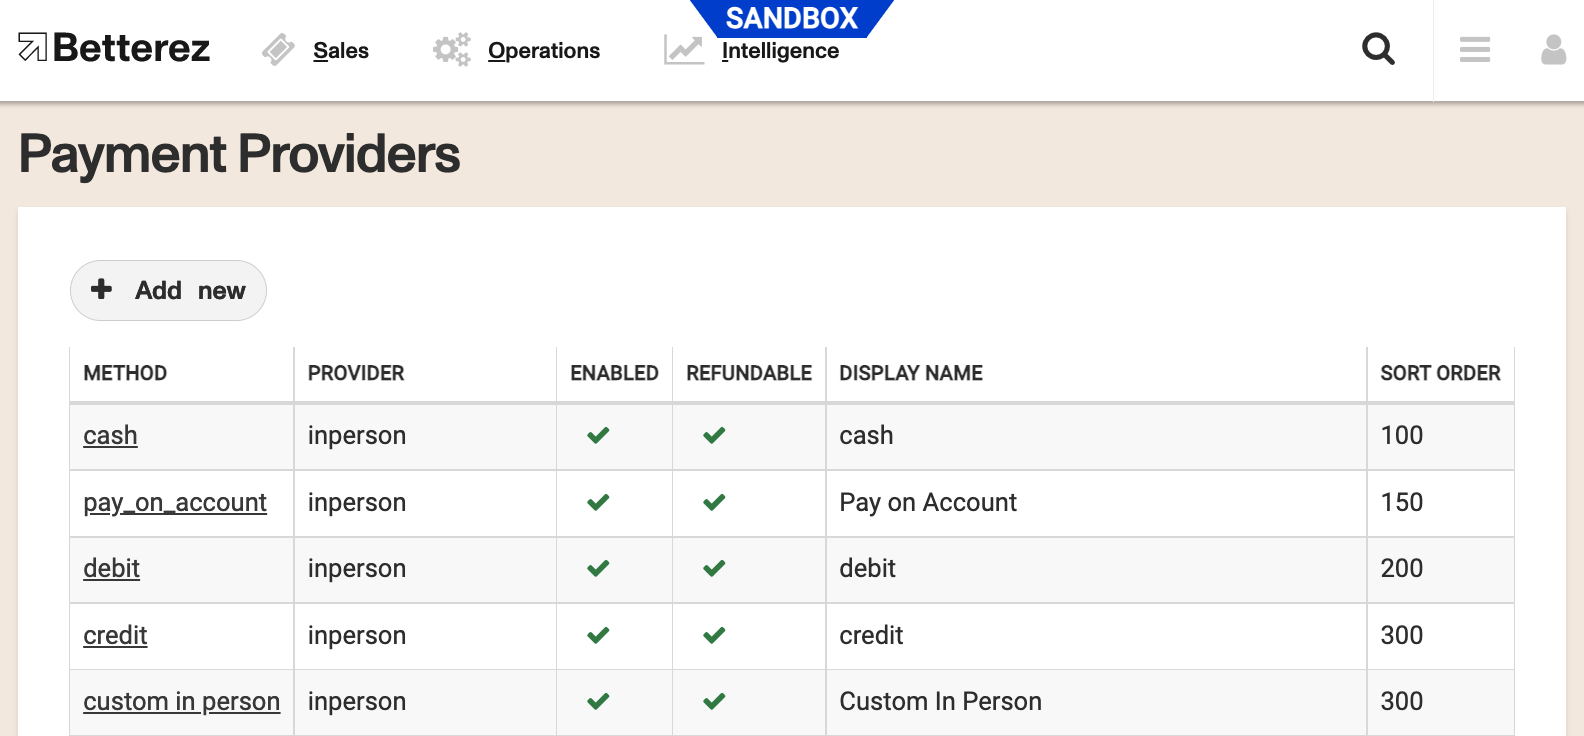
You can also create new custom payment methods for your account by clicking the Add New button. In person payment methods can only be used in backoffice, while referenced payments are meant to integrate with an external system.
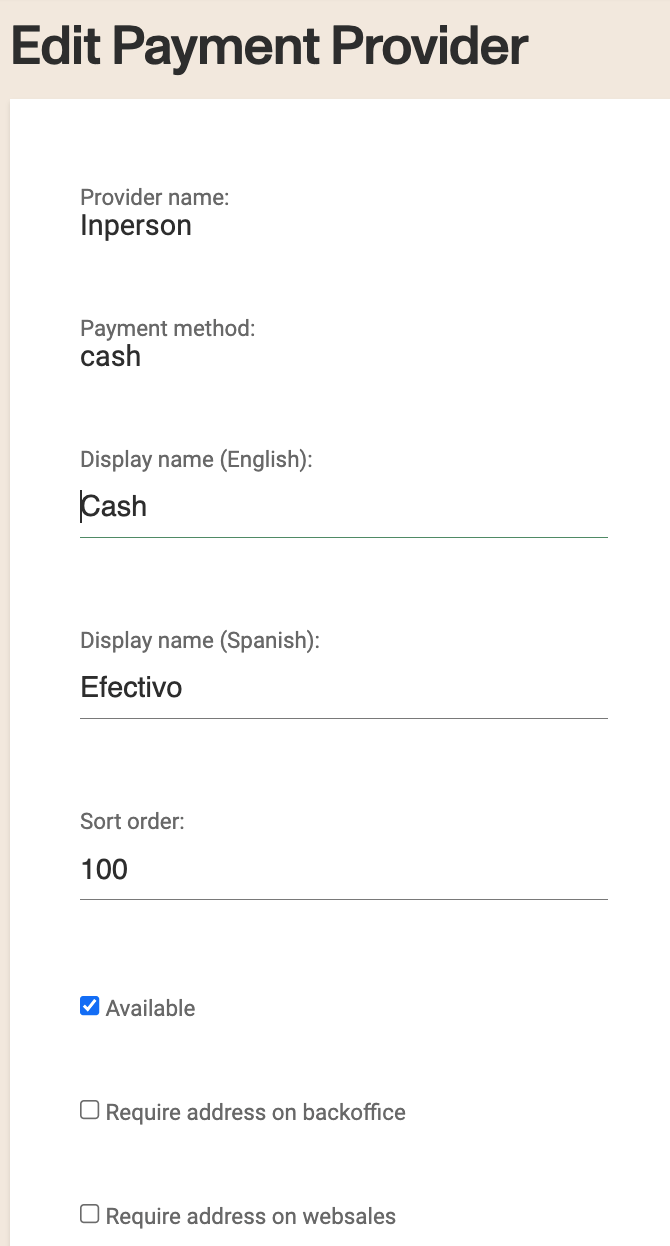
- Payment method: Add your custom payment method name. If editing a default payment method, this field will be autofilled with the name listed by Betterez.
- Display name (EN-US): Enter the name that you would like this payment type to display in the shopping cart.
- Display name (ES or others): Enter the name of the payment type in any other languages available for your account.
- Status If checked, this method of payment will be available for the sales channels selected.
- Sort Order: the lower the number, the higher on the drop down list this payment type will appear in the shopping cart.
- Require address on back end If checked, this method of payment will require an address to be entered in the back end.
- Require address on web sales If checked, this method of payment will require an address to be entered in web sales.
- Refundable If checked, tickets purchased with this method of payment will be refundable.
- Changeable If checked, tickets purchased with this method of payment will be changeable.
- Require confirmation If checked, the sales flow will ask for any type of extra data according to the payment method
- Include in deposit totals If checked, all transactions with this payment type must be included in the deposit totals shown in the shift summary after closing a shift.
- Send automatic emails for refund receipts Determines whether the receipt should be automatically emailed when refunding with this method. If set to 'Use system default', the behavior will follow the 'Email refund receipts automatically' setting in the account's admin/setup page.
- Allow to combine If checked, method of payments that are selected in the "excluded combinations" list may not be combined with the payment method being configured.
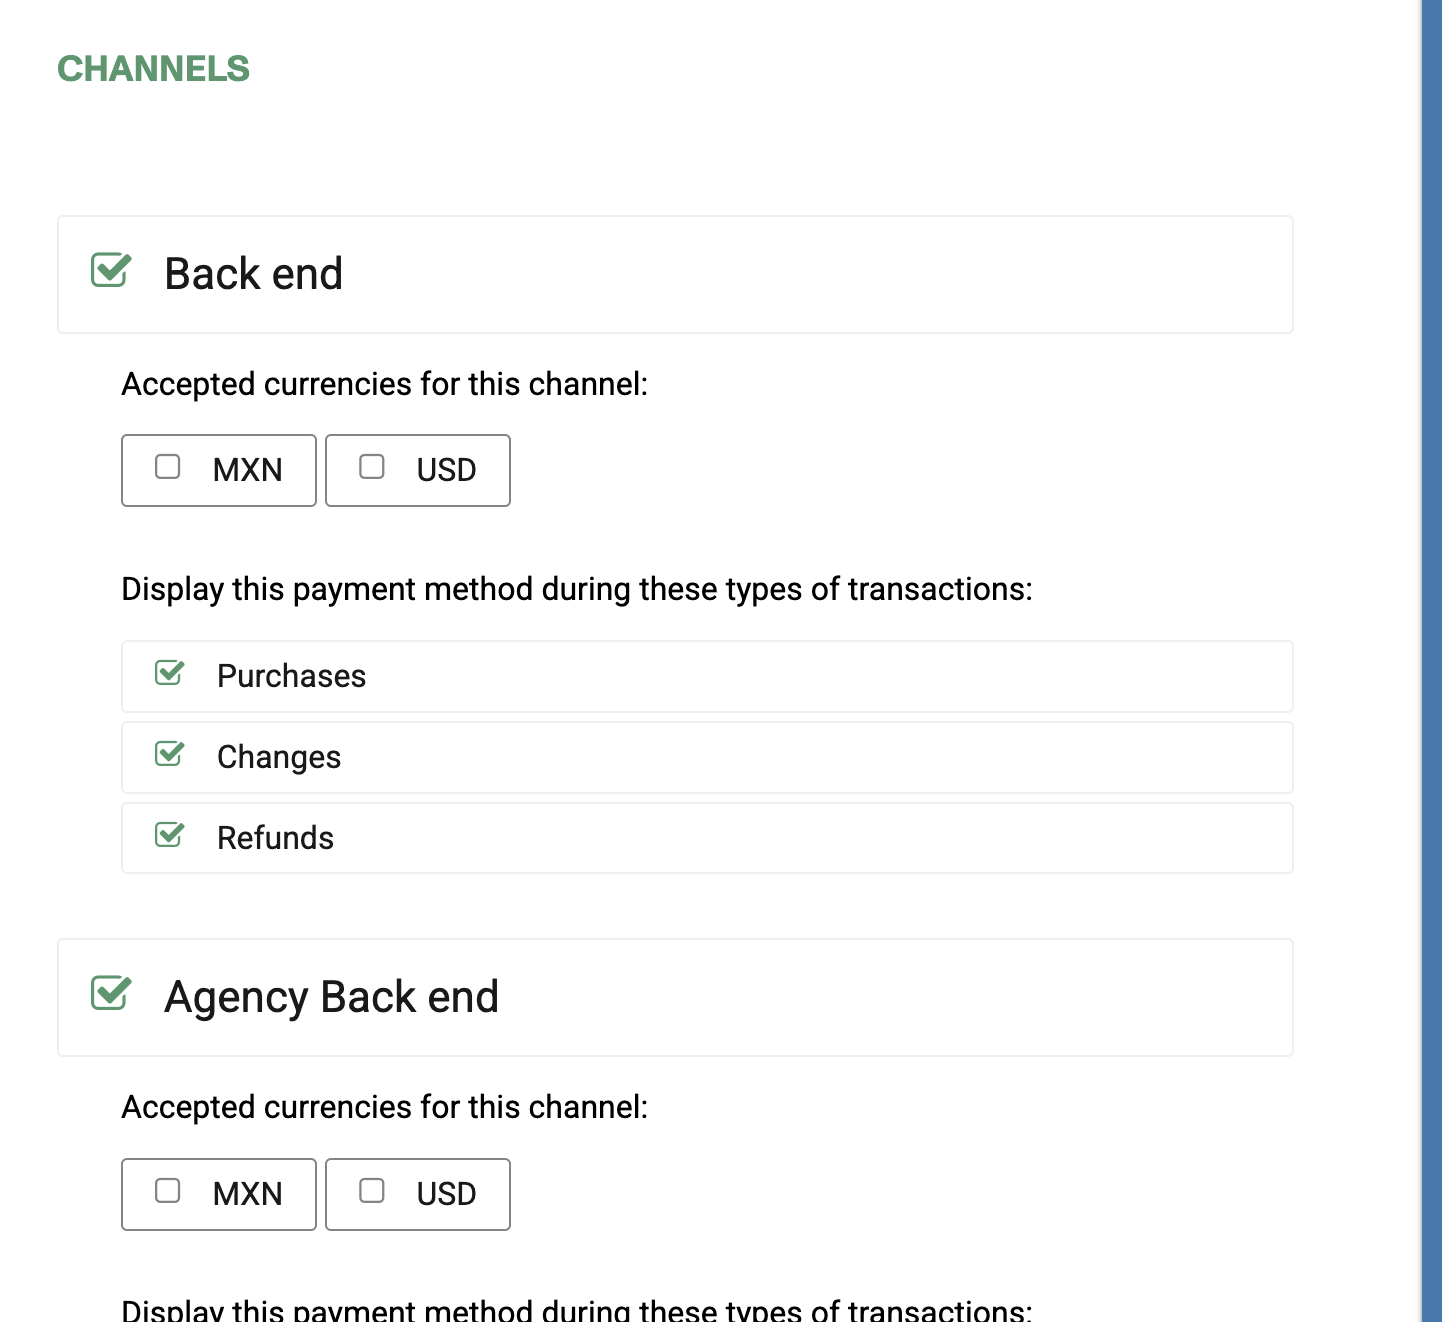
- CHANNELS: In the last section you may select the sales channels for which you would like to make this method of payment available. You may select the currencies enabled for each channel, as well as the type of transactions (Purchases, Changes, Refunds) for which this payment method will be enabled.
Click Save to save your changes. This method of payment will now show as enabled on the list of payment providers.
PROVIDERS
We can create new payment methods working with In person or Referenced payment providers only. In person payment method should not be used in websales since there is no way to validate ids. Referenced payment are meant to integrate with an external system. Those payment methods working with other providers will be self-populated by Betterez and we could update them only.
The complete list of providers is:
- AuthorizeNet
- Cardpointe
- Cybersource
- Deferred_payment
- Ingenico
- In person
- LoyaltyPoints
- Moneris_ca
- Moneris_us
- Oxxo
- Datalogic
- Paypal
- Referenced payment
- Square
- Stripe
- System
REQUIREMENTS
The Payment method value is required and can't be one of the following list (since they are already configured):
- Cash
- Cardpointe_terminal
- Custom_jp
- Credit
- Debit
- Employee_pass
- Flexpass
- Gift_certificate
- Irop_movement
- Ivr
- Monthly_pass
- Online_credit
- Pay_me_later
- Pay_near_me
- Pay_on_account
- Pay_on_delivery
- Pinpad
- Redeemable_item
- Referenced_custom
- Square_terminal
- Voucher
The Display name, the list of Parameters and the Parameters overrides are also required values. At least one Credit card has to be selected, just like the Currencies if the related channel was turned on and the the account is a multi-currency account.
2: Holiday setup
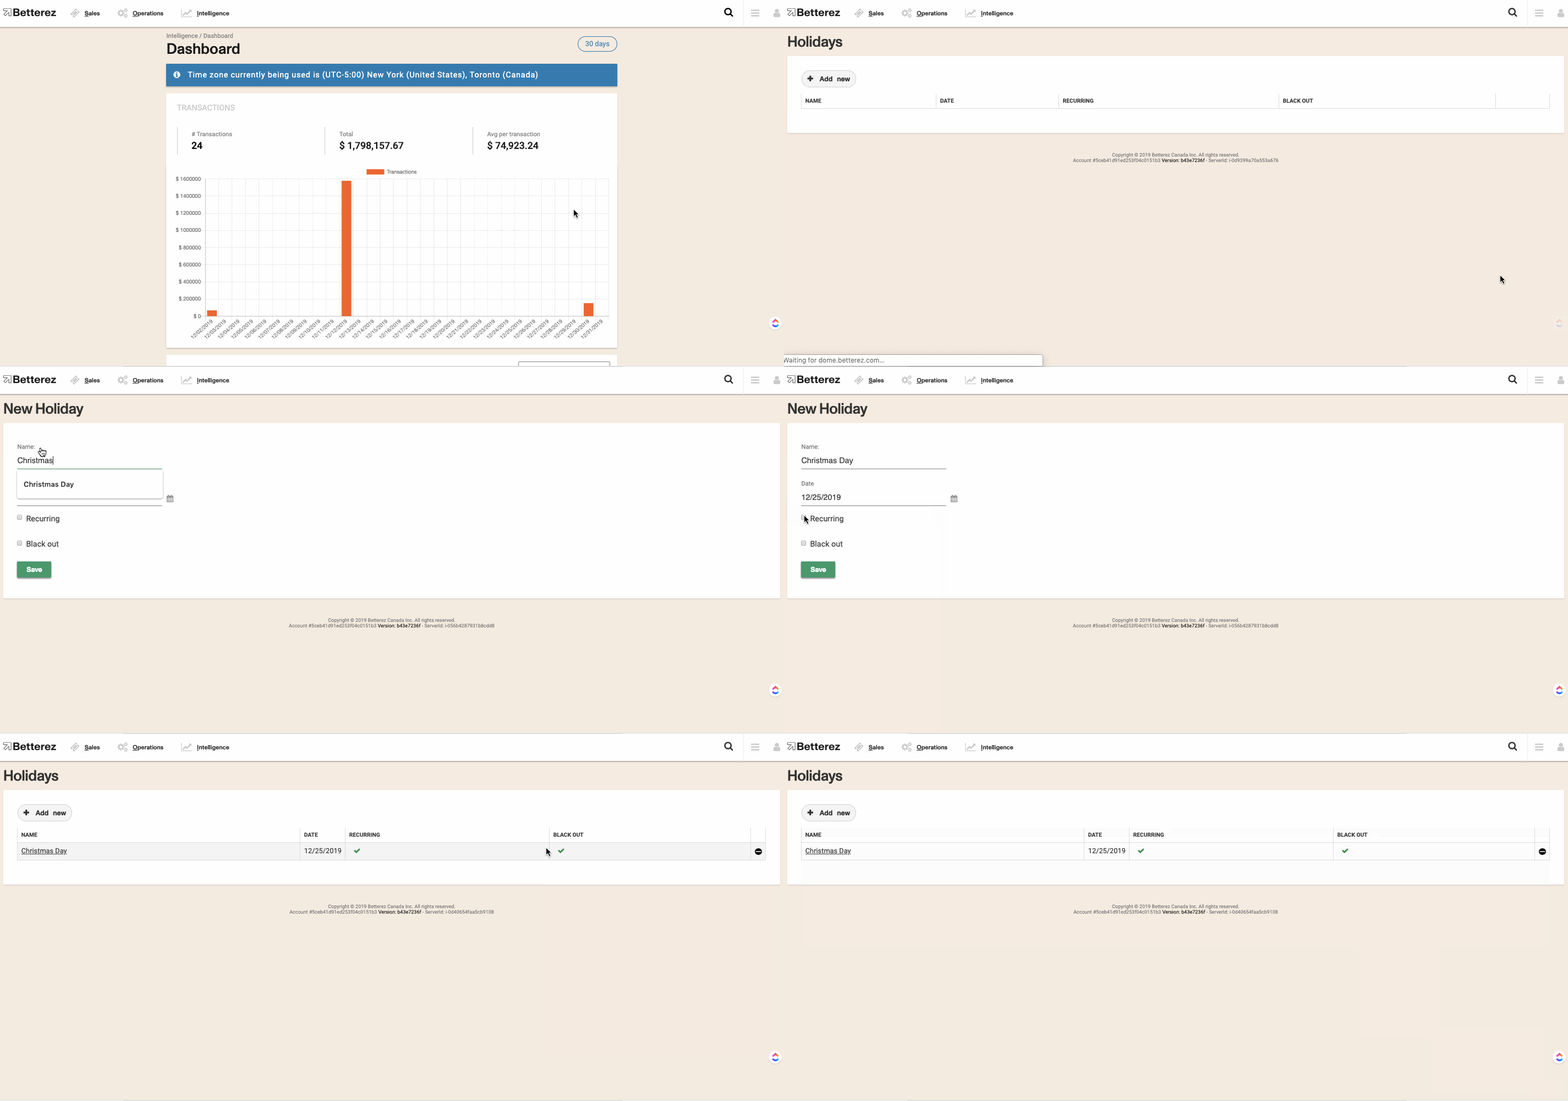
As we continue the initial configuration of your account, there may be some holidays to identify during which time you have abnormal or enhanced service schedules or cease operations altogether. In this case, you will need to identify these holidays.
To do so, navigate to Admin -> Holidays and select + Add New to arrive to the New Holiday screen to begin the configuration of your new holiday.
Name: Enter the name of your new holiday.
Date: Enter the date of your new holiday.
Recurring If checked, the new holiday you are creating will be valid for every subsequent year on the same date.
Blackout If checked, the new holiday you are creating will mean that no services are provided on this day.
Click Save to save your new holiday so it may appear on the list of holidays.
3: Taxes setup
To create a tax, navigate to Admin -> Taxes and selected +Add new to continue to the New Tax screen to begin with the configuration of your new tax. If you would like to edit an existing tax, select the tax you wish to edit.
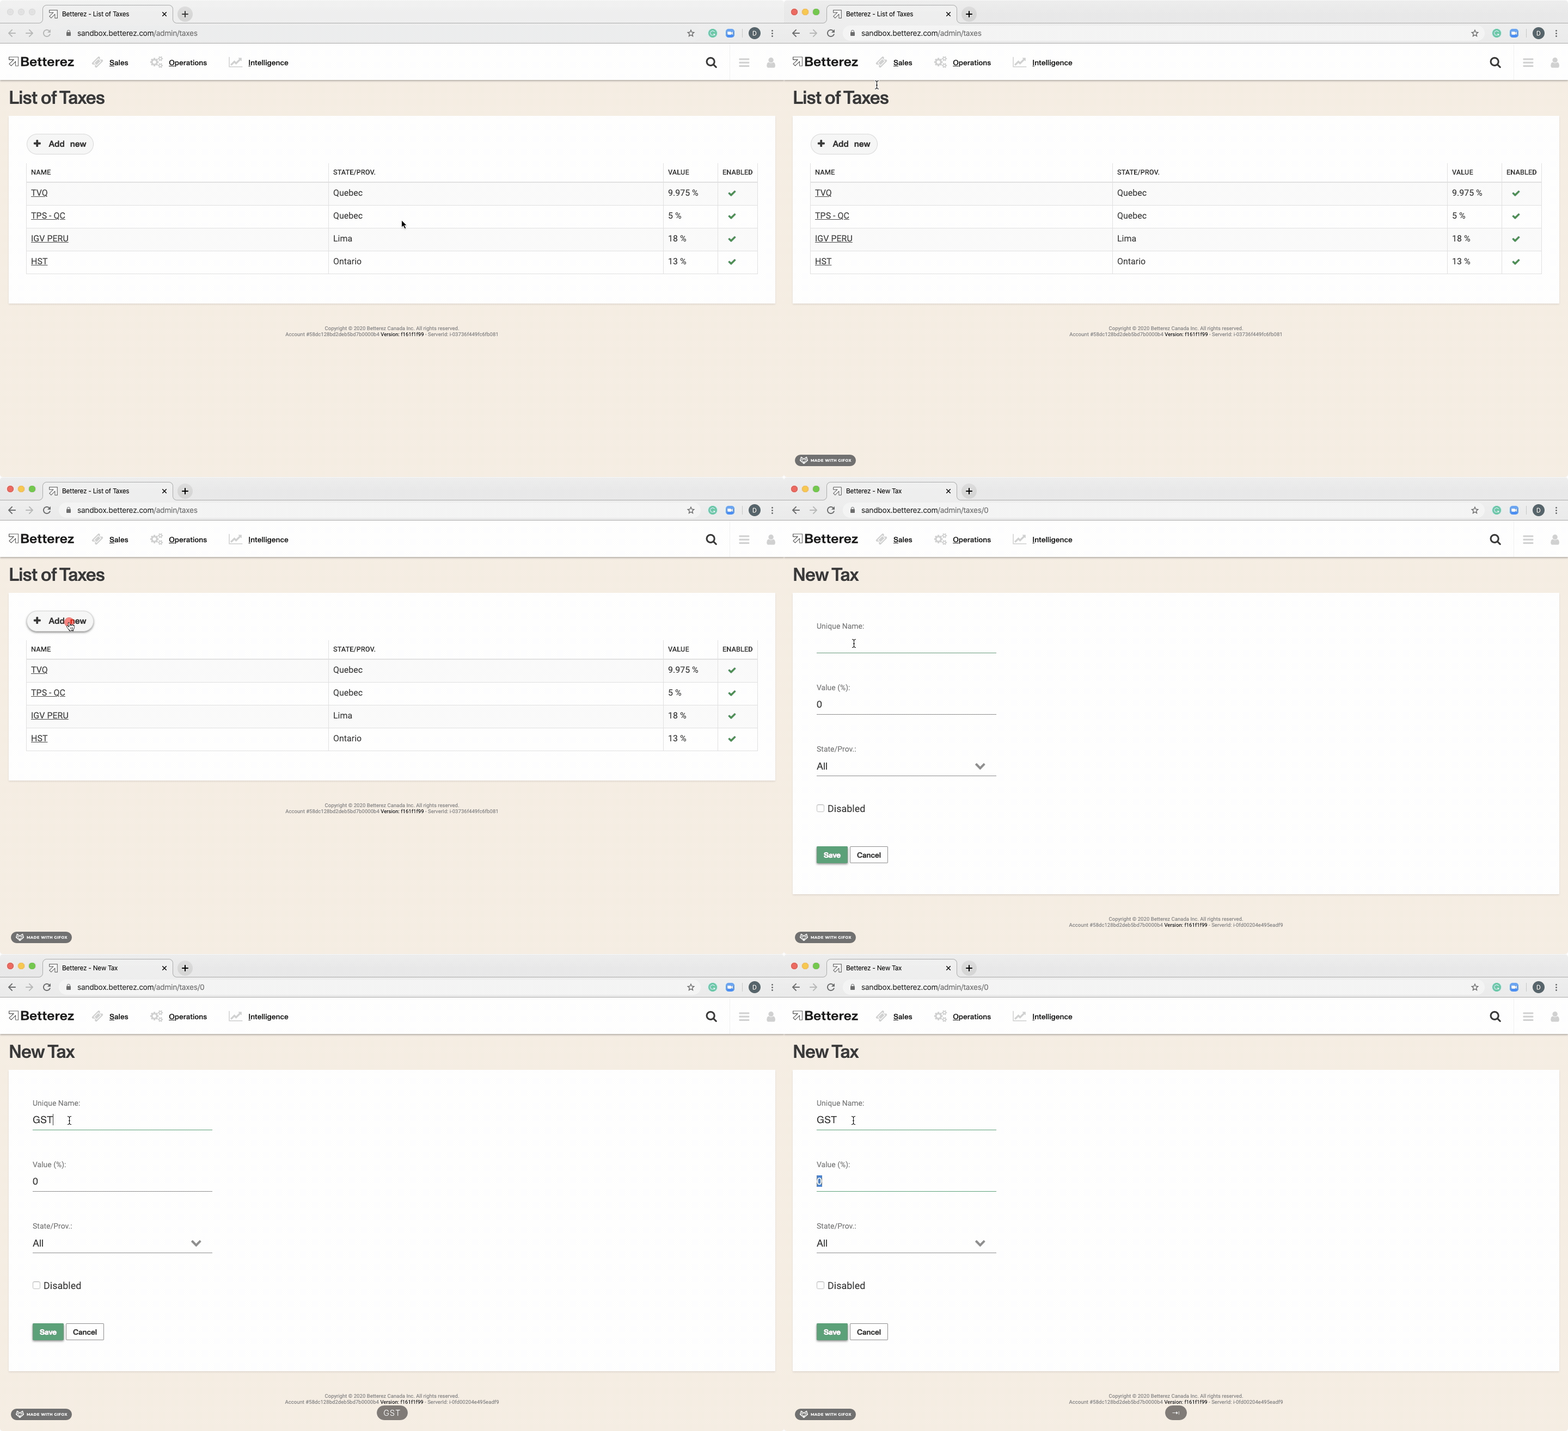
Unique Name: Enter the name of the tax.
Value(%): Enter the tax rate percentage.
State/Prov: Choose the state/province you would like to apply this tax (Please note once the State/Province in the station details is changed or stop matching the value in taxes you will need to re-select the new State/Province from the tax field as well, otherwise, there will be no taxes applied to the tickets)
Disable: If =true, this tax will be disabled.
Click Save o save the new tax.
4: Fee Setup
Depending on the type of transaction you are undertaking, there are a number of different fees that can be enabled and applied to a transaction and/or ticket.
To configure fees, navigate to Admin -> Fees and click +Add new to arrive to the New Fee screen.
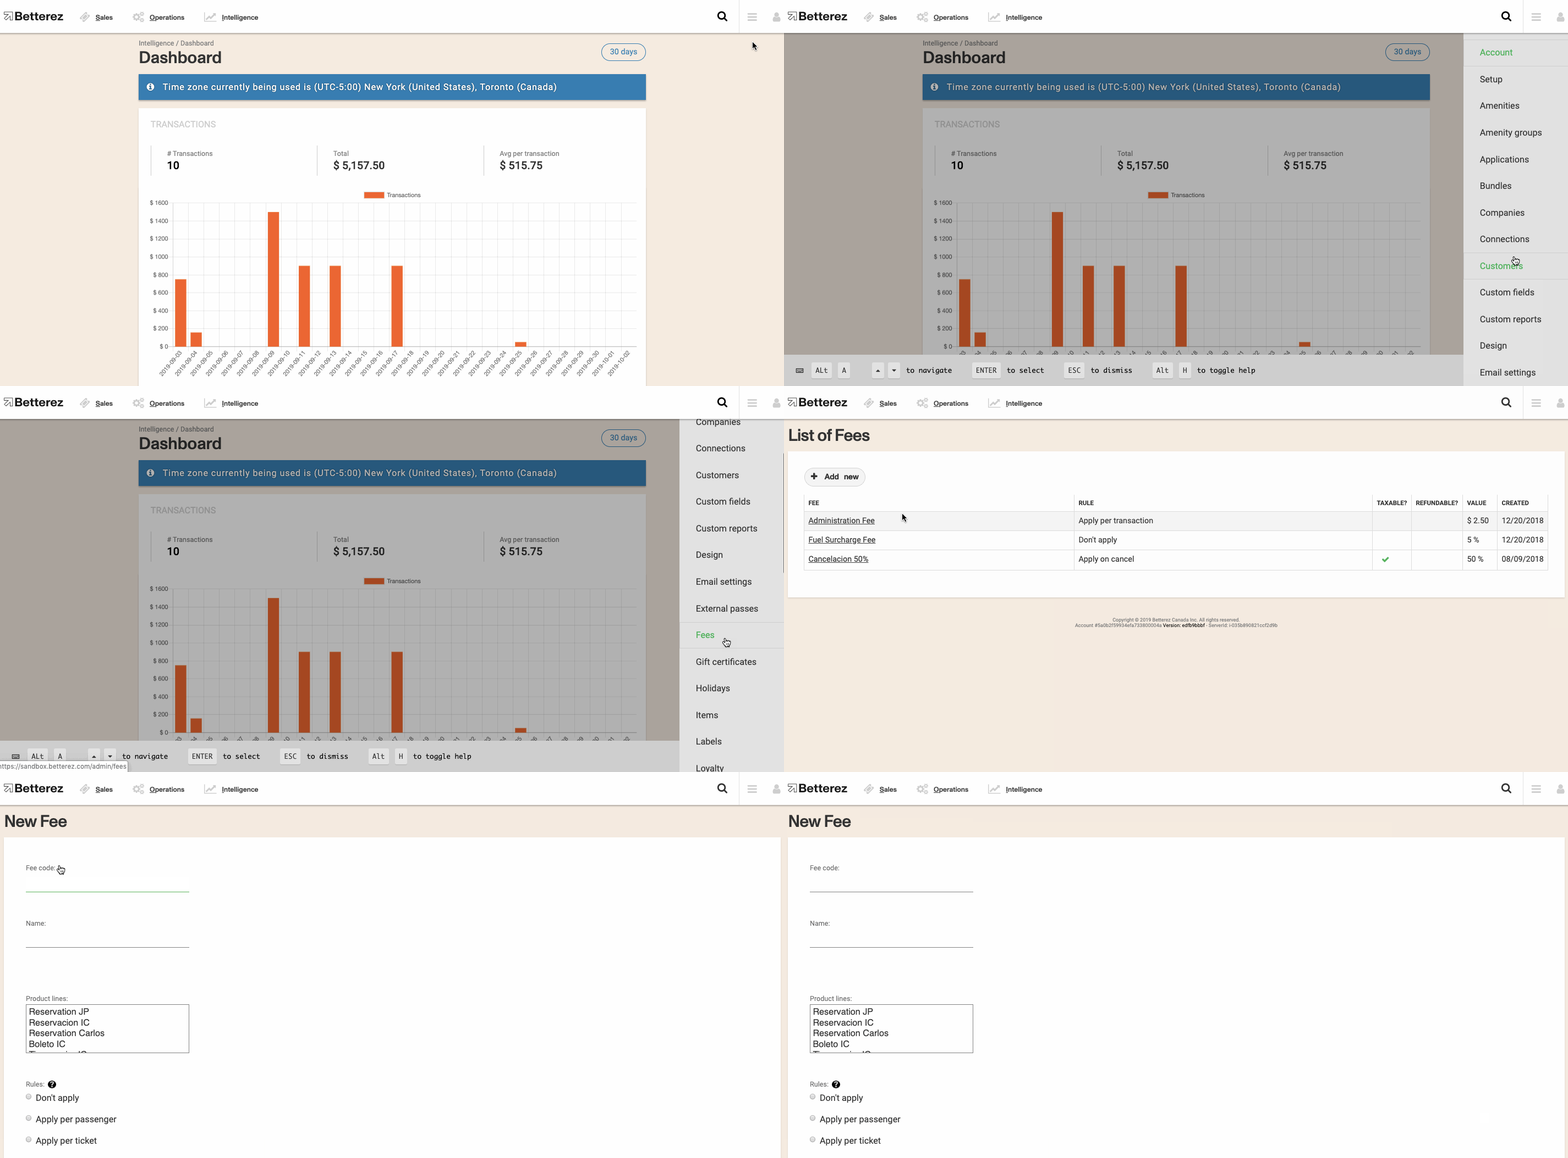
Fee Code: Enter the code that you would like to assign to this tax.
Name: Enter the name that you would like to assign to this tax.
Product: Select the name of the product(s) that you would like to assign to this tax.
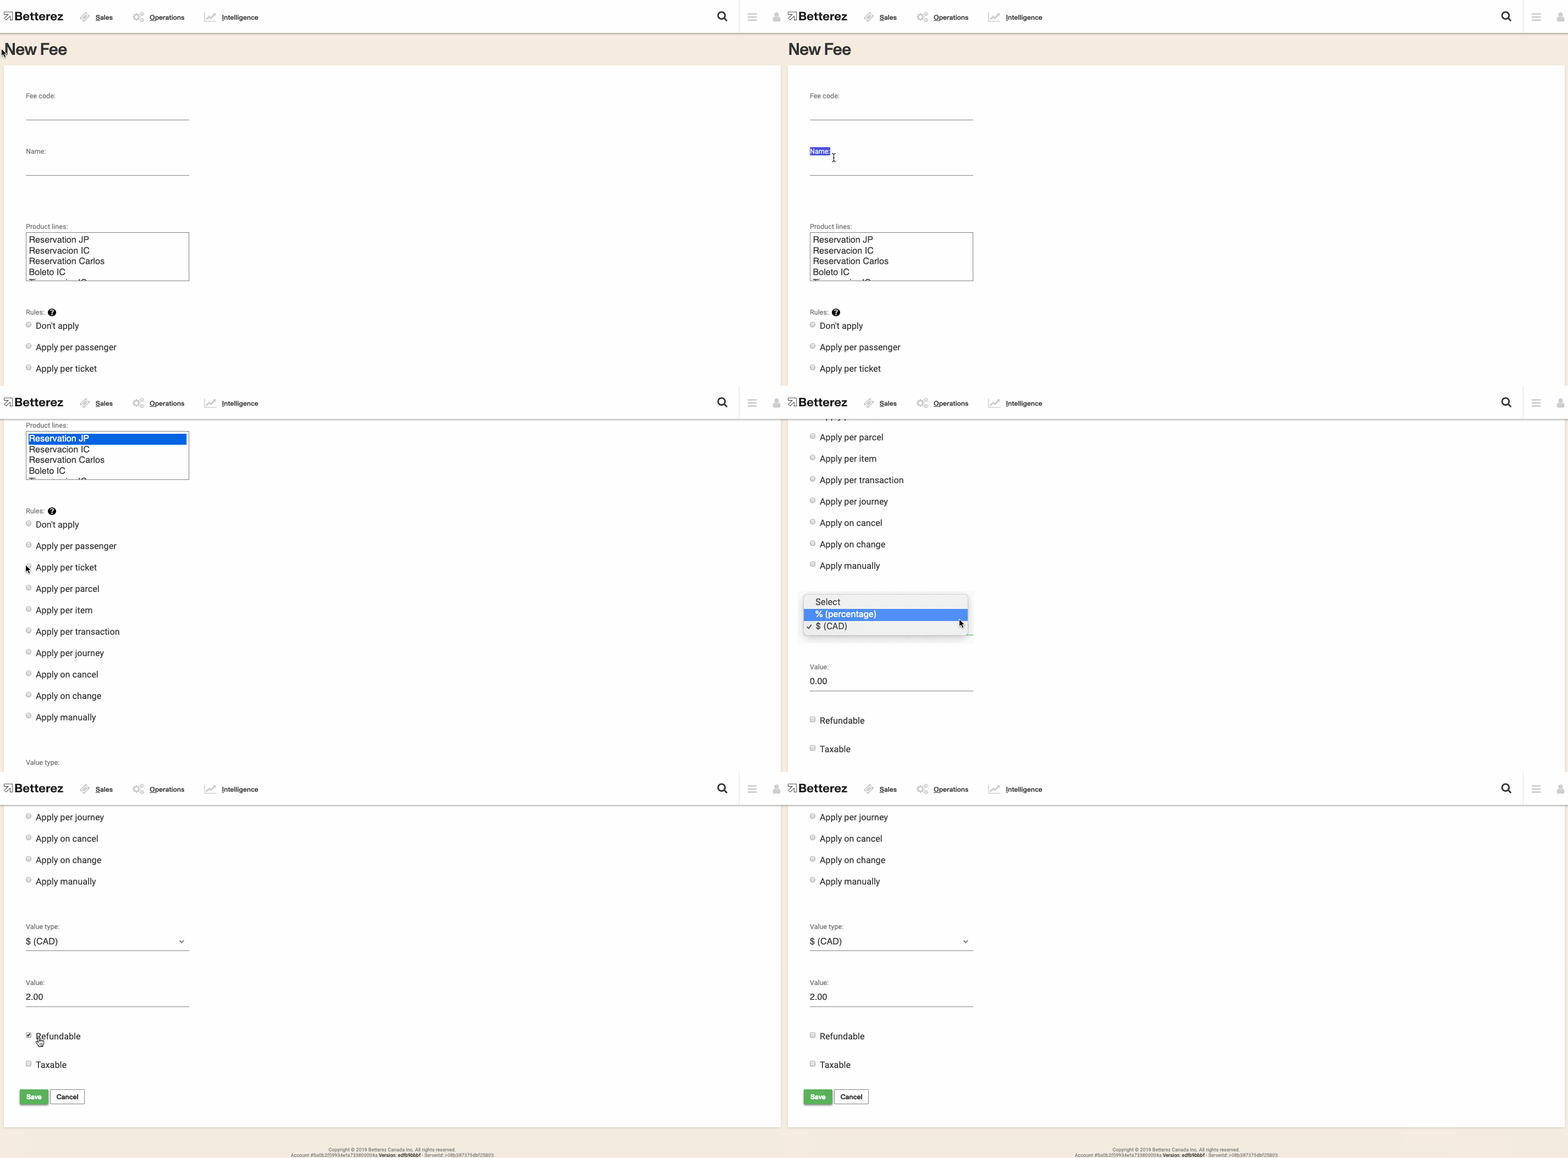
Rules:
- don't apply: If =true it will ensure that the fee is not applied.
- apply per passenger: If =true it will ensure that the fee is charged per passenger.
- apply per ticket: If =true it will ensure that the fee is charged per ticket.
- apply per parcel: If =true it will ensure that the fee is charged per parcel.
- pply per item: If =true it will ensure that the fee is charged per item.
- apply per transaction: If =true it will ensure that the fee is charged per transaction.
- apply per journey: If =true it will ensure that the fee is charged per journey.
- apply on cancel: If =true will ensure that the fee is charged on cancelLation of a ticket and will appear when applicable during the cancel process.
- apply on change: If =true it will ensure that the fee is charged on a change of ticket and will appear when applicable during the change process.
- apply manually: If =true it can be applied manually by the user and will create a new dropdown box on the main booking page so the fee or fees can be applied 1, or multiple times to a purchase.
Value Type: Using the drop down menu use either a percentage % amount dollar $ value.
Value: Enter a nominal value.
Refundable: If =true, this fee is refundable.
Taxable: If =true, this fee is taxable.
Click Save to save your new fee.
EXAMPLE:
Imagine a customer purchasing three round trip tickets for himself and 2 friends, so it’s 3 total passengers:
- $1 fee applied per passenger would result in $3 total, $1 per passenger.
- $1 fee applied per ticket would result in $6 total, since each round trip ticket is actually 2 tickets.
- $1 fee applied per transaction would result in a $1 total charge.
5: Special service request setup
A Special Service Request (SSR) allows operators to provide additional services to their passengers such as requests for accessible seating, requiring wheelchair storage, or declaring that a service animal accompany the passenger on board.
Creating an SSR is easy. To begin please follow this link to Special Service Request Set Up
6: Connections Setup
7: Amenity setup
Before we can properly configure a schedule, there are a number of items that we must first consider and create before we create the schedule as these items will be associated at the schedule level.
The first item associated to a schedule is the Amenity Group. In order to create an amenity group, we must first create the amenities.
To create an amenity, navigate to Admin -> Amenities and select +Add new to arrive to the New Amenity screen to begin the configuration of your new amenity..
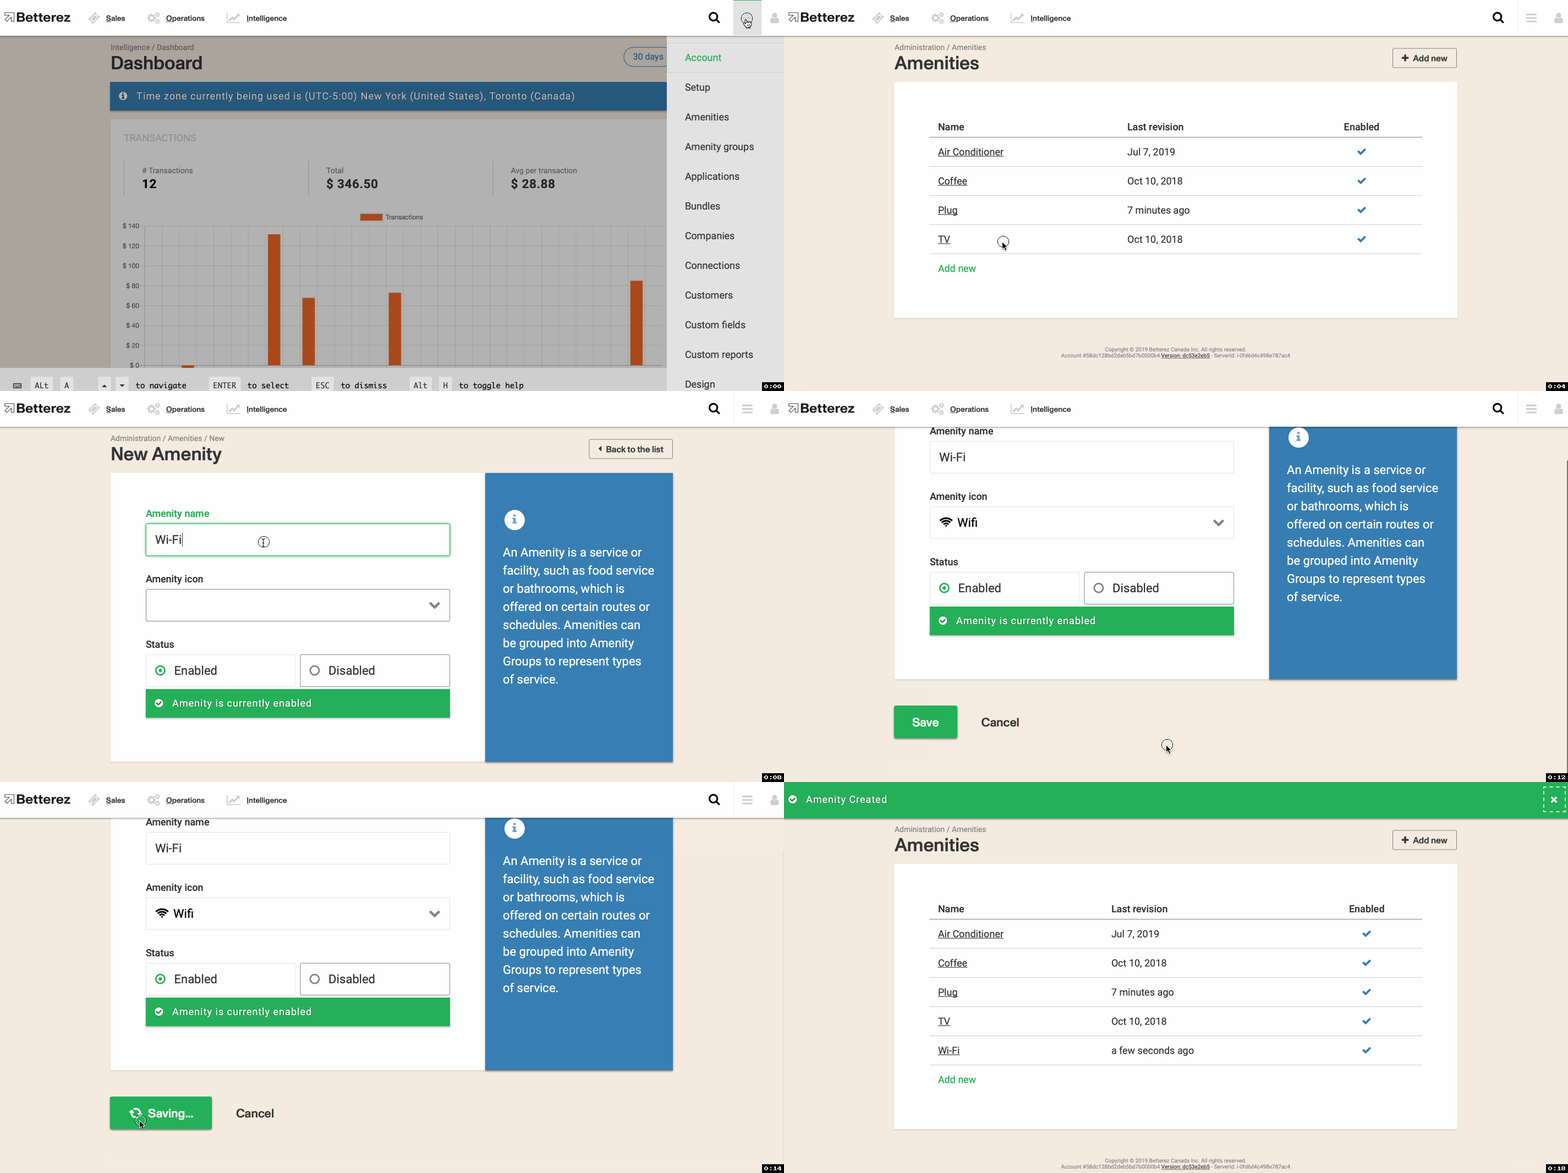
Amenity Name: Enter a name for the amenity.
Amenity icon Select an amenity icon from the drop down list.
Enabled: If =true, the amenity will be enabled.
Disabled: If =true, the amenity will be disabled.
Note: The name of this amenity will be visible when the mouse cursor hovers over the icon in ticket selection (Shown later).
Setting up connections settings in stations
It is not uncommon for an operator to offer a journey with one or more connections on route to the final destination. This is done by connecting different schedules using specified stations as connecting hubs. Before connections can be enabled in an account it is necessary to ensure that the following steps are completed.
- By default, the Betterez system will mark all stations as a connecting hub. If however, there are specific stations that you would NEVER like to be considered as a connecting hub, navigate to Operations -> Stations and select the station that you would like to deactivate as a connecting hub by clicking the Don't use for connections flag.
- There is a section called Station waiting times, by checking the "Override Connections configuration" option, it allows users to enter the Minimum and Maximum waiting time for this station, to override them in connection setup under Admin - Connections. If leave this option unchecked, the system will use the connection settings by default.


Once these two requirements have been reviewed and completed, the rest of this article will provide insight as to the unique function of each configuration setting found when navigating to Admin -> Connections and enabling connections.
Setting up connections
A new connection engine (also called Coltrane) with an enhanced searching algorithm, more robust settings allowing a customer to retrieve the optimized connection trips in a faster way, is now available in Betterez system.
There are 3 major parts compose the new connection engine setups: Transfer restrictions, Trip variety, and Pathfinding options:
Transfer restrictions:
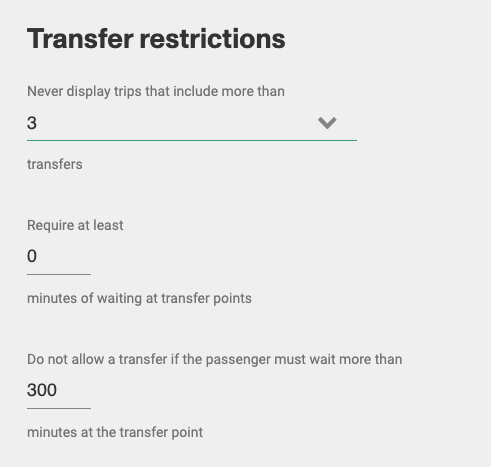
- Never display trips that include more than X transfers - It's the max number of connections which will filter out any trip results that have more than X connections. If the value is zero then you will not see any connections in the trip results page if there are direct trips. If set to one then you will see one connecting trip in addition to the direct trips that are listed.
- Require at least X minutes of waiting at transfer points - It's the requirement of minimum waiting time at the connect station. A trip will be filtered by the connection engine if one of the waiting time at connect station is more than X minutes. If it's set as 0, means no minimum waiting time required.
- Do not allow a transfer if the passenger must wait more than X minutes at the transfer point - select the maximum waiting times (time in between two connecting trips) in minutes. EX. 120 minutes, then any connecting trips that require the passenger to wait over 2 hours between transfers will not be shown in the search results.
Trip variety:
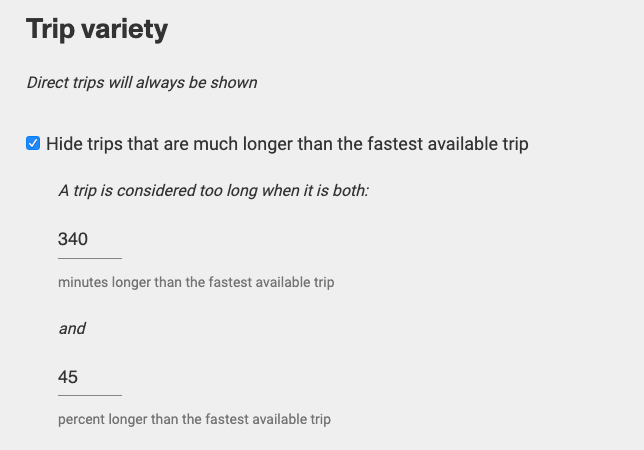
- Minutes: will filter out any connection options that have more than X minutes in between trip results
- Percentage: will filter out any trip results that are Y% longer than the other option.
NOTE: Options i & ii work in conjunction! This means that option B will only be filtered out if it meets BOTH the minutes and the percentage criteria.
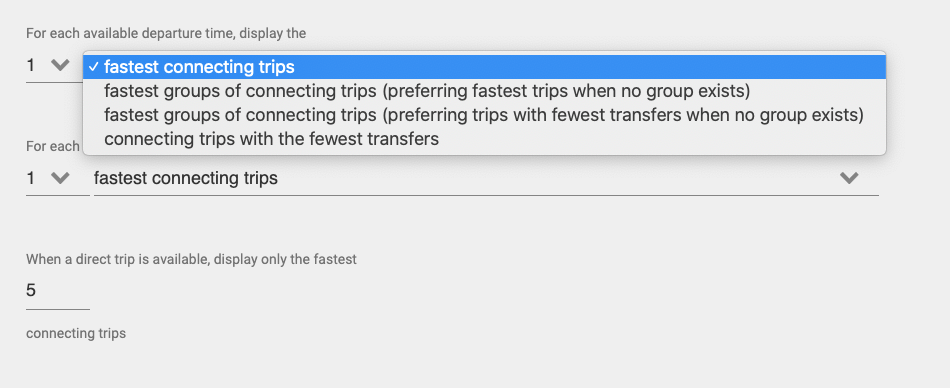
- Display the X number of fastest connecting trips - based on each departure/arrivel time, the connection engine will find the X fastest trips with the smallest duration. Trips which are longer than the X fastest trips will be removed.
- Display the X fastest groups of connection trips (preferring fastest trips when no group exist) - based on each departure/arrival time, the connection engine will search through all the trips and find the fastest X group, which may contain multiple trips with the same duration. When there is no groups exist, it will just show the X number of fastest trips.
- Display the X fastest groups of connection trips (preferring trips with fewest transfers when no group exist) -based on each departure/arrival time, the connection engine will search through all the trips and find the fastes X group, which may contain multiple trips with the same duration. When there is only one trip in the groups, it will show the X number of trips with fewer transfer. For example, if X set as 1, trip A has 2 transfers while trip B has 3, even trip B has shorter duration time, the connection engine will still show trip A.
- Connecting trips with the fewest transfers - based on each departure/arrival time, the trip result will show the top X fewest transfer trips
- When a direct trip is available, display only the fastest X connecting trips - If there are direct trips exist between the origin and destination, there will be another X number of fastest connection trips available for booking, ranked by the departure time.
Pathfinding options:
- Allow direct schedules to be used in connecting trips - When this option is checked, it will allow connection trips to use a direct trip (if applicable) while the direct trip is also displayed as a separate trip result. If it's unchecked, while there is a direct trip exist, all connection trips that contain this direct trip will be filtered out.
- Number of days of traffic to simulate - this number will set the limitation of displaying your longest trips in the trip result page. For example, if your longest trip covers 3 days but you set the number as 2, the trip results won't show up.
8: Amenity group setup
Before we can properly configure a schedule, there are a number of items that we must first consider and create before we create the schedule as these items will be associated at the schedule level.
Now that we have configured various amenities, we can continue to make an amenity group.
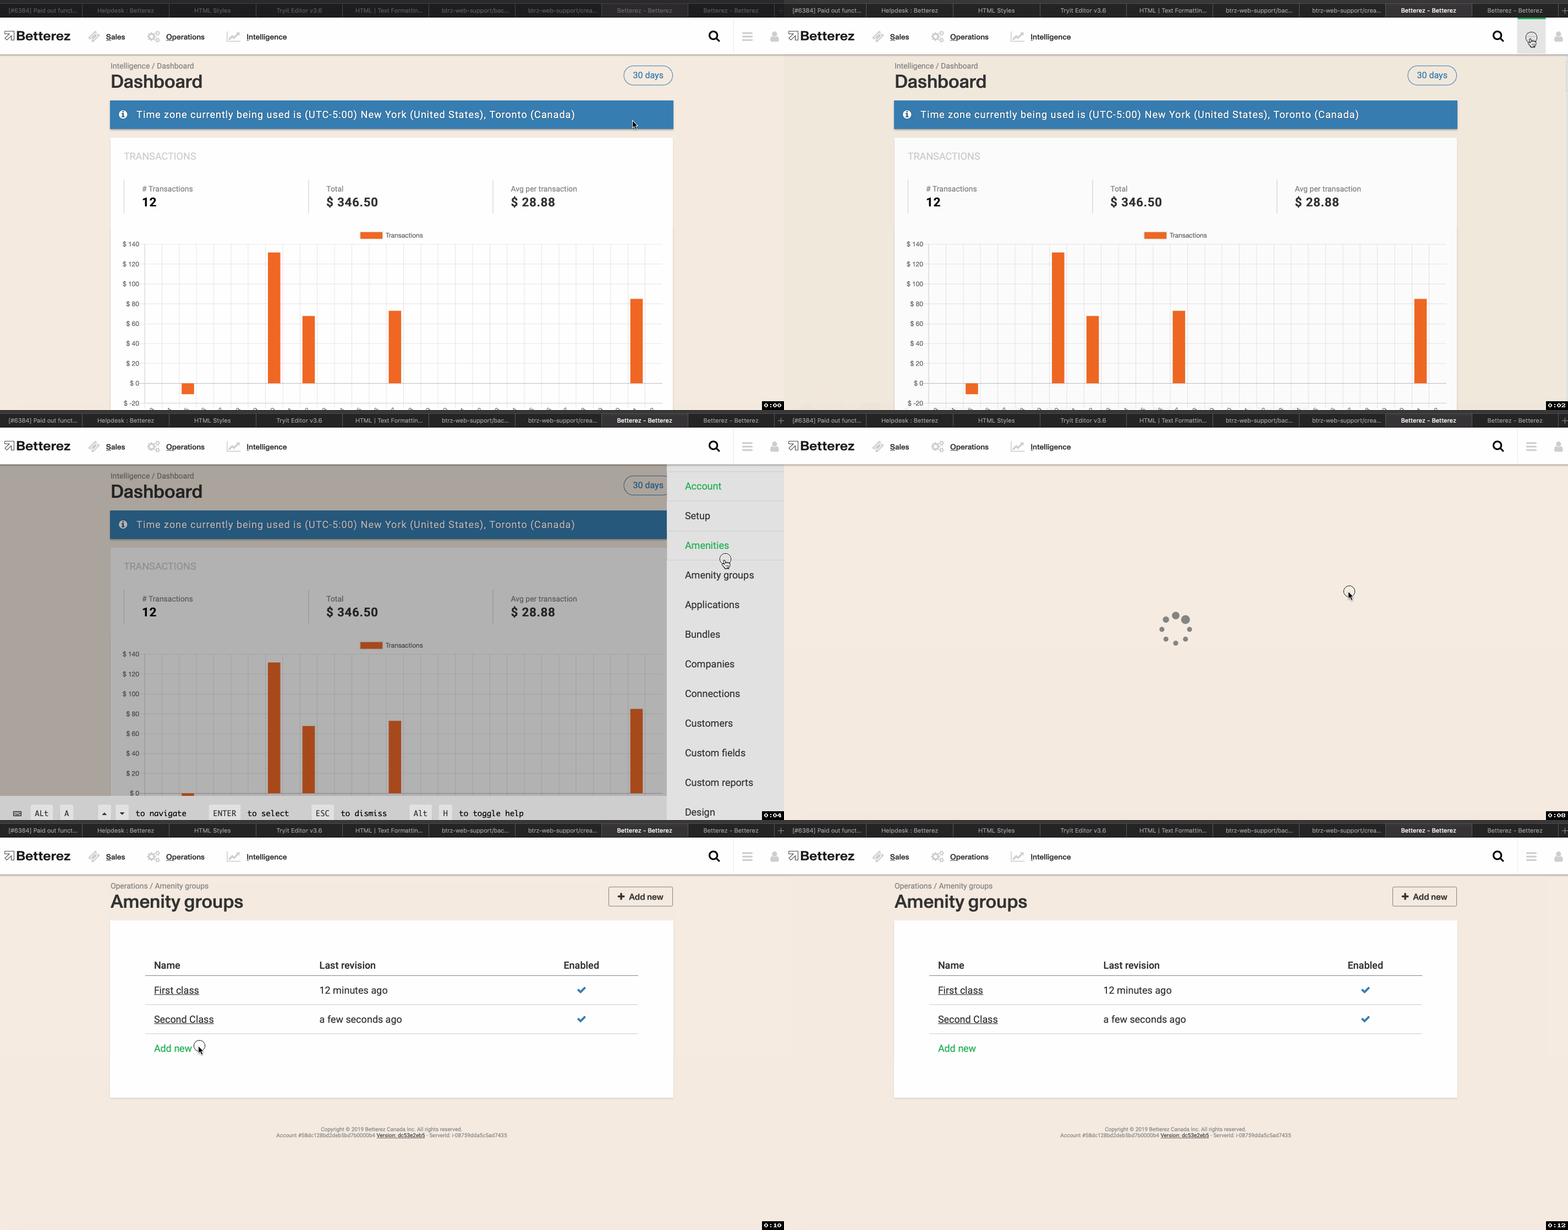
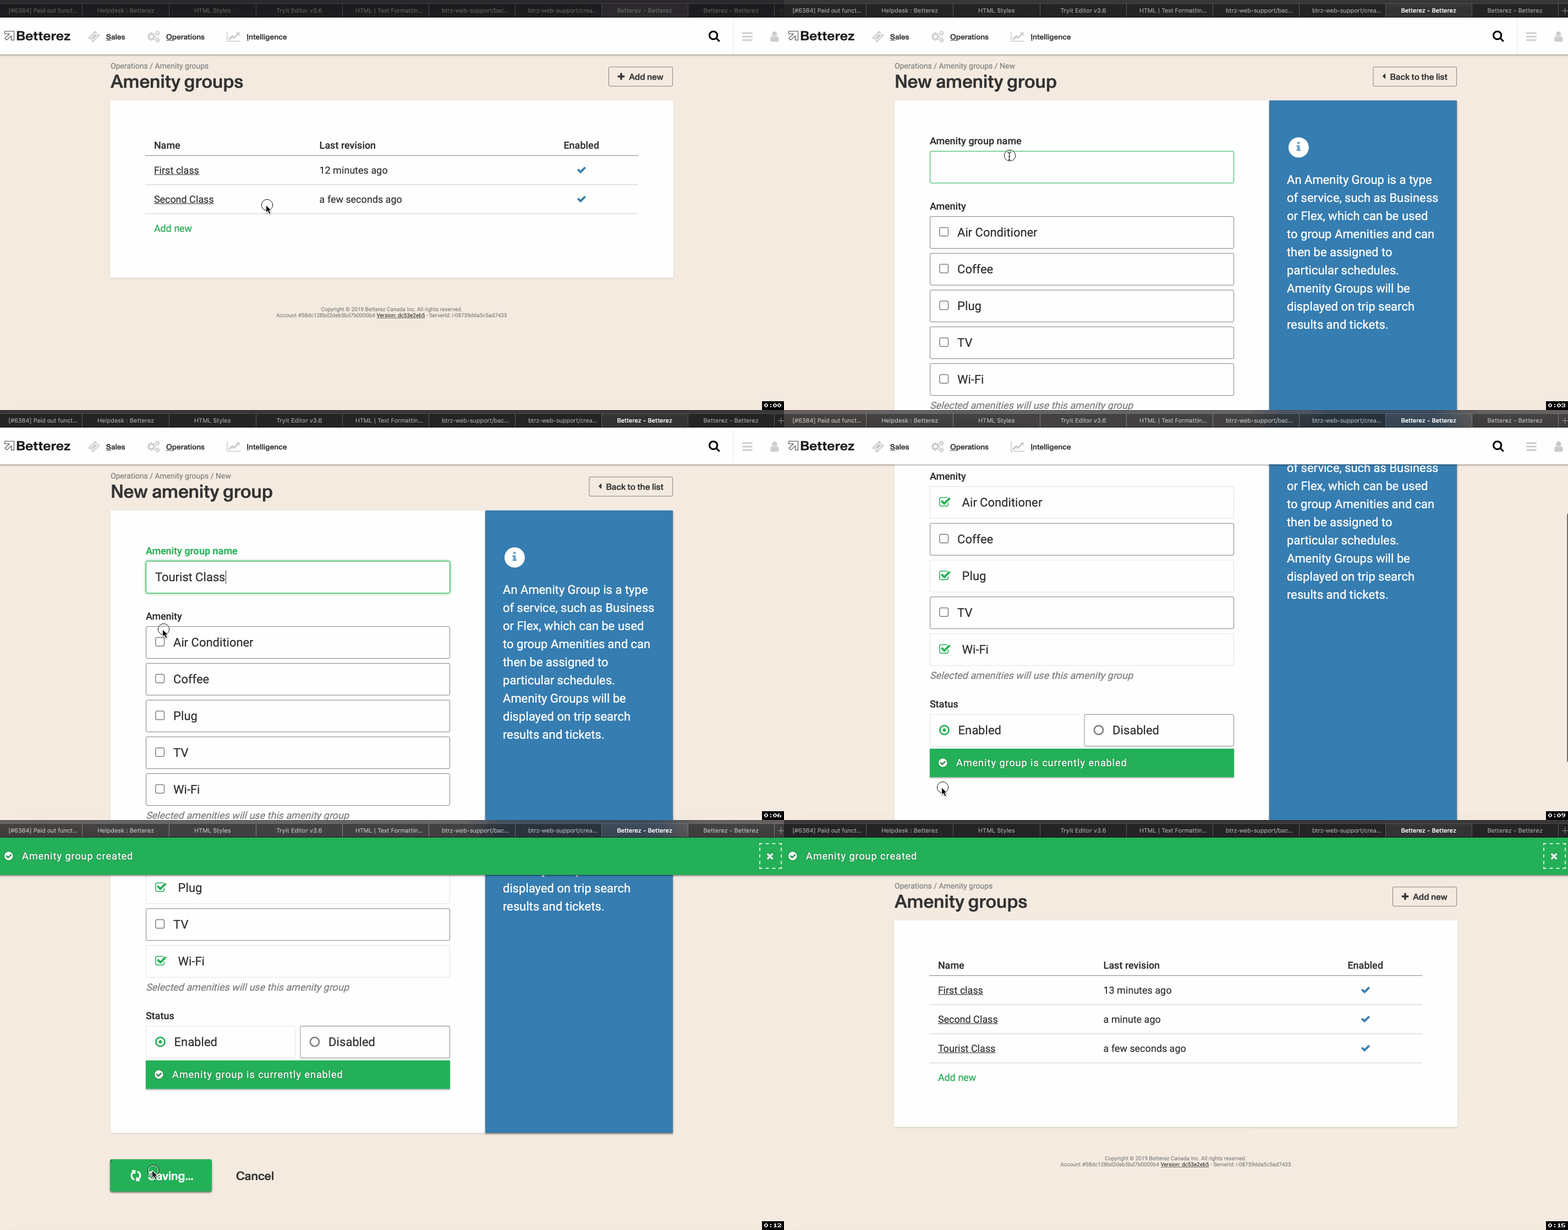
To create an amenity group, navigate to Admin -> Amenity groups and select click +Add new to arrive to the New Amenity Group screen.
Name: Enter the name of the new amenity group.
Amenity: Select the amenities that you wold like to include in the new amenity group.
Enable*: If =true, the amenity group will be enabled.
Disable If =true, the amenity group will be disabled.
Click Save to update your changes and add your new amenity group to the list of amenity groups.
9: Network operator setup
If you intend on using agencies to sell your product, you will have to set yourself up as on operator.
To do this, navigate to Admin -> Network and select the I am an operator flag.
Click Save to save your changes.
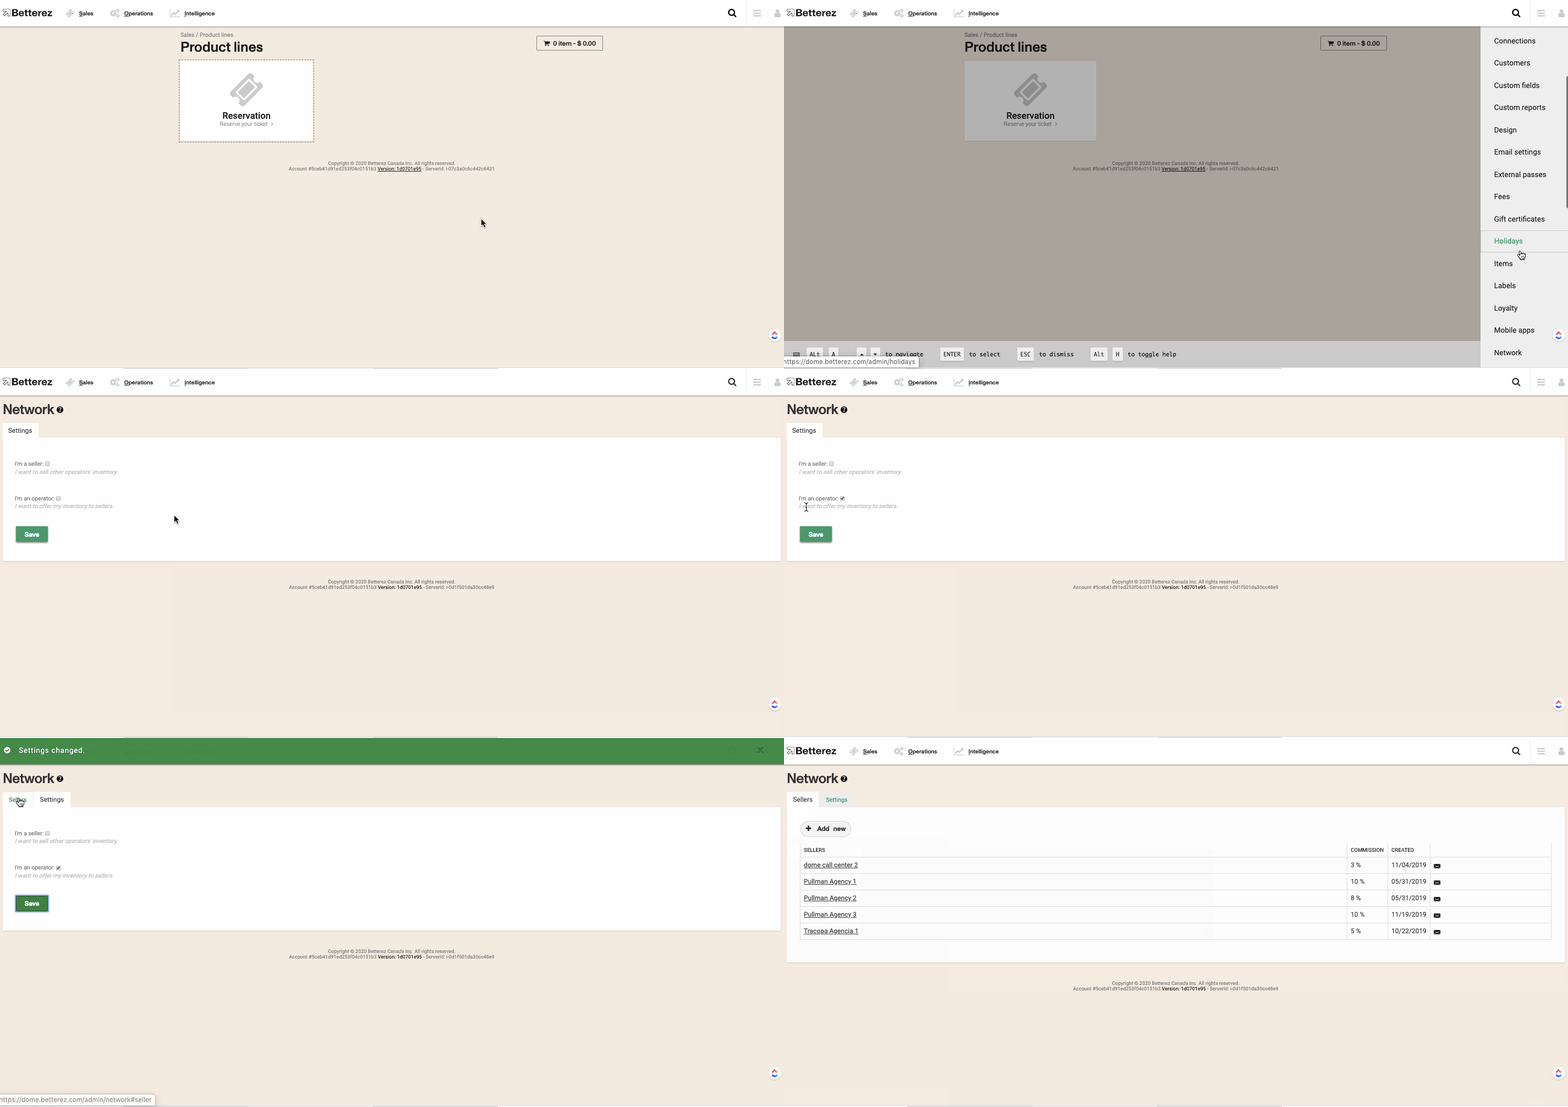
Once the flag has been enabled, you will be able to create network agencies to sell your product.
Creating new network accounts
In order to add an agency and provide them their own custom URL - follow these steps:
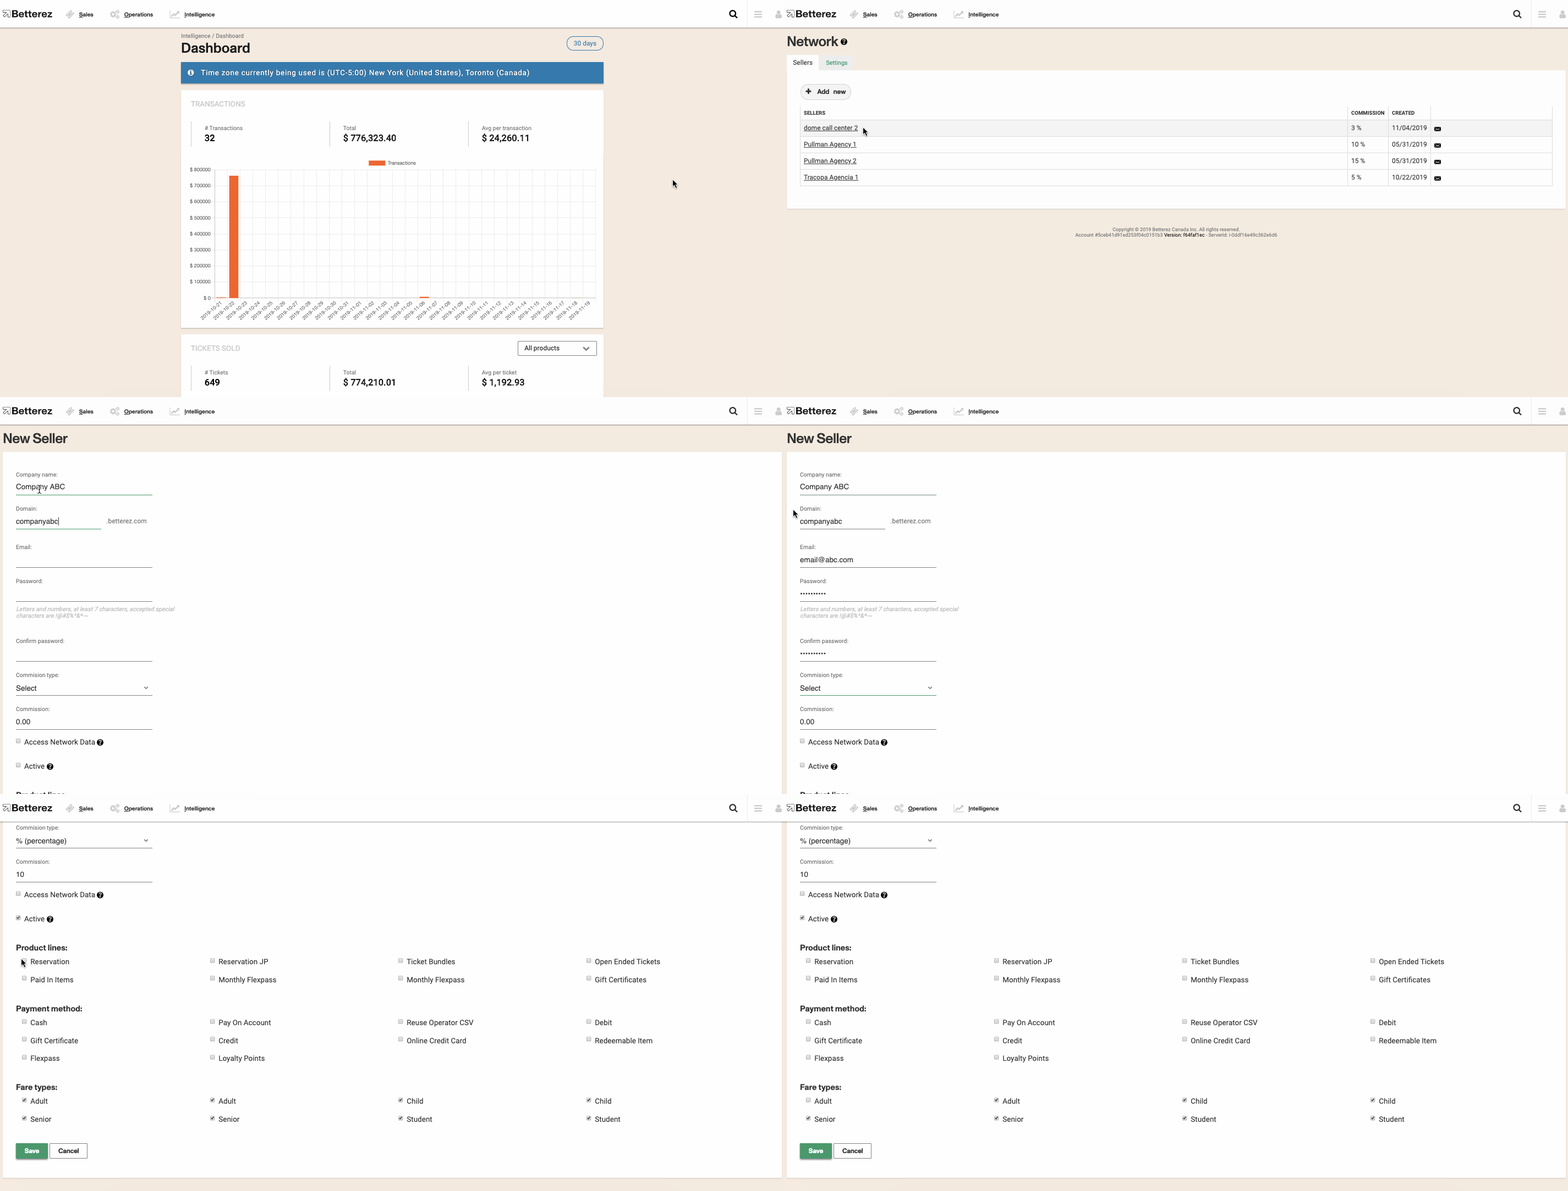
Navigate to Admin -> Network, and click the + Add New button to arrive at the New Seller screen and complete the required fields.
Company Name: Enter the name you would like to give the agency.
Domain: Enter the URL that you would like to add to .betterez.com. EX. companyABC.betterez.com.
Email: Enter the email you will assign to the admin user. IMPORTANT It should be the operators own email.
Password: Enter the password for the email.
Confirm passwored: Confirm and enter the password a second time.
Comission Type: Use the dropdown menu to select the commission type as either % percentage, or $ dollar value.
Commission: Enter the commission amount you wish to provide to the agency. IMPORTANT This is view only and will not calculate commission amounts to be paid.
Access Network Data: If =true, the network seller will have access to the all data, network wide.
Active: If =true, the network seller will be an active seller.
*Important notes on configuration
As an operator, you have the ability to customize which of your products, and fare types the agency can sell. You can also choose which payment methods they can accept, as needed.
How to start selling
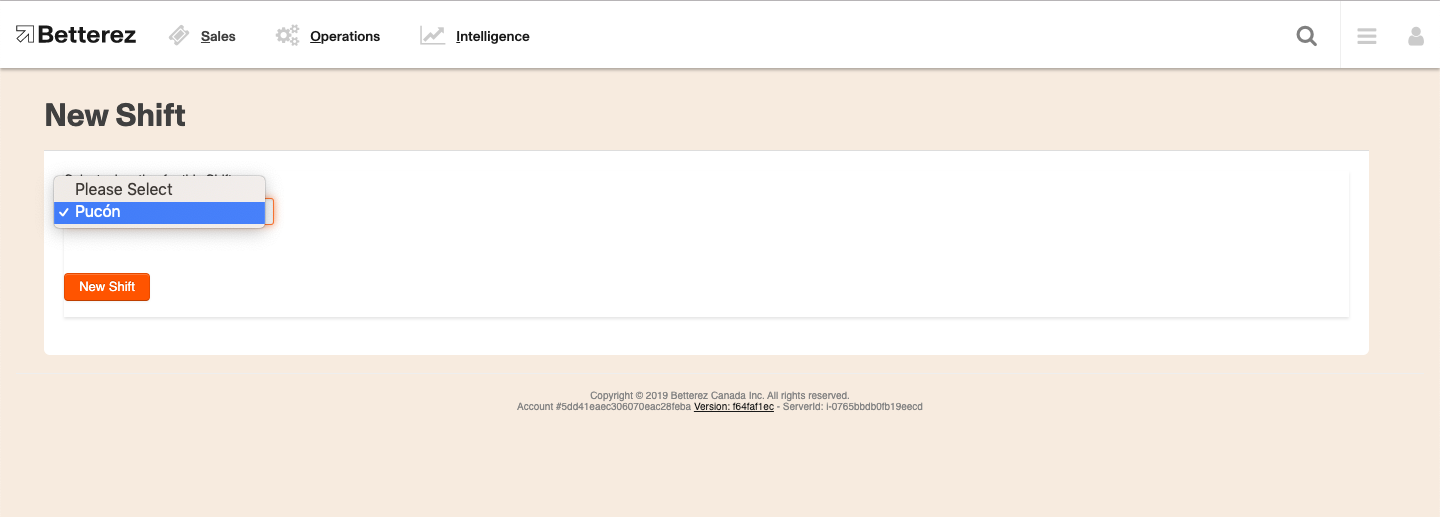
When you login to the new agency account, the opening page will say 'New Shift' and direct you to select a location, but you will not be able choose anything from within the drop-down menu. This is because no stations have been created within this account.

In order to start selling, a new station must be created. Note that this stop will not be added to any routes, and is solely for the purpose of recording a shift location.
Navigate to Operations -> Stations, and click the +Add new' button. Fill in the 'Name', 'State/Province' and 'Zone' fields. We recommend leaving the 'Zone' as 1, and click 'Save'
Now if you go back to the 'Sales' tab, you will see the new station name in the shift drop-down. Select this entry, and the account will be ready to sell tickets.
10: Notifications setup
With Betterez, you can actively monitor the capacity of your different schedules, the purchase of different products , and/or the purchase of special service requests by using the Notifications feature.
To create a notification, navegate to Admin -> Notifications, and click the Add new button to arrive at the New Notification screen where you will begin the configuration of your new notification.
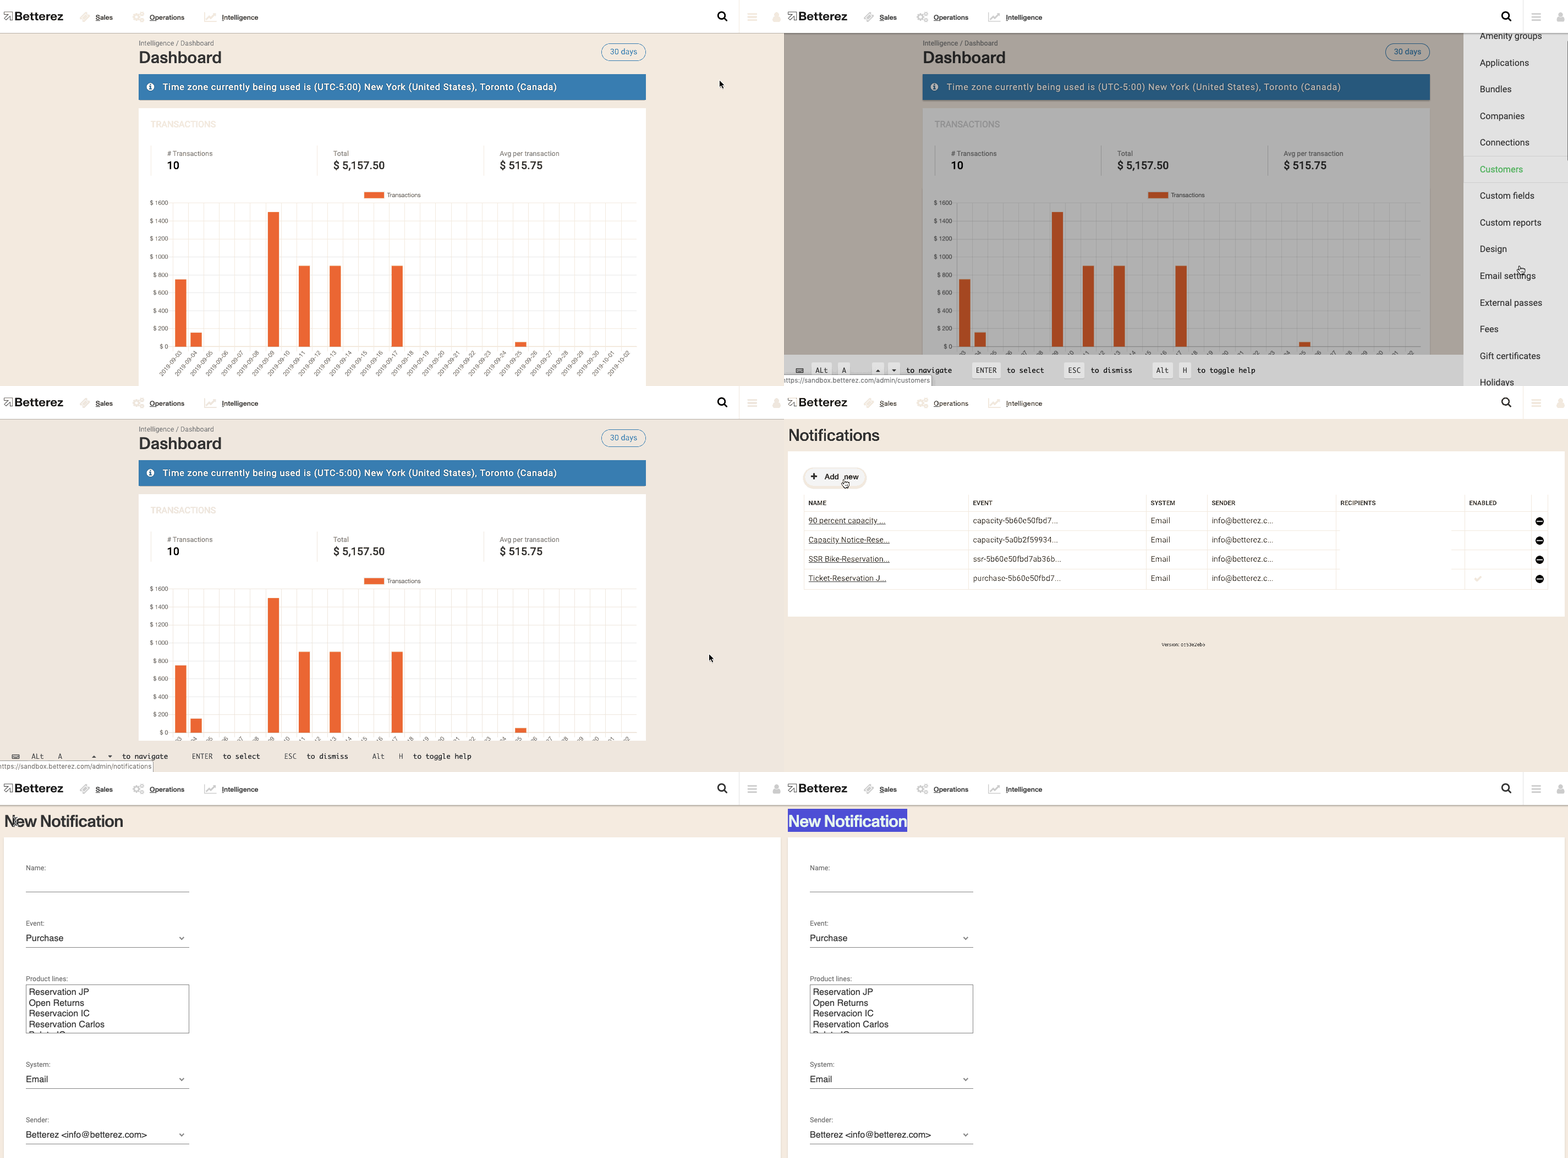
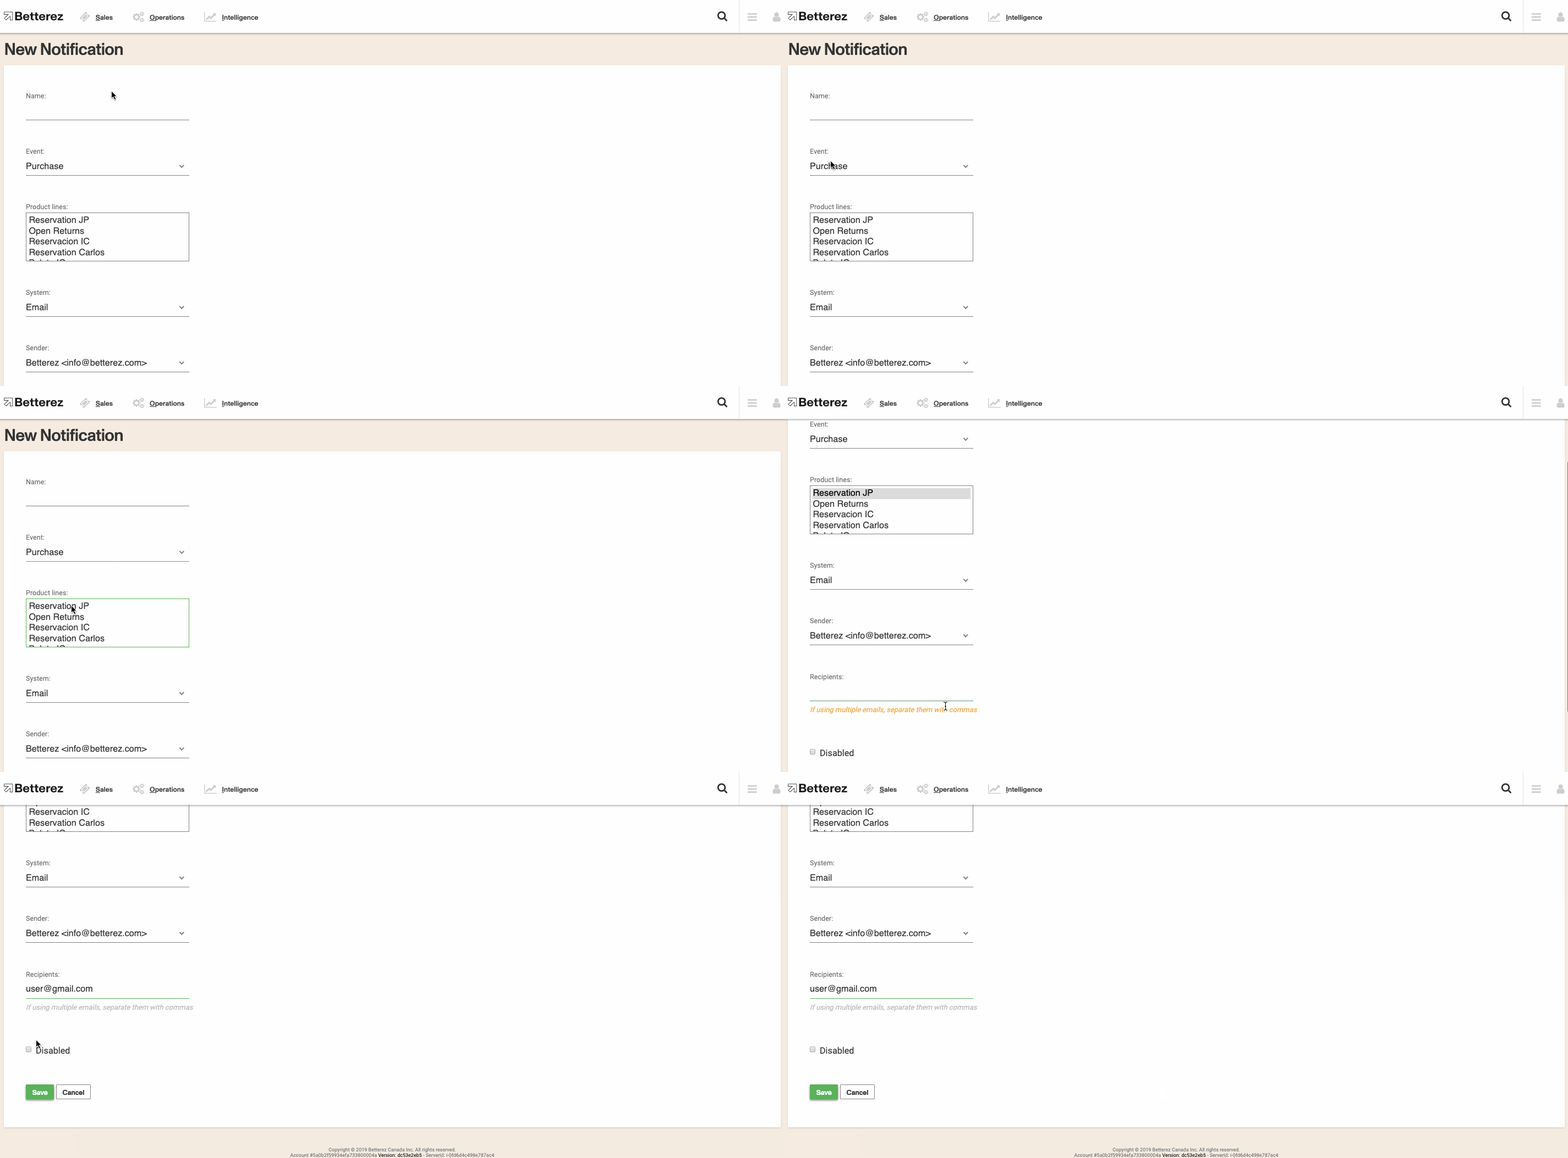
Name: Enter the name for the notification.
Event: Select the event type for which you would like to receive a notification: Purchase, Capacity, or Special Request.
(If capacity is selected)
Threshold %: Enter the capacity amount, if reached, that you would like to receive the alert. Ex. if you enter 80 you will receive an alert when the capacity of the schedule reaches 80% full.
(If special service is selected) you have to select the SSR codes for which you would like to receive notifications when purchased.
Product Lines: Select the product(s) that you would like to associate the notification with.
System: Select Email.
Sender: Select the email address from which you would like the notification(s) to be sent.
Recipient:s Enter the recipients' e-mail to which you would like the alert to be sent. Note: When entering multiple e-mails, be sure to separate each ID with a comma.
Disabled: If =true this notification will be disabled.
Click Save to save your new notification.
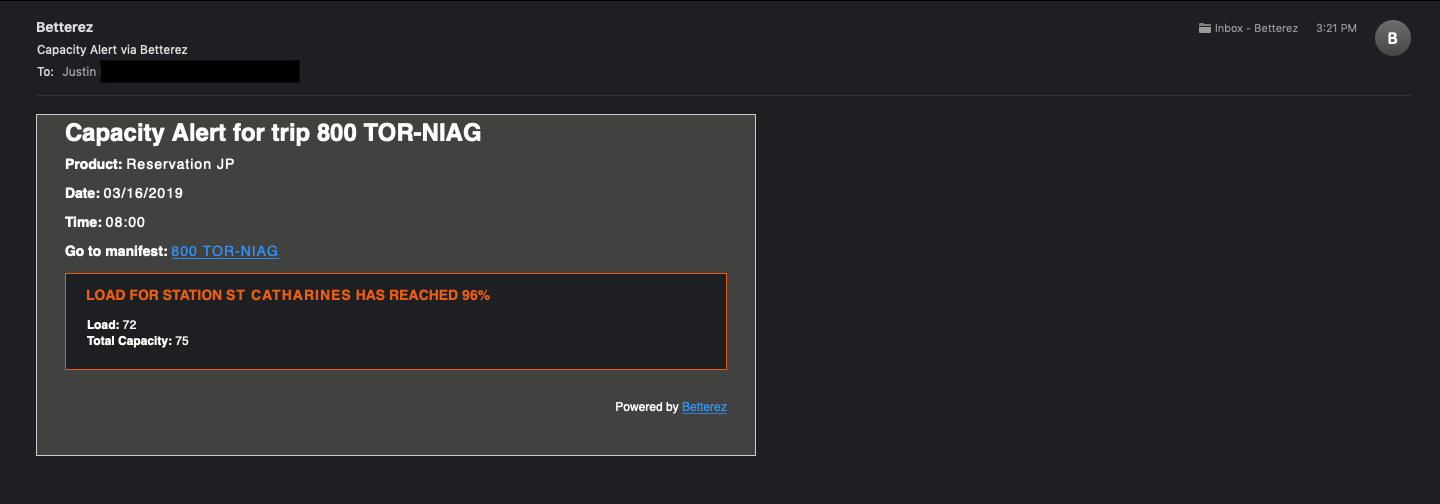
The following are examples of each type of email you will receive in the case of a:
i) Capacity notification
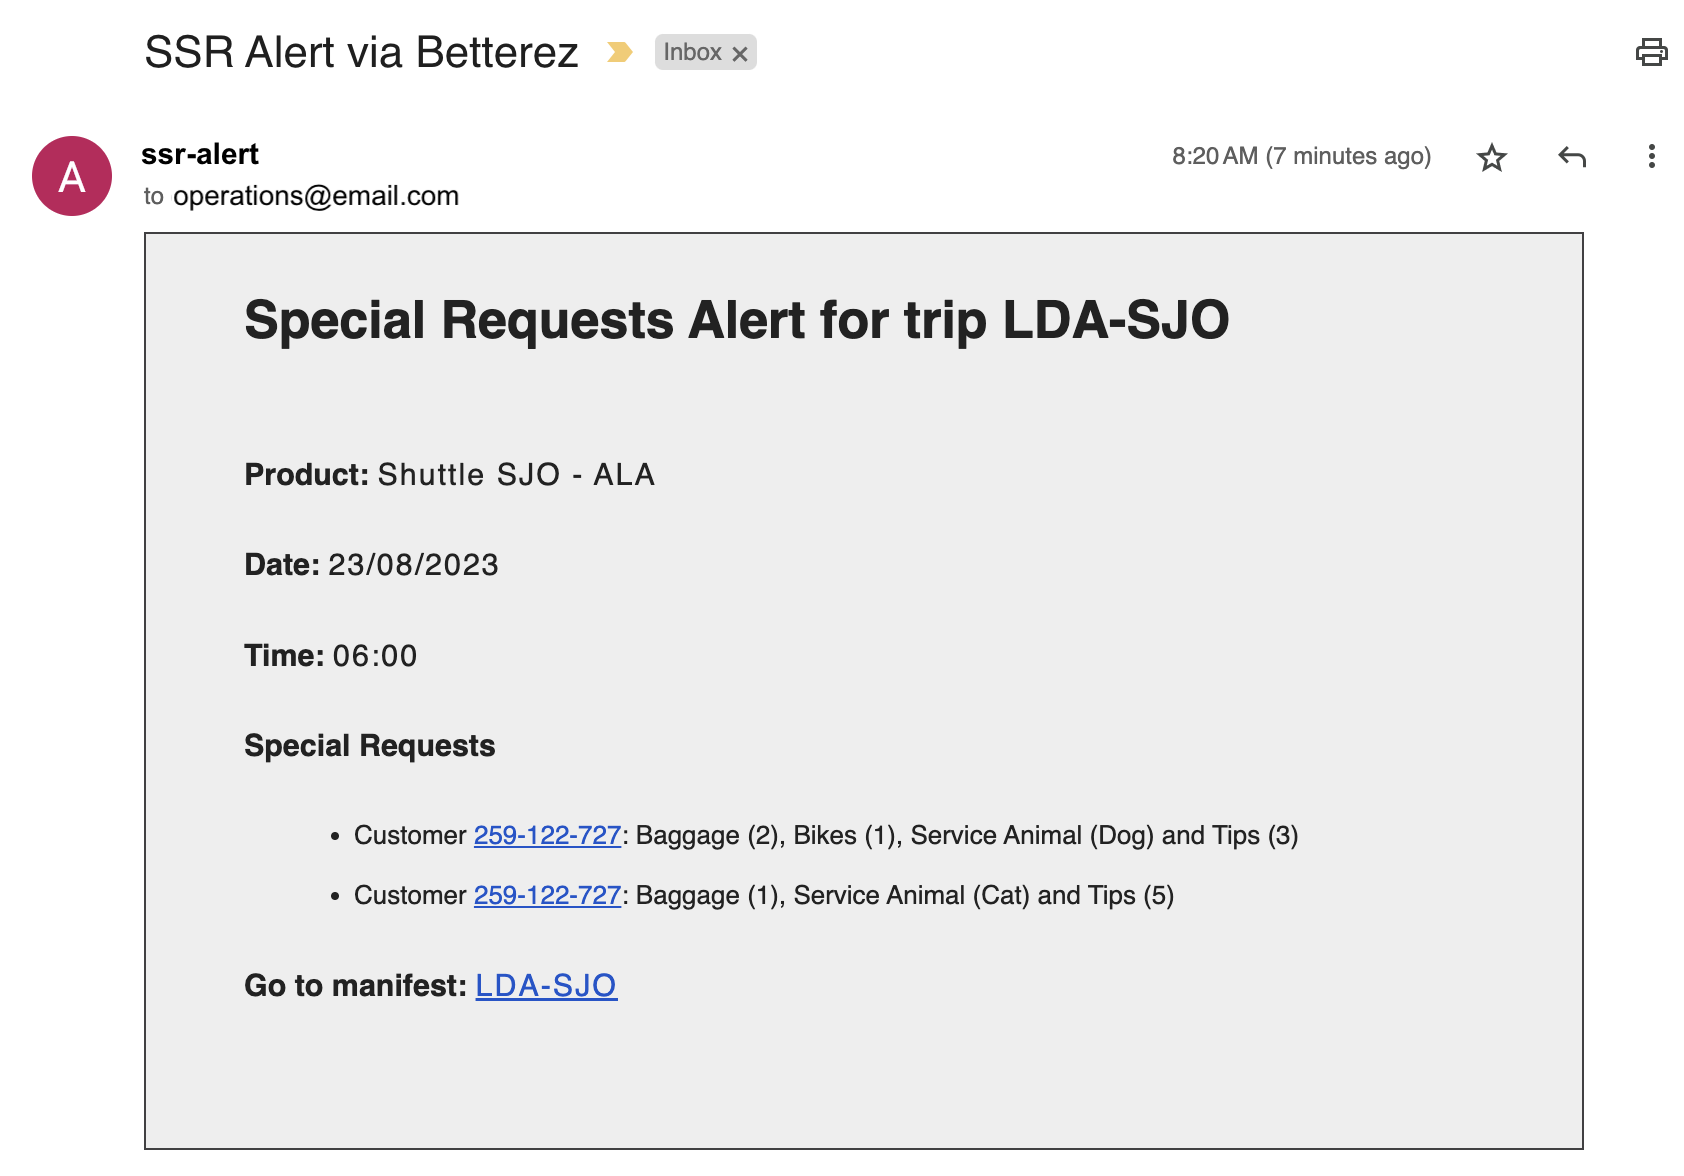
- Special service notification
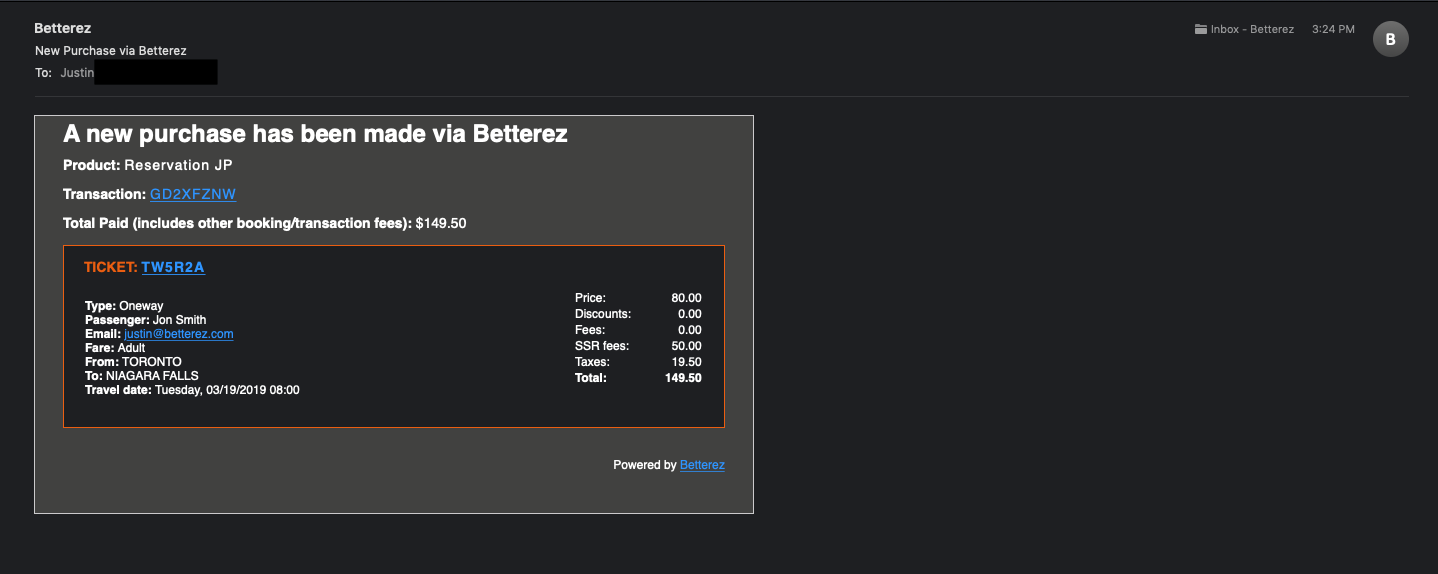
- Purchase notification
11: Voucher setup
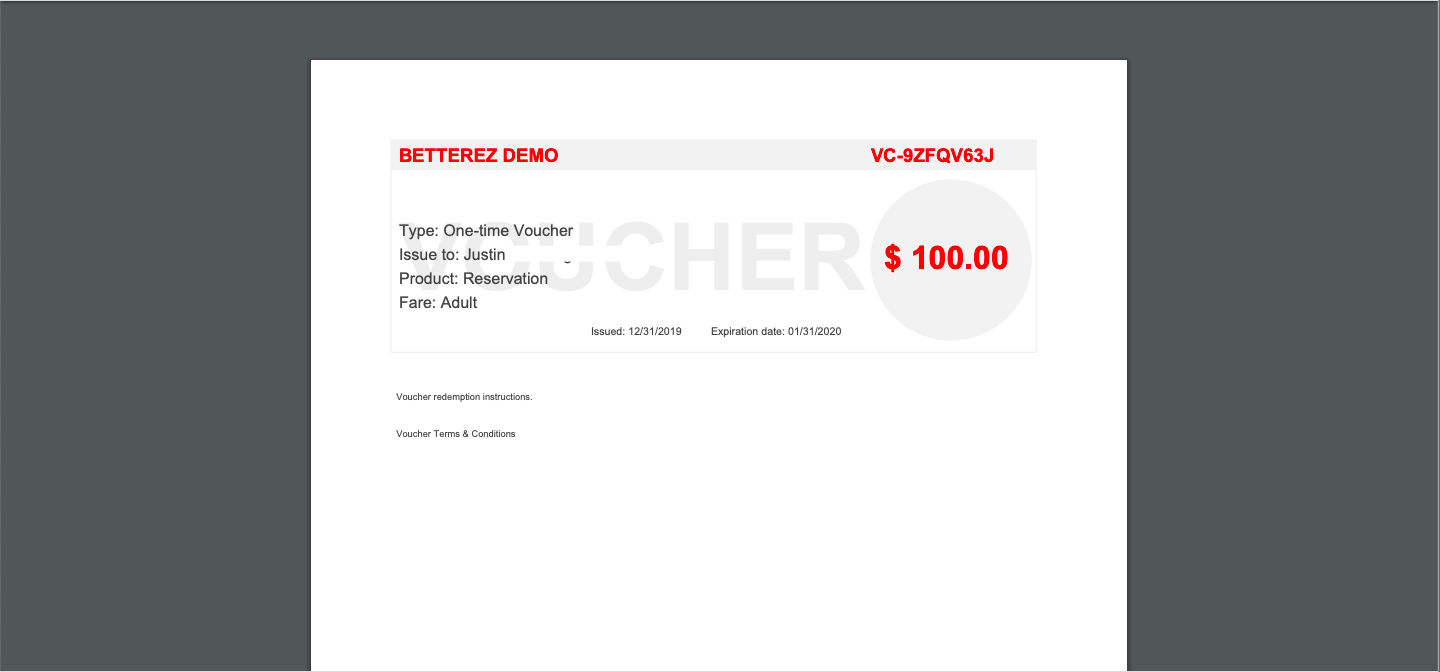
Vouchers are promotional tools that are available for one-time redemption only, and cannot be distributed for multiple purchases. In order to create a new voucher you must first navigate to Admin -> Vouchers to be brought to the Voucher Settings screen.
Enable vouchers for all products: If =true, vouchers will be available for all products.
Terms & Conditions: Enter the specific term's and conditions that will accompany the voucher.
Instructions: Enter the instructions of how to redeem the voucher.
Click Save to save your voucher settings.
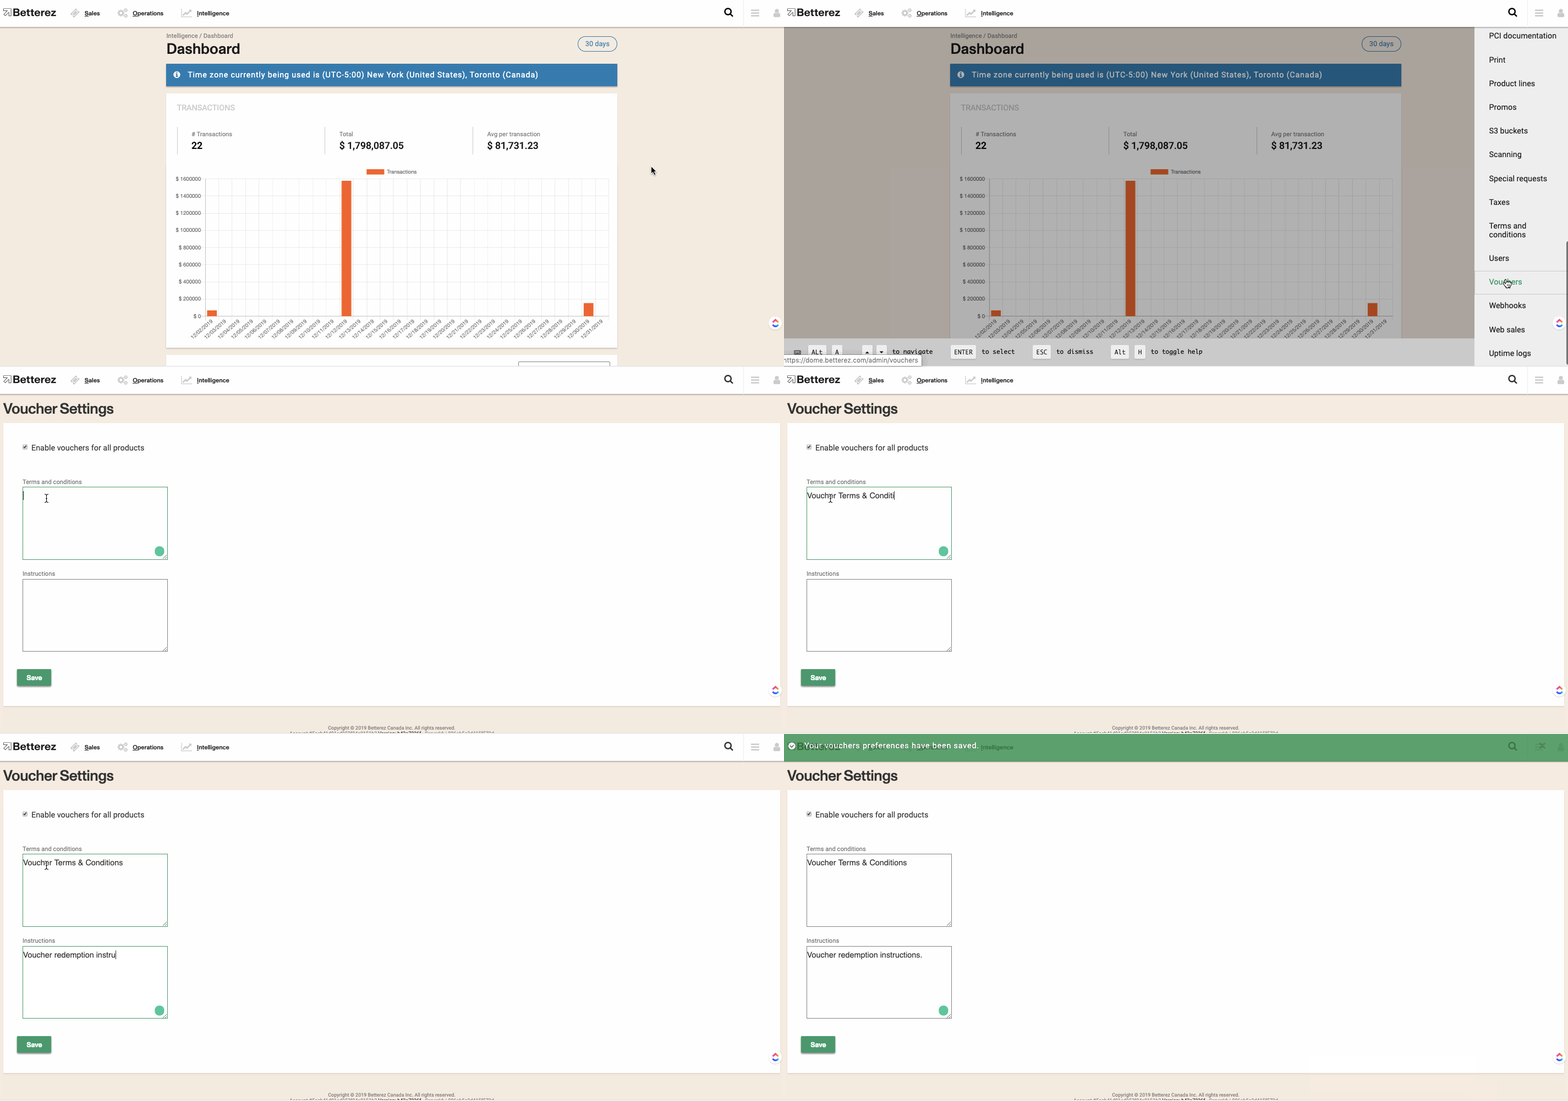
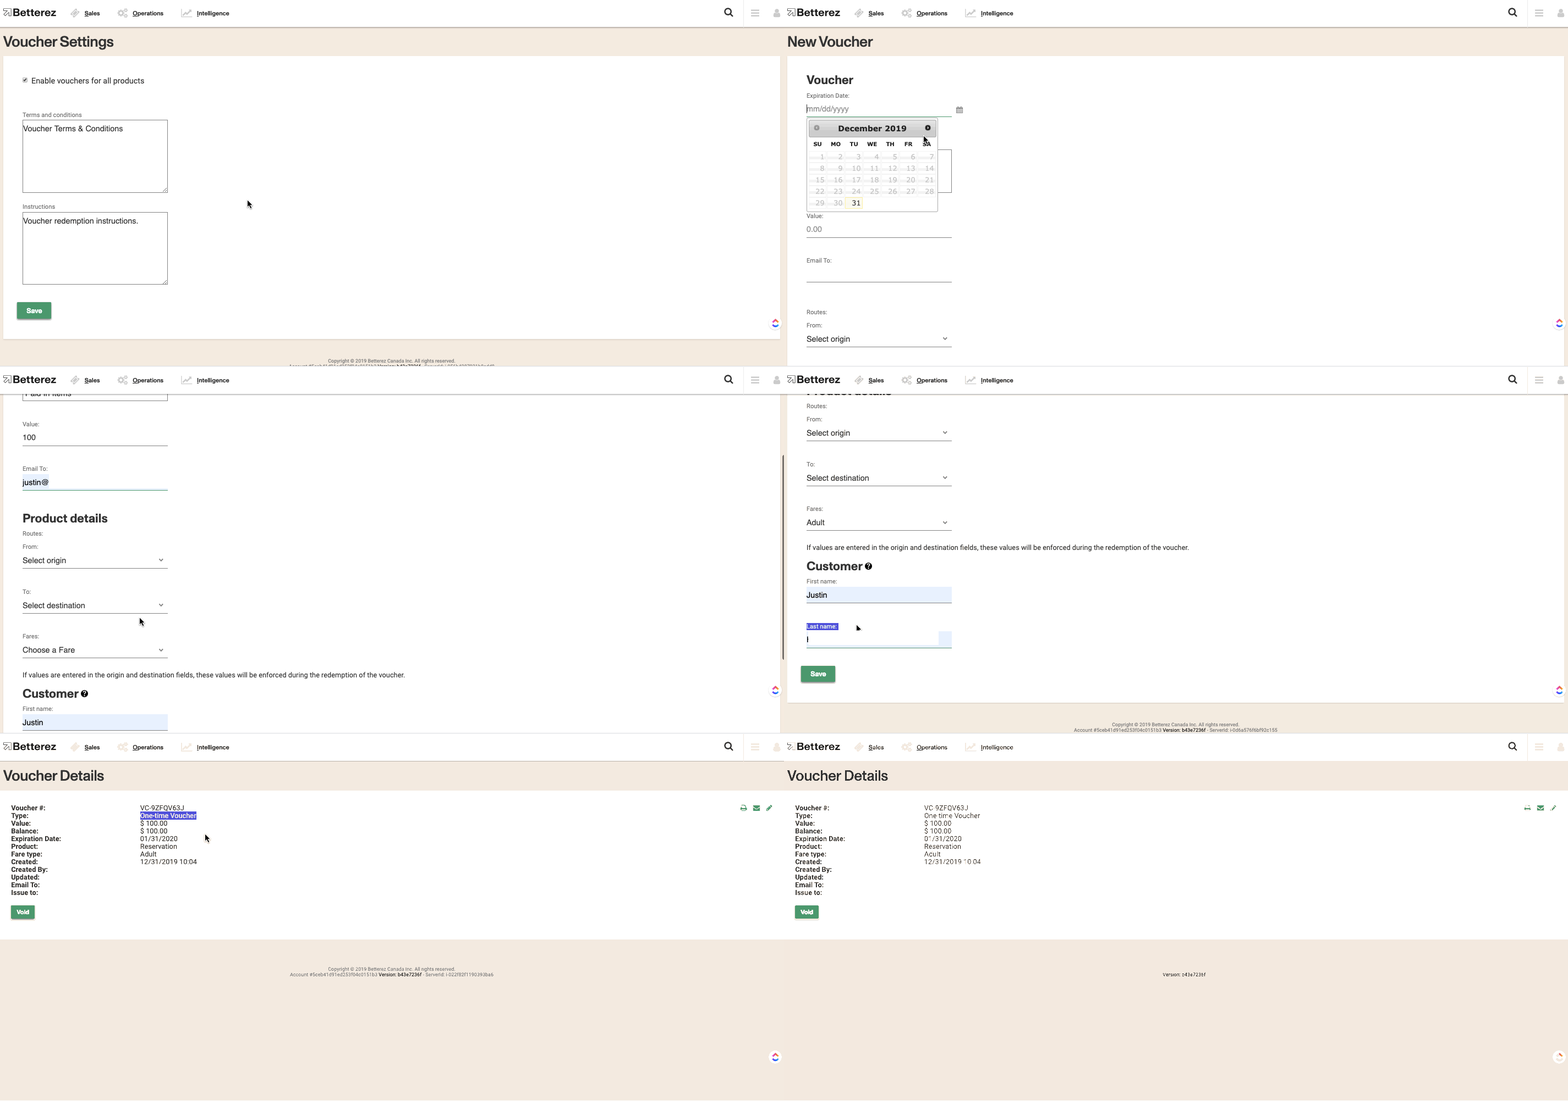
Next, navigate to Operations -> Vouchers and complete the configuration on the New Voucher screen.
Voucher
Expiration Date: Enter the expiration date of the voucher.
Product lines: Select the product(s) to which you would like to associate the voucher. You may choose multiple products.
Value: Enter the value of the voucher.
Currency: If your account is multicurrency, you will have to select the currency of the voucher you are going to create.
Email To: Enter the customer's email address who will be receiving the voucher.
Routes:
From: Select from the dropdown list if you would like to make the voucher for use with a specific origin.
To: Select from the dropdown list if you would like to make the voucher for use with a specific destination.
Fares: Select from the dropdown list if you would like to make the voucher for use with a specific fare type.
Customer In order to allow the voucher to be used by any customer, leave the name field blank and this way the voucher can be made available for multiple redemptions.
IMPORTANT: The Customer name entered here must match the "Customer Name" field before the checkout (not the passenger name).
First name: The customer's first name if you wish to make it customer specific.
Last name: Enter the customer's last name .
Click Save to save and send your new voucher. Once sent, the recipient will receive the voucher to the client's email.
12: Gift certificate product setup
Gift certificates are multi-use promotional tools, where operators can assign a discounted value from various base fares. Once enabled your organization will be able to sell gift certificates to your customers through the backoffice app and your customers will be able to redeem gift certificates with both the Betterez Backoffice app and through Betterez Websales app.
In order to setup the gift certificate feature, navigate to Admin -> Gift certificates and select +Add new and enter the following information on the New Gift Certificate screen.
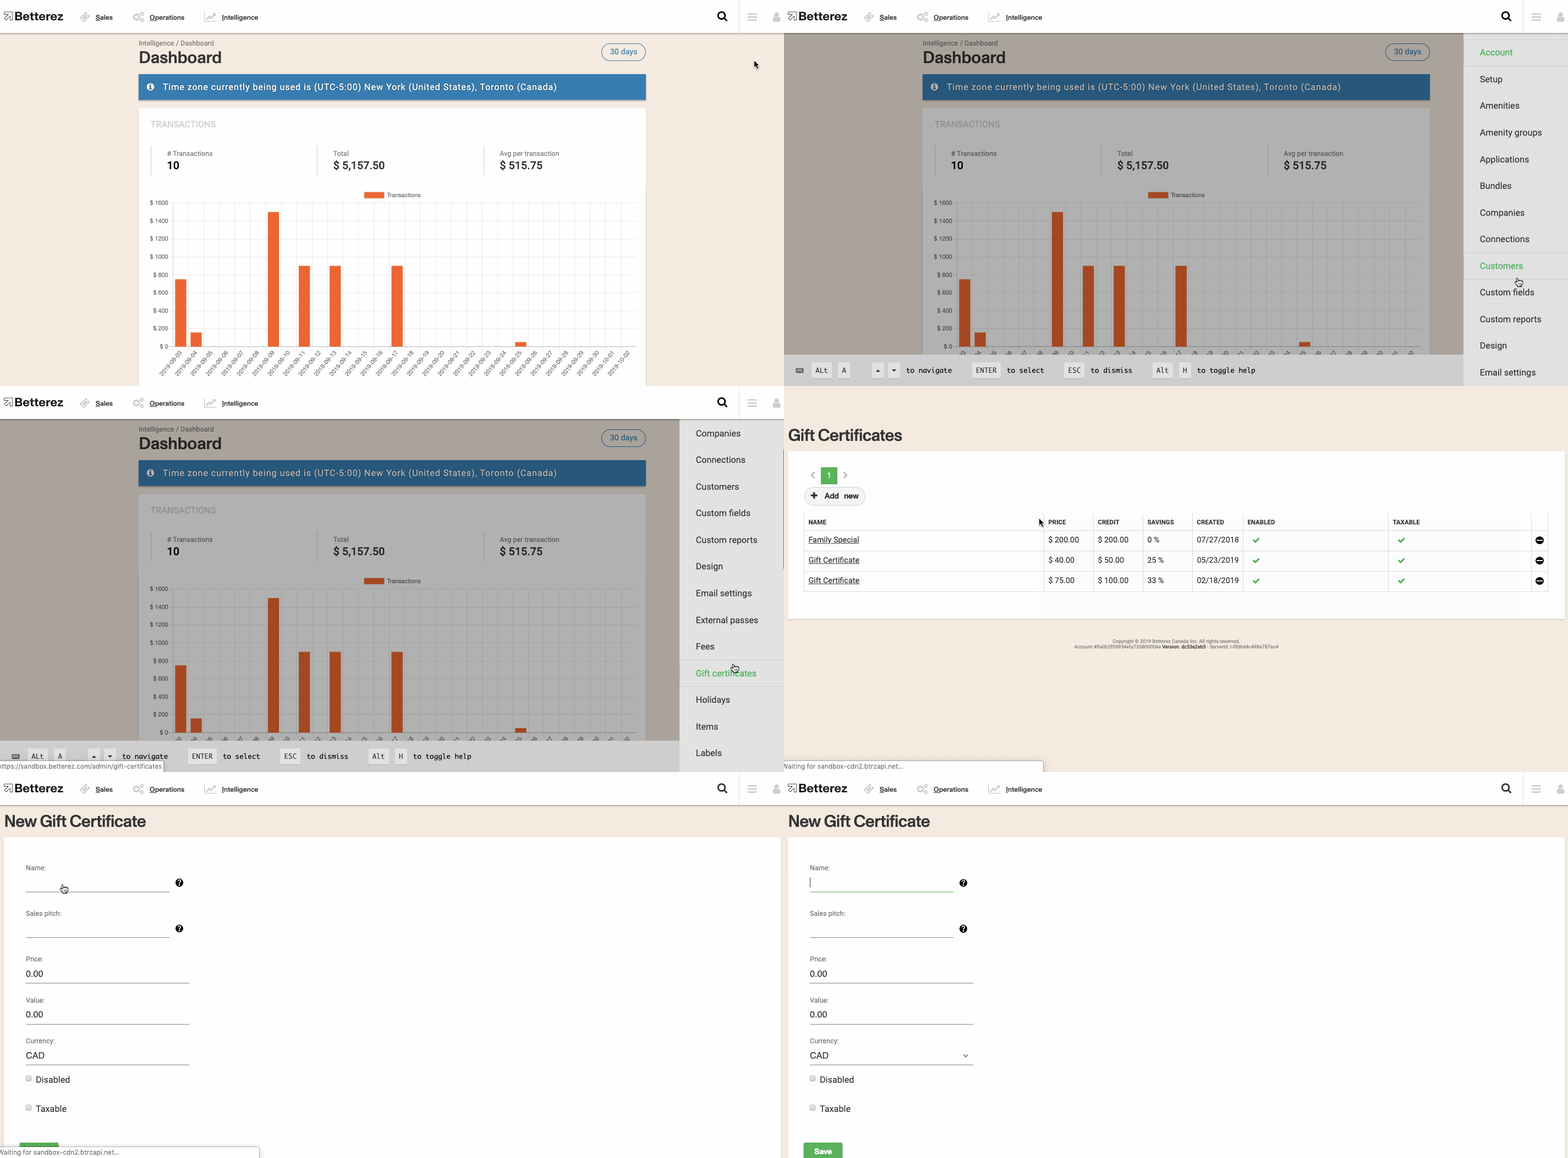
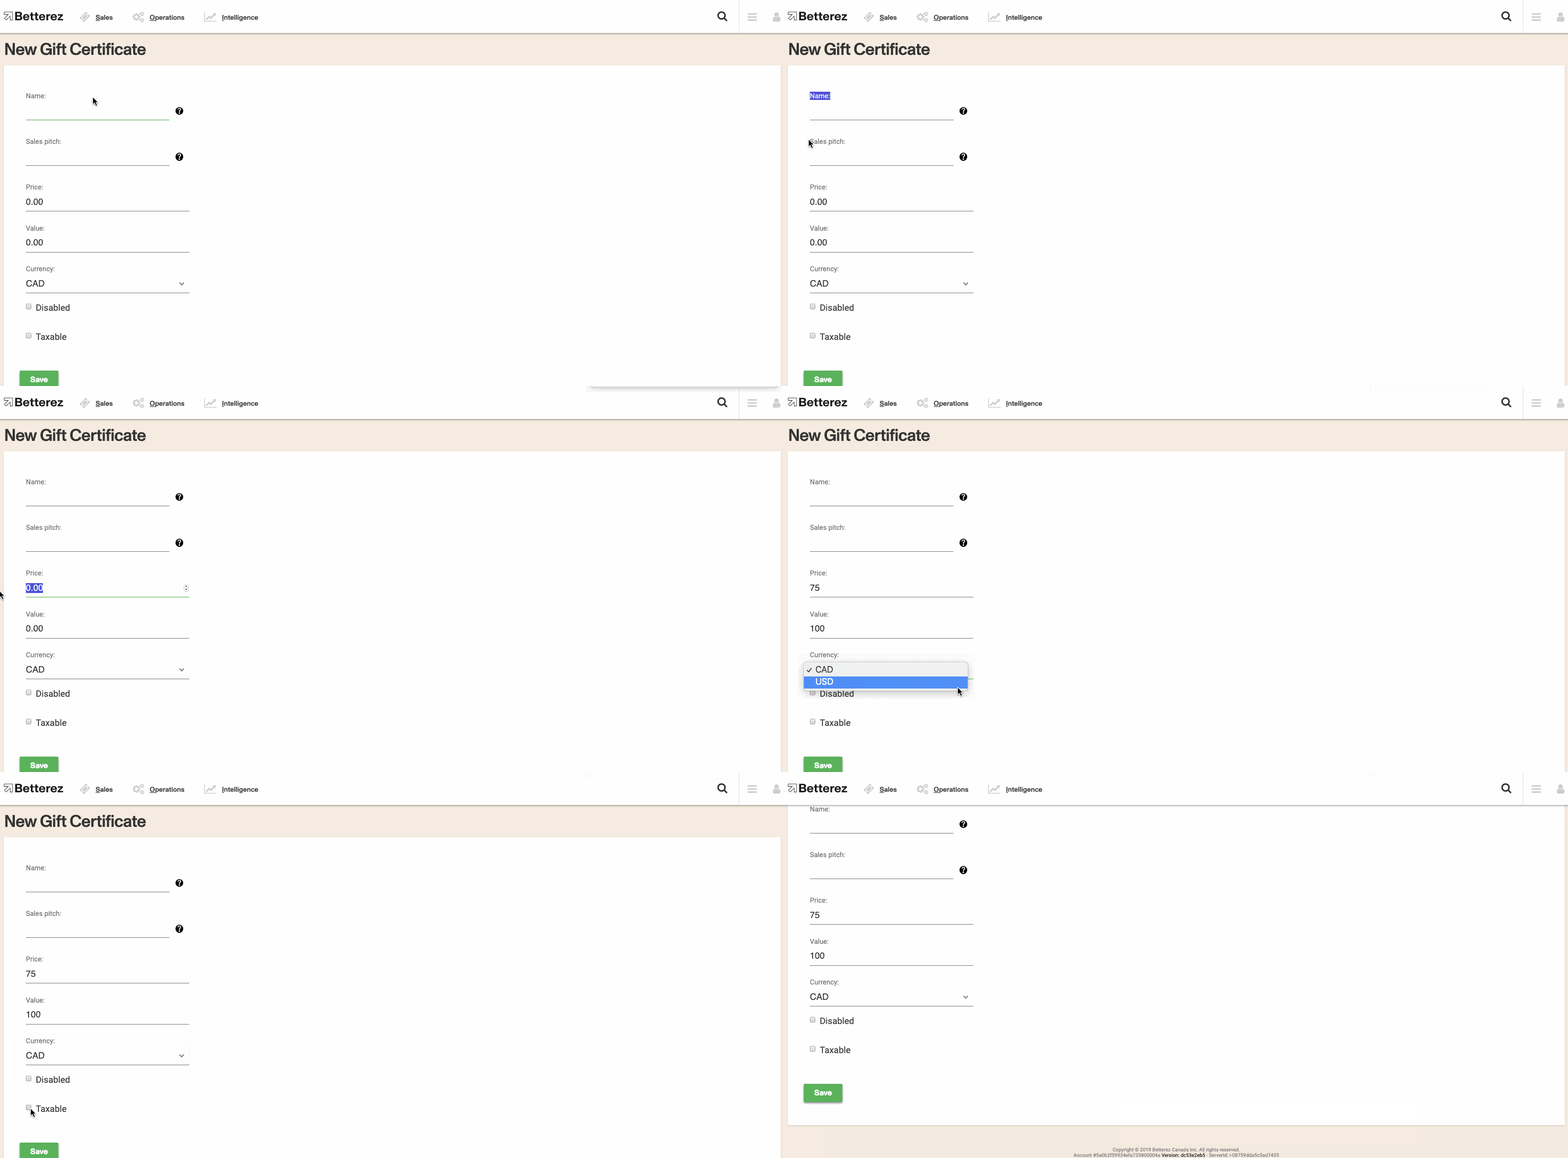
Name: Enter the name of the gift certificate.
Sales pitch: Enter a short sales pitch of the product.
Price: Enter the price of the product.
Value: Enter the value of the prodcut to the customer.
Currency: If a multicurrency solution is enabled in the account, a dropdown list of the currencies enabled in the account will appear in order to determine which currency you would like to issue the gift certificate.
Disabled: If checked, this product will not be available for sale.
Taxable: If checked, this product will be taxable.
Click Save when done entering the information.
Gift certificate payment setup
Finally, navigate to Admin - > Payments and ensure that gift_certificate is enabled as a payment provider. This feature allows you to turn Gift Certificates on or off.
Click Save if you enabled it.
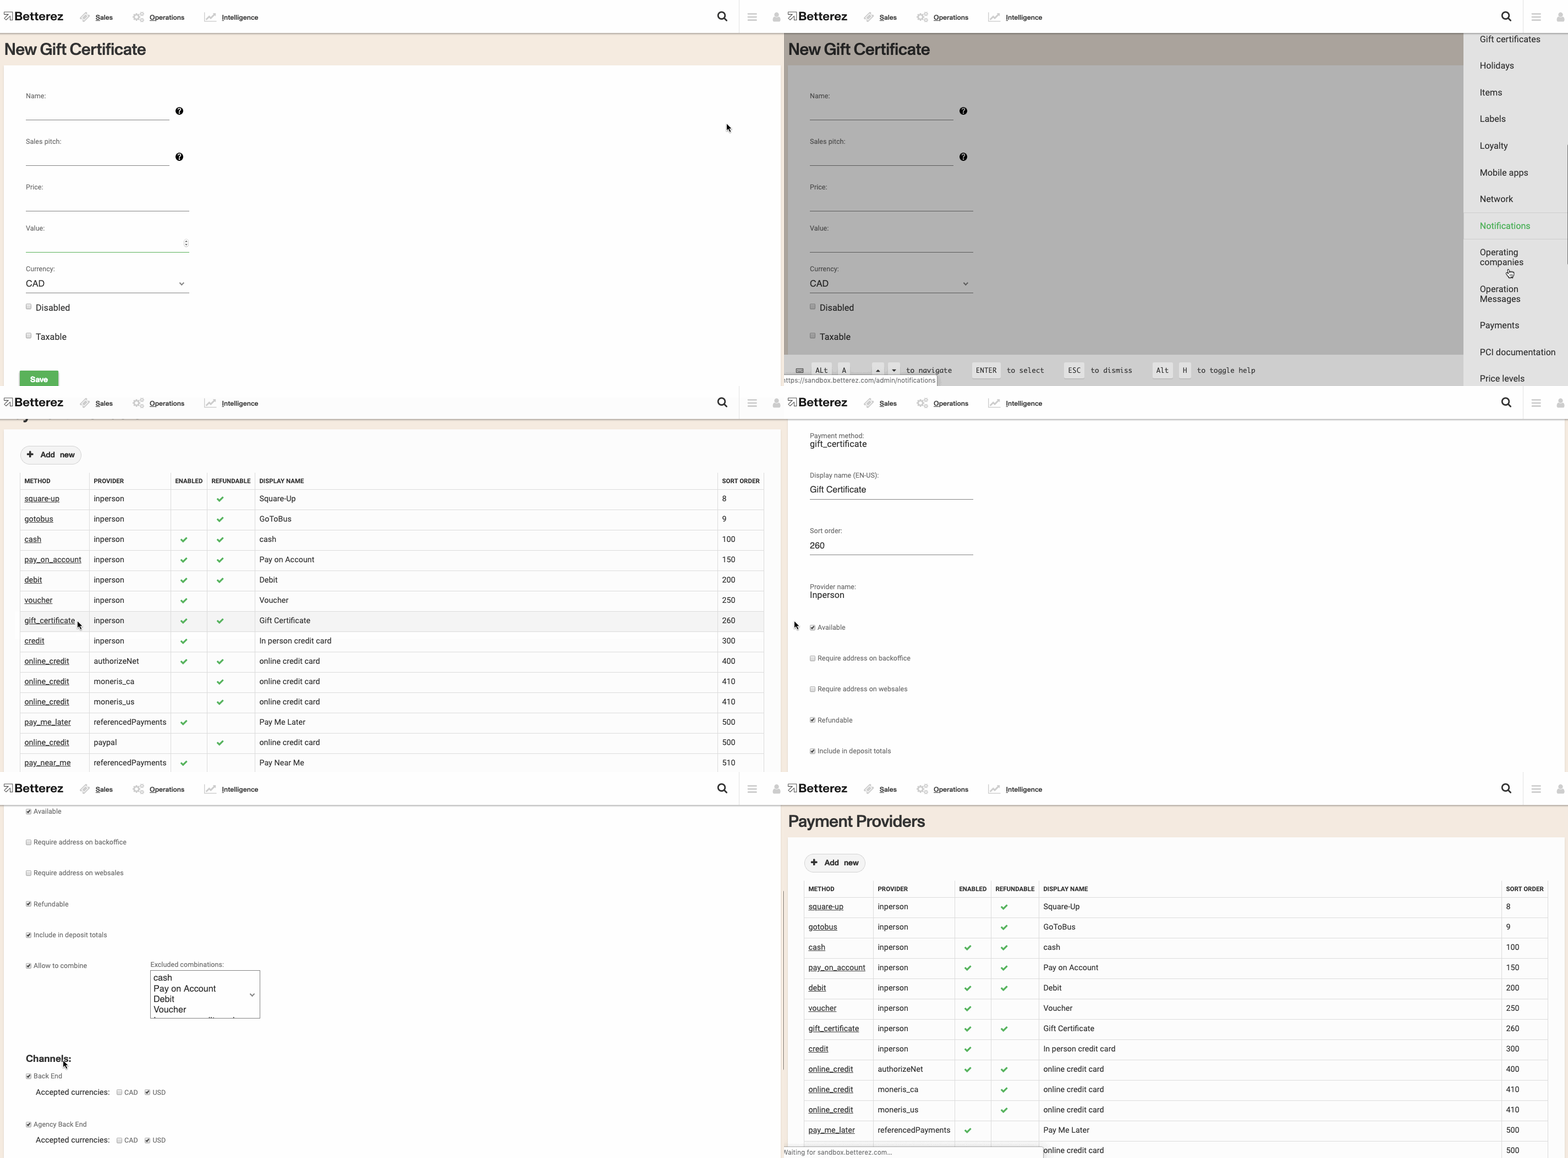
Now a Gift Certificate program has been created for your team to sell to your passengers through the Betterez Backoffice app.
If at any point you'd like to stop offering your new promotion, simply go to the created program and check the Disabled box and click Save.
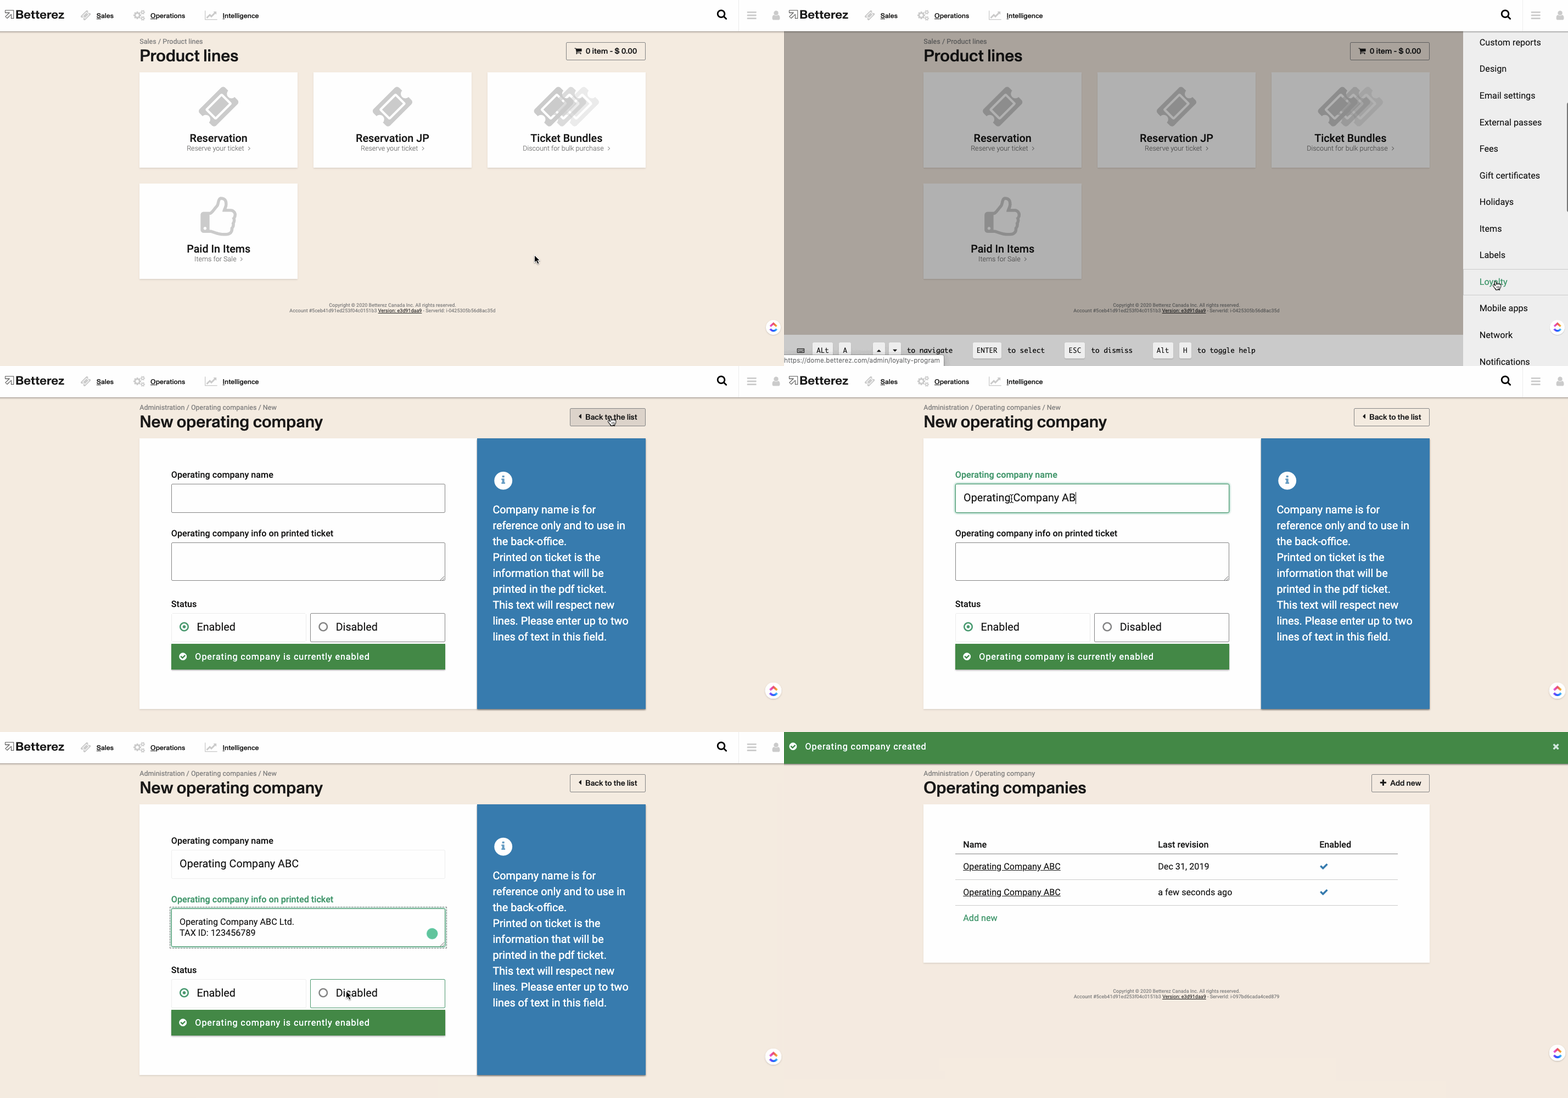
13: Operating company setup
Before we can properly configure a schedule, there are a number of items that we must first consider and create before we create the schedule as these items will be associated at the schedule level.
If you use different operating companies to operate specific routes and schedules and would like to identify them by official name and tax identification number on the ticket then this feature is for you.
To configure an operating company, navigate to the Admin Menu -> Operating companies and then select +Add new to be brought to the New Operating Company screen.
Operating company name: enter the operating company's legal name.
Operating company info on printed ticket: enter what you would like to appear on the printed ticket. You are able to enter multiple lines in this section.
When you are done, enable it and click Save.
14: Operation messages setup
Often there are events that are occurring in a certain location that have the ability to impact regular operations. Those events could be classified as insignificant or significant when considering the impact they will have on day-to-day operations.
When service disruptions are insignificant, they may still be noteworthy and it may be necessary, but not obligatory, to notify customers. In other cases, the disruption may be so significant that service in a particular location may cease (for a period of time) altogether.
The use of the operation messages feature will help communicate service disruptions/cancellations in a particular area to customers (via websales) and back-office users alike purchasing a reservation product or redeeming a flex-pass for a reservation.
In order to configure an operation message, navigate to Admin -> Operation messages and select +Add New to proceed to the New operation message screen in order to begin the first of three steps in the configuration.
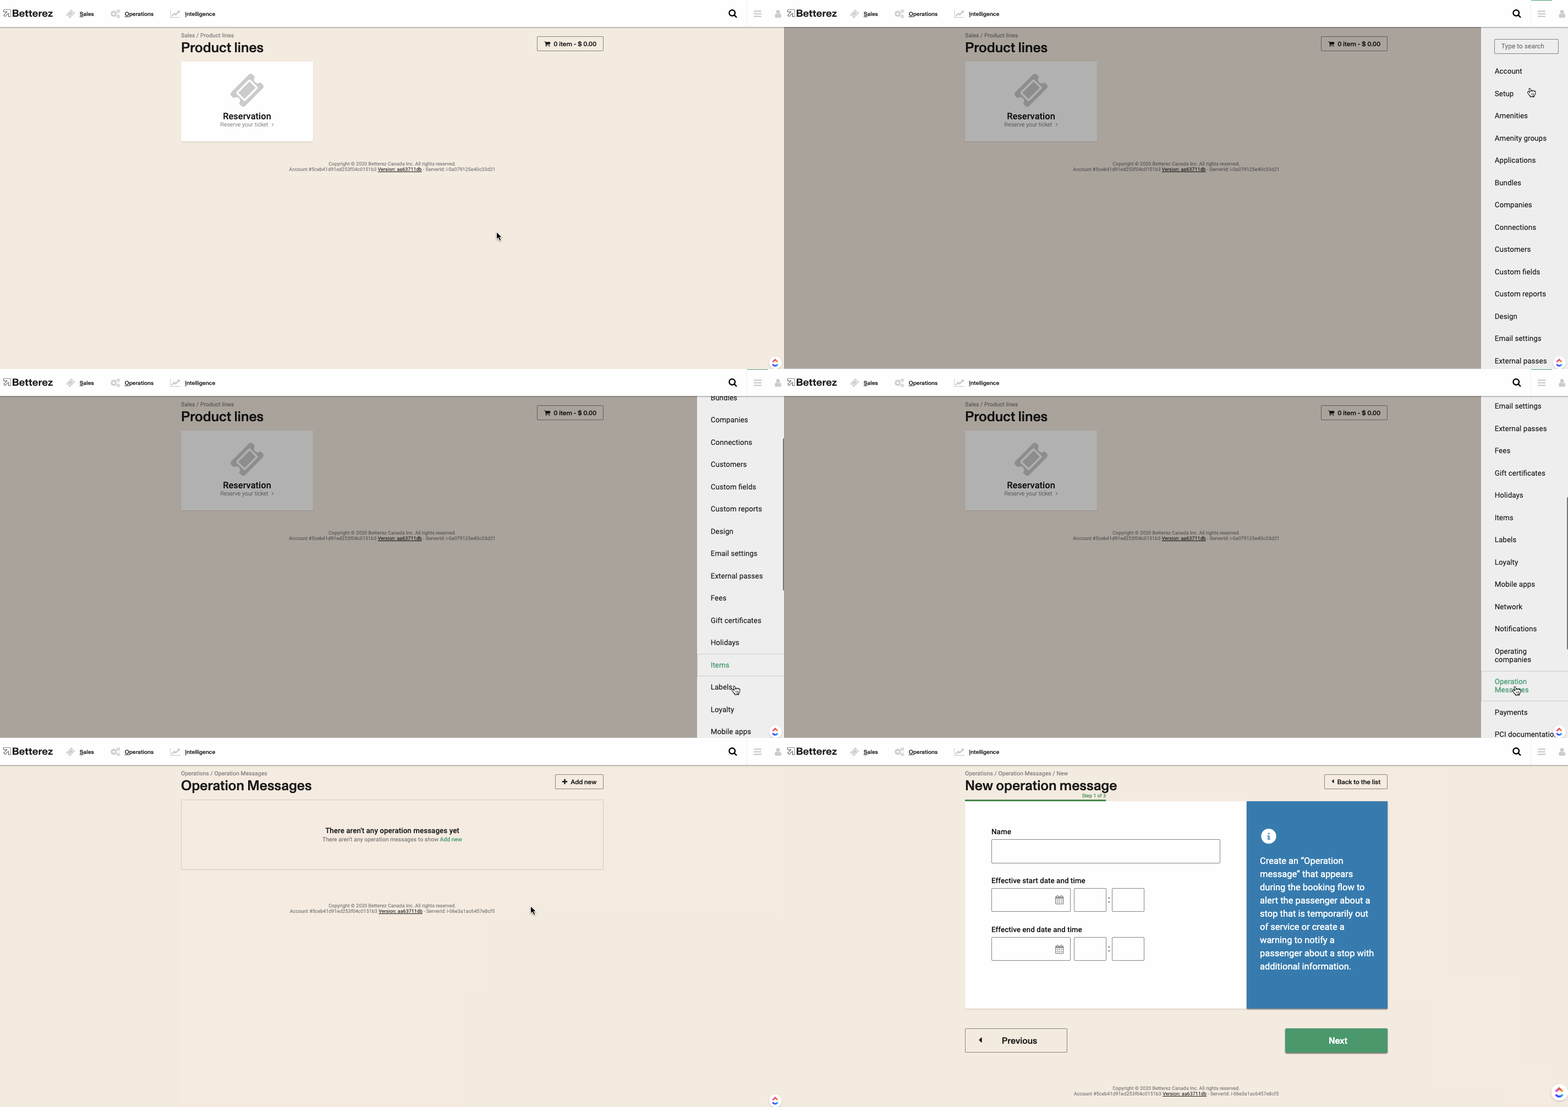
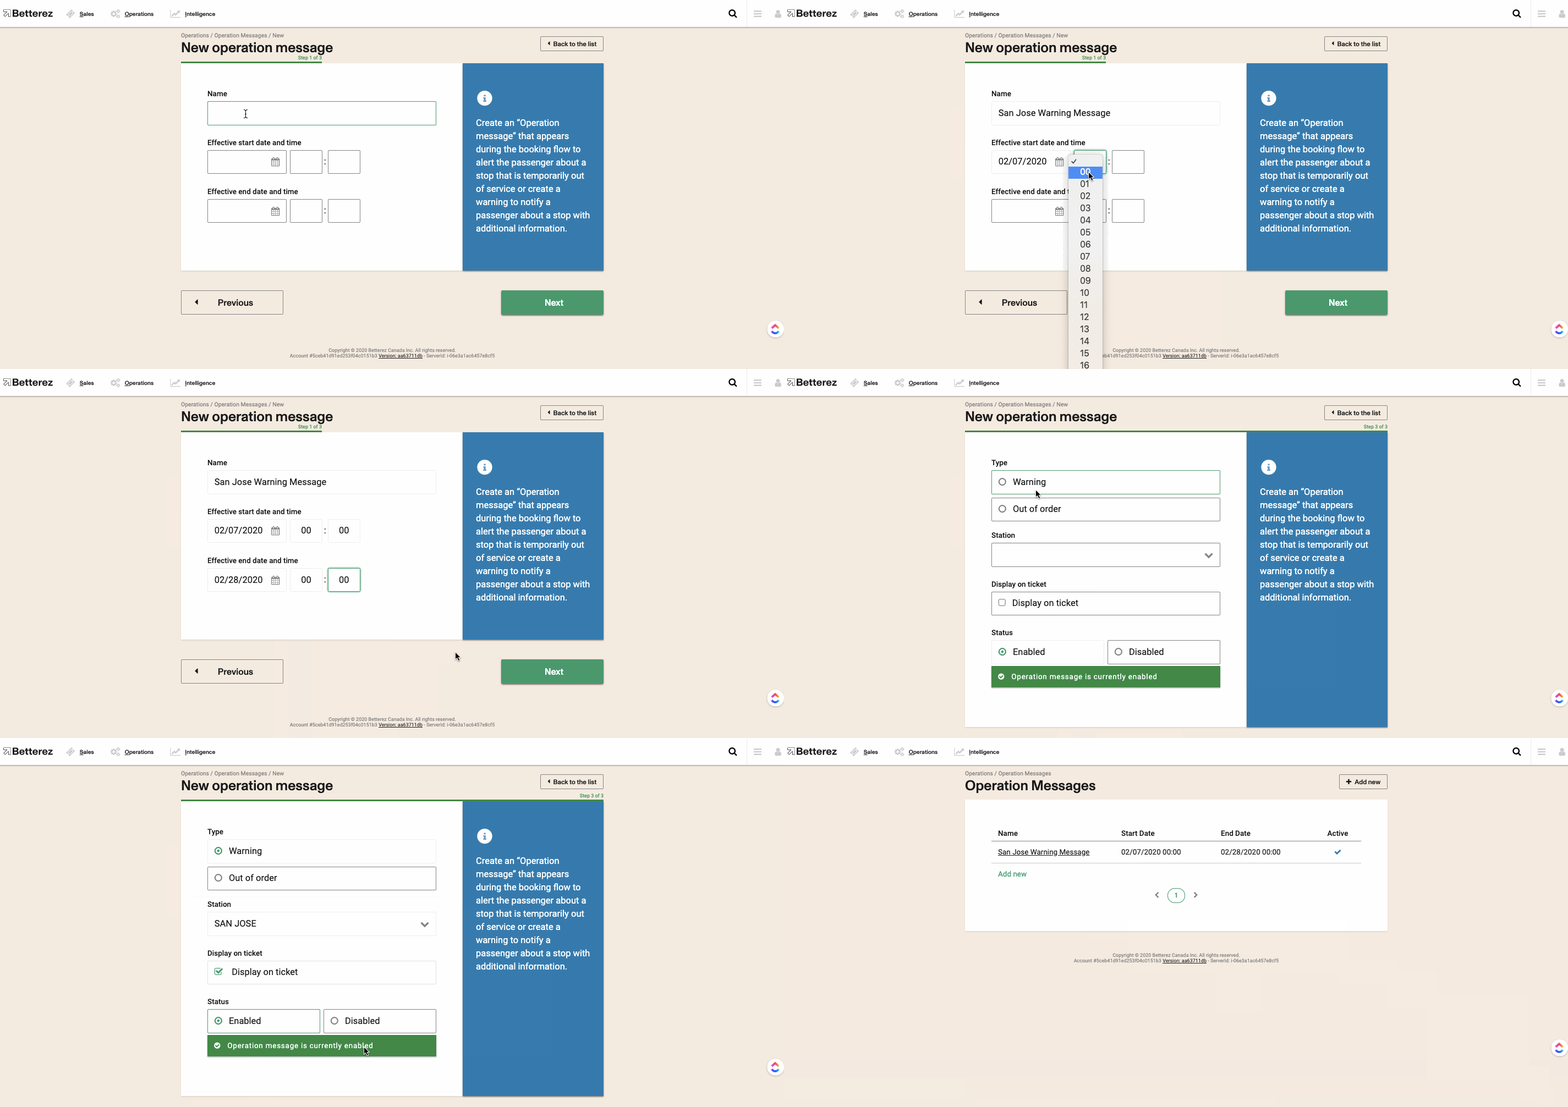
Name: Enter the name of your new operation message.
Effective start date and time: Enter the start date and time that you would like the operation message to appear in the UI.
Effective end date and time: Enter the end date and time that you would like this operation message to disappear from the UI.
Click Next to continue with the configuration.
Message Configure the message that you would like to appear in the UI. Note You can add HTML to these messages and also add hyperlinks for example: "Station has moved to .... Example URL Link"
Click Next to continue with the configuration.
Type
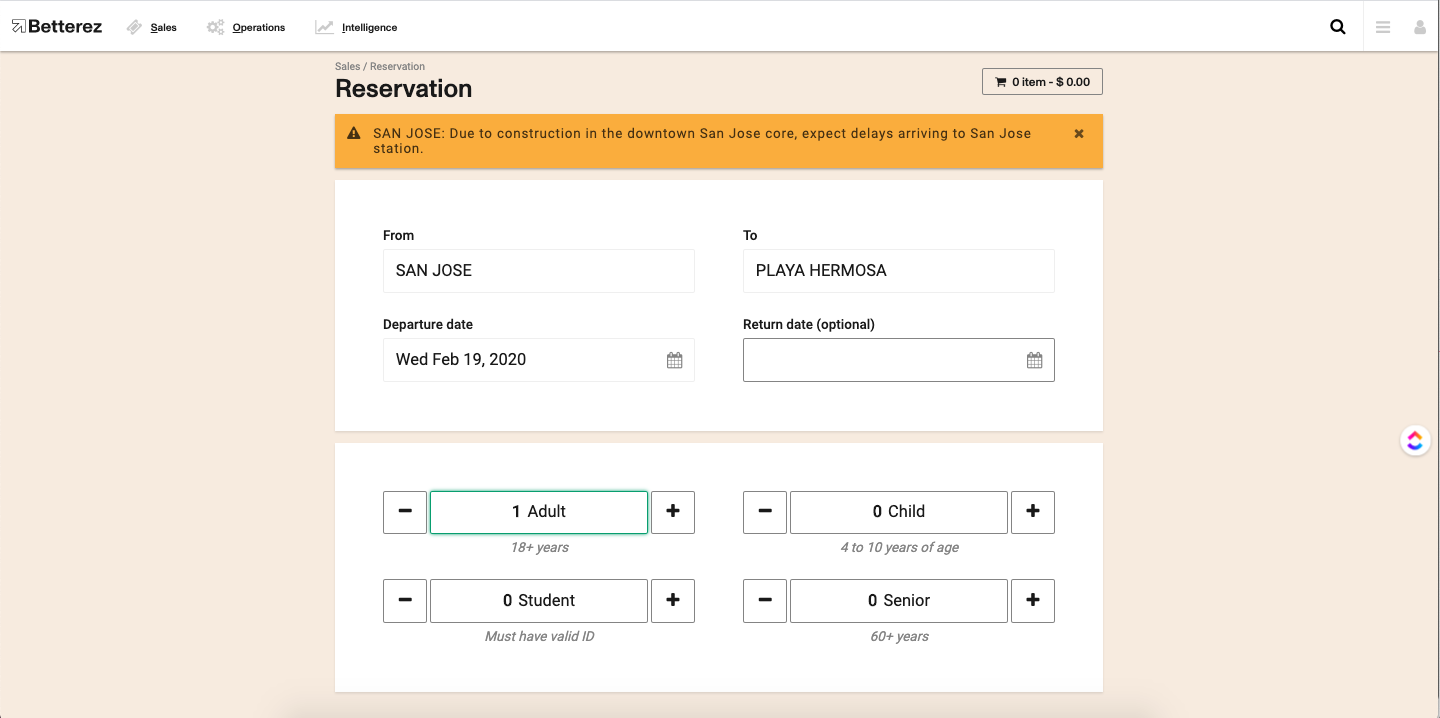
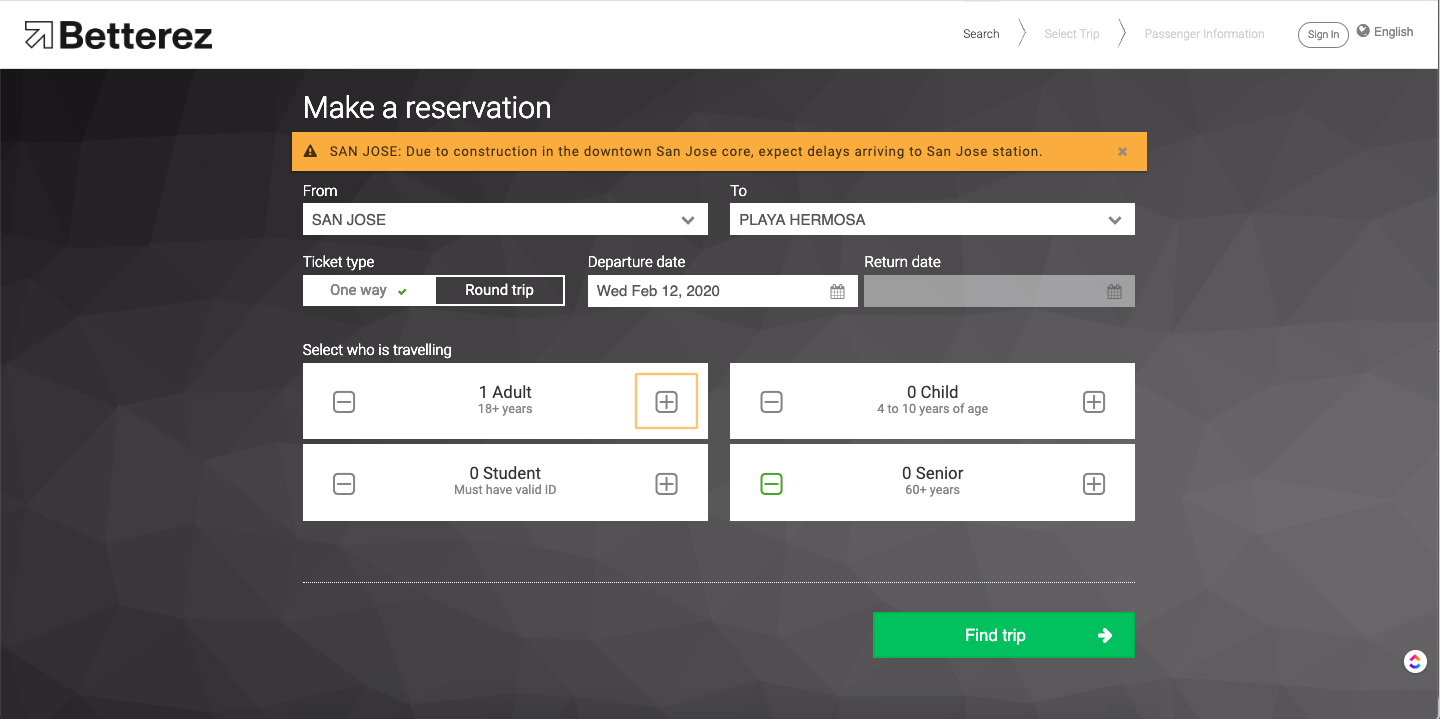
Warning If =true the operation message will appear as a warning (in an orange colour), but still allow the customer to proceed with the purchase. If warning is selected and a station is not associated to the warning, the warning message will apply to all stations network-wide.
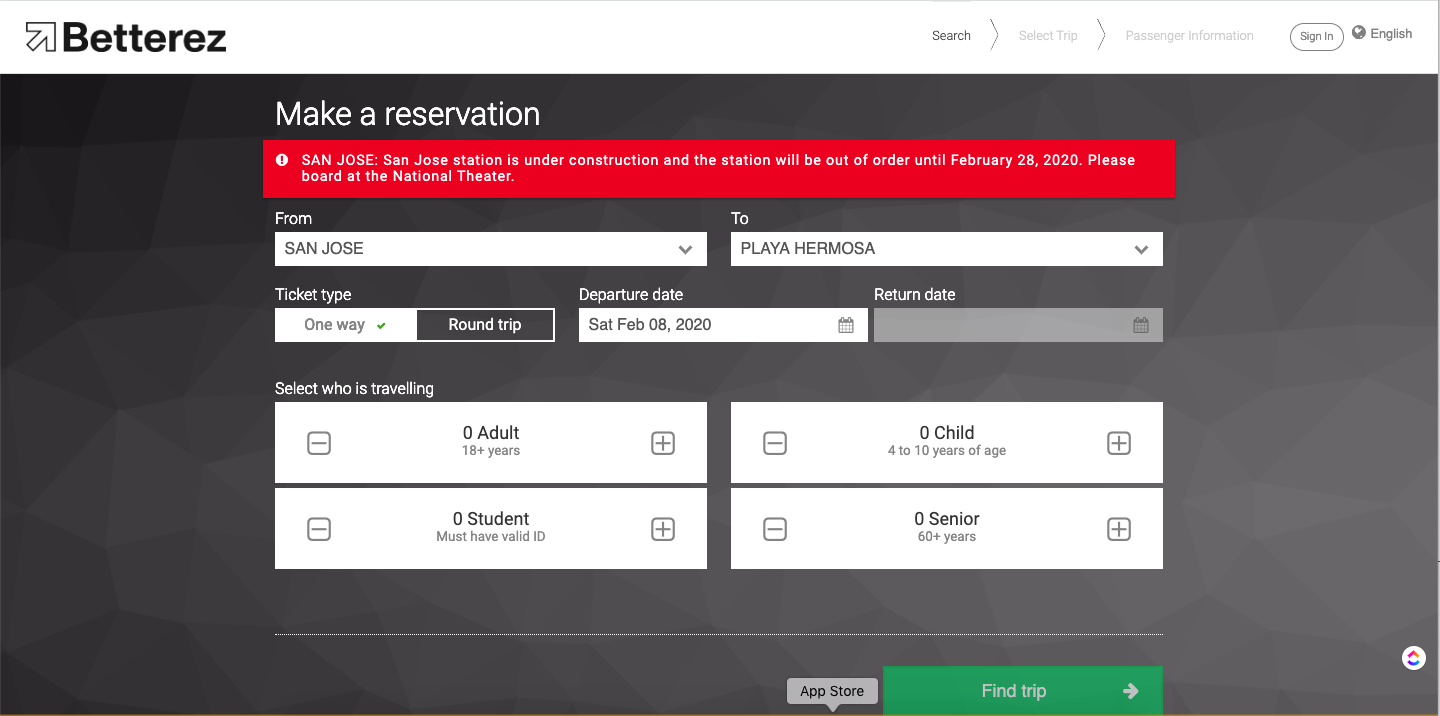
Out of Order If =true the operation message will indicate (in a red colour) that a particular station is not in service which will prevent the customer from proceeding with the purchase.
Station Select the station for which you would like to warning or out of order operation message to appear.
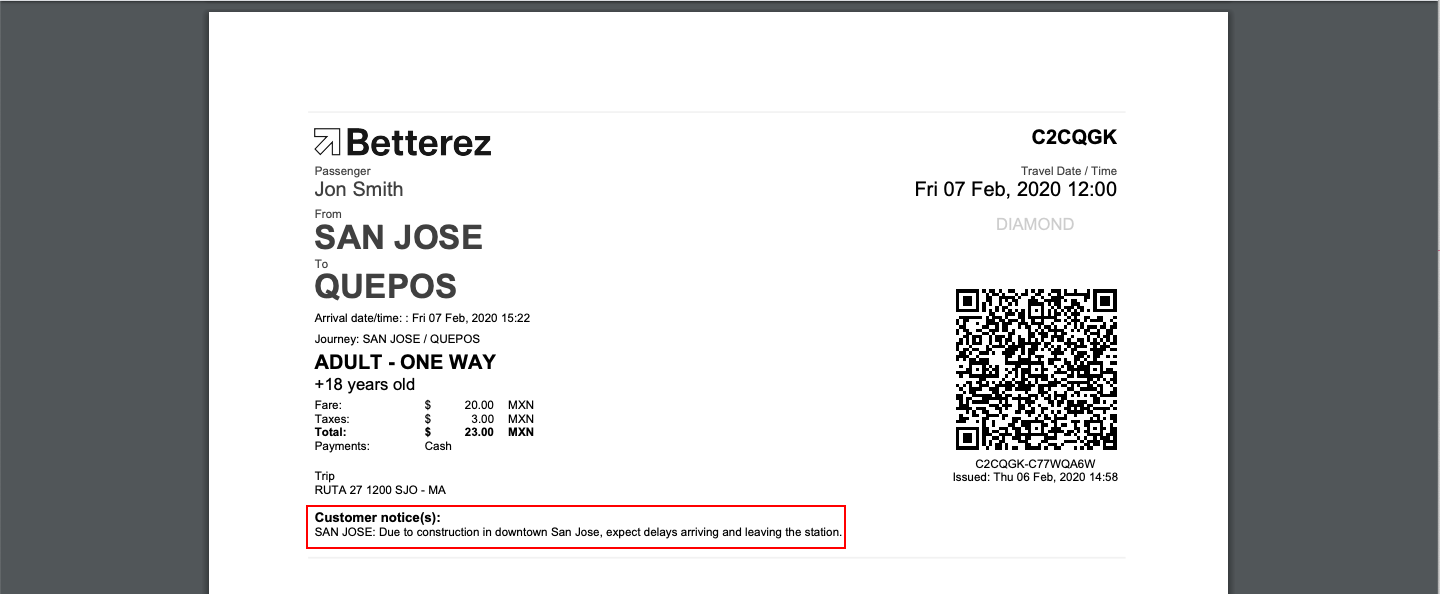
Display on ticket If =true if you would like the message to display on the ticket as a Customer notice.
Enable If =true the operation message will be enabled.
Disable If =true the operation message will be disabled.
Click Save to save your progress. The new operation message should now appear in the List of Operations Messages.
When the message appears on the trip search page, it is because the message applies to all schedules for the entire day.
When the message appears on the trip results page, it is because the message only to a portion of schedules for that day.
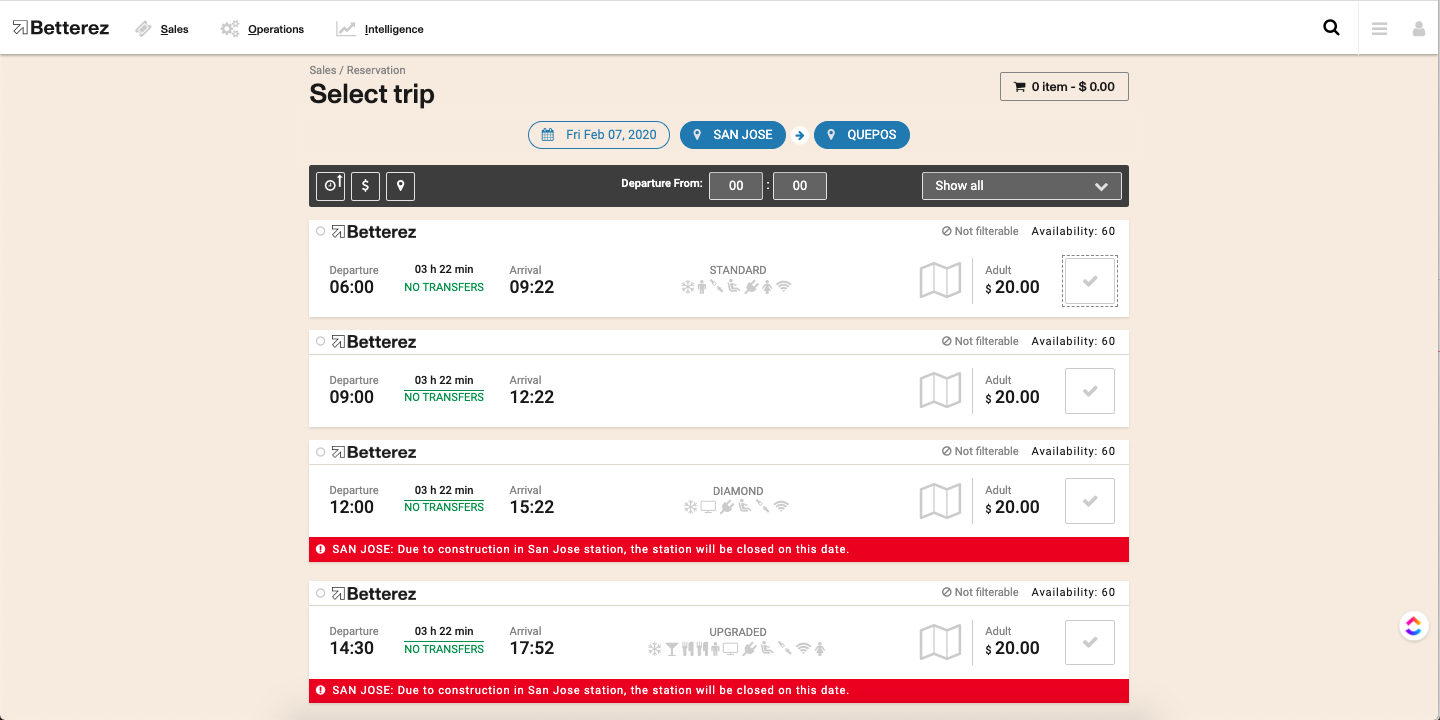
Operation messages that are configured will also apply to the websales channel.
The operation message has will now show on the ticket if selected under the Customer notice: section.
15: Promotion Setup
The Betterez platform allows a user to configure different types of promotions. Simply navigate to Admin -> Promos and select + Add New to arrive at the New Promo screen.
Coupon Code refers to the the code that will be assigned to the specific promotion.
Campaign Name is the name given to the promotion campaign
Name is the name that will appear in the drop down list in the shopping cart UI.
Disabled if checked, the promotion will not appear in the UI in the list of promotions to apply to a transaction.
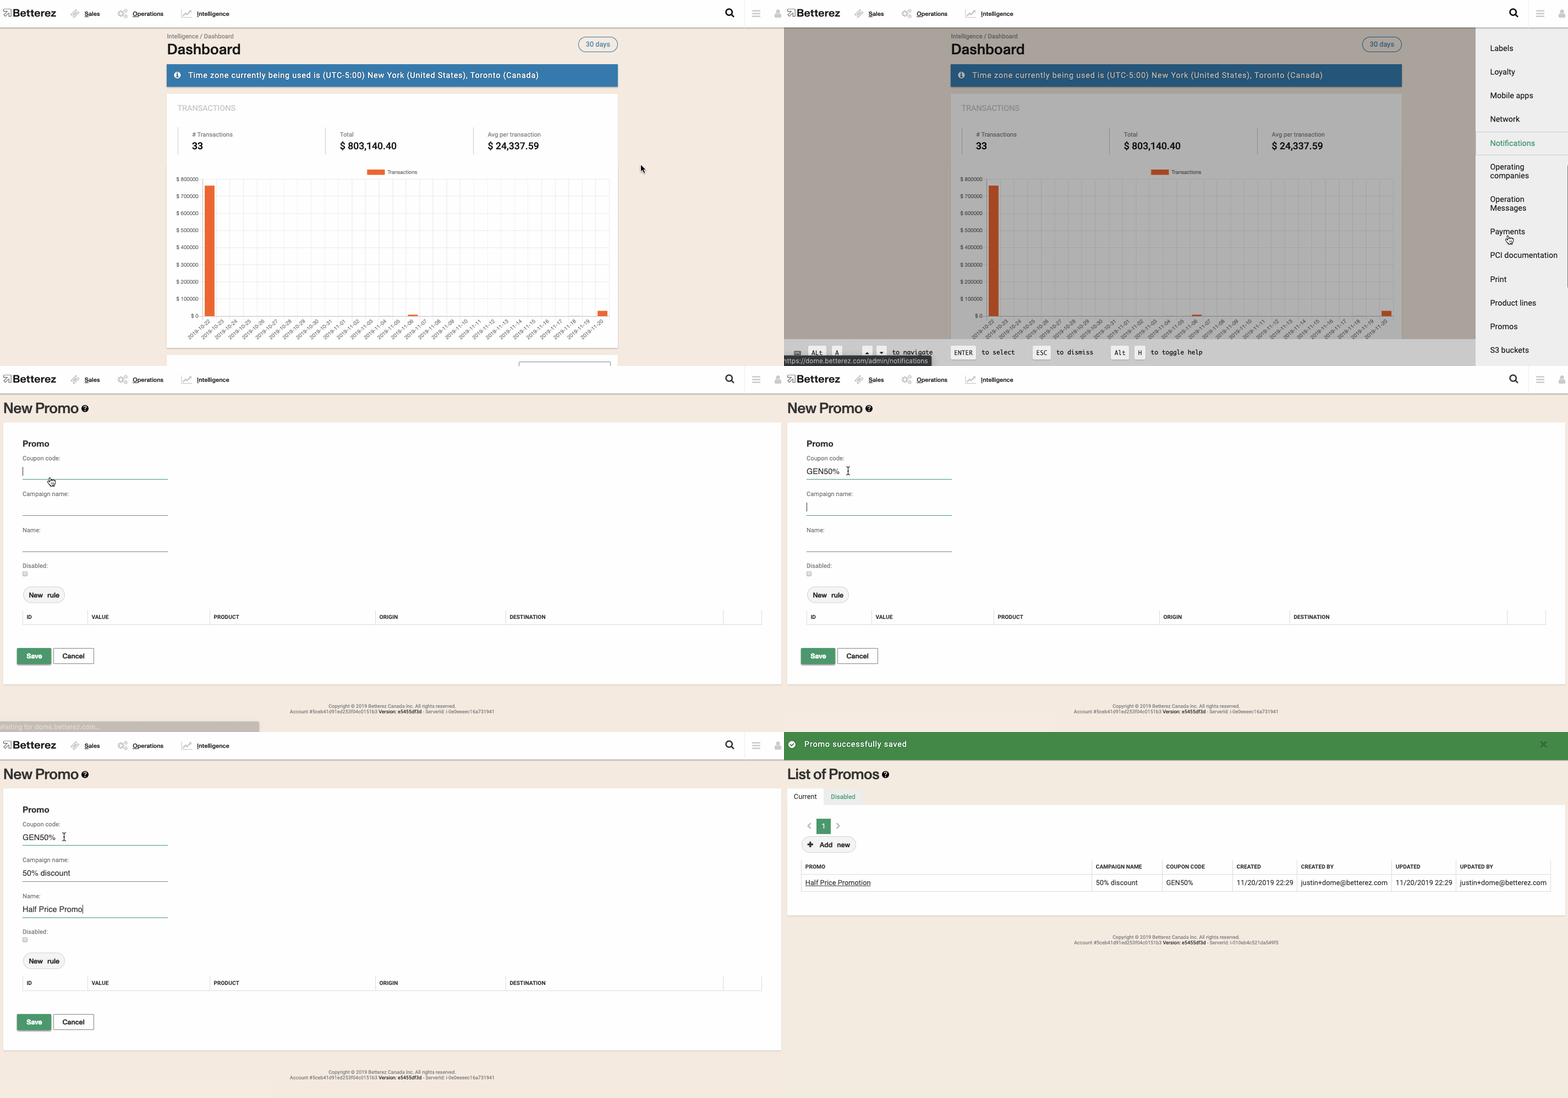
Click New Rule to add a new rule for the promotion. It is possible to create multiple rules for the same promotion/promotional campaign.
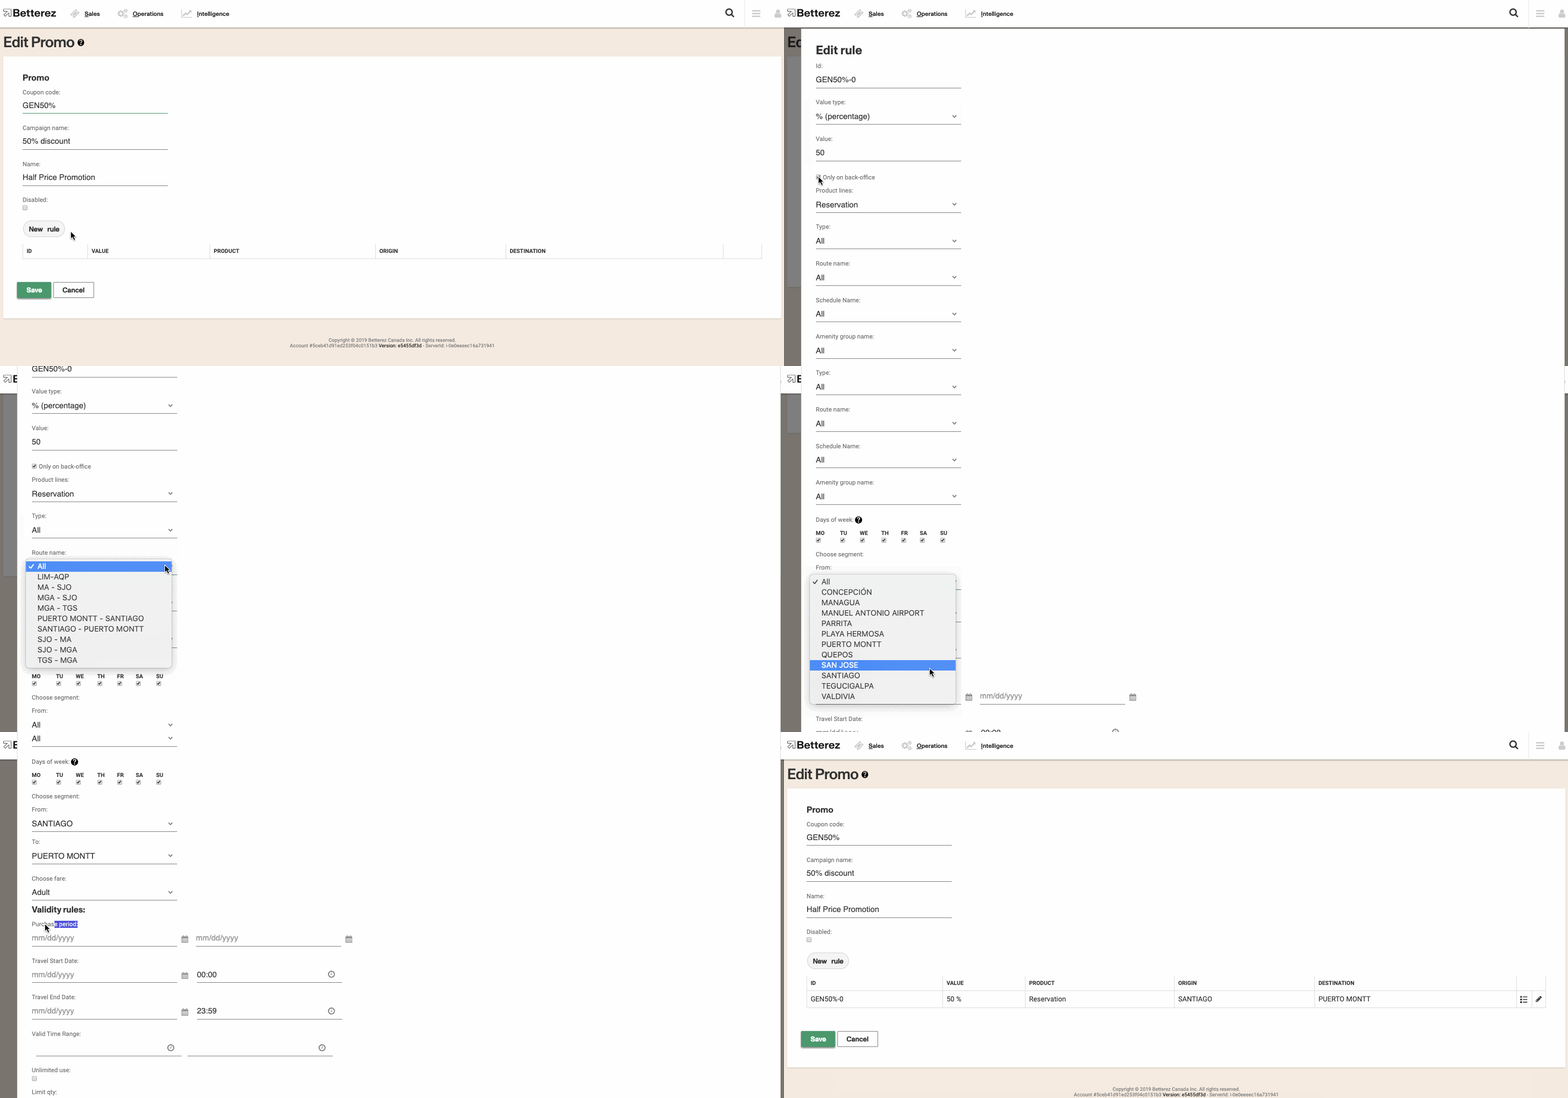
Value Type: refers to the whether the promotion type is a % (percentage), $ (dollar), or override price.
Value: refers to the actual amount of the percentage, dollar, or override price.
Only on backoffice: this flag will determine if the promotion is only meant for back-office use.
Promotions can then use a number of different factors or combination of factors to determine the eligibility of the promotion including:
by Product Line:
- Trip type - Assign a promo for all trip types or only one way, or round trip
- Route name - Assign a promo for all routes or only one specific route
- Schedule name - Assign a promo for all schedules or only one specific schedule
- Amenity group - Assign a promo for all amenity groups or only one specific amenity group
- Day of the week - Assign a promo for all days of the week or only one/a few day(s) of the week
Choose Segment:
- From: Assign a promo for all or only one specific origen
- To: Assign a promo for all or only one specific destination
- Fare Type: Assign a promo for all or only one adult, child, student, senior, etc
VALIDITY RULES:
- Purchase Period (valid purchases within a range of dates)- Travel Start Date (range of dates)- Travel End Date (range of dates)- Valid Time Range (range of hours)
Unlimited use: if this flag is checked, the promo will be for unlimited use.
Limit qty: if the unlimited use flag is left unchecked, the user can define the number of uses for the promotion before it becomes invalid.
CHANNELS
Back End - If checked enables the promo for the back-office.
Agency Back End - If checked enables the promo for the agency back-office.
Web Sales - If checked enables the promo for websales.
Agency Web Sales - If checked enables the promo for agency websales.
By checking all checkboxes, the promotion would be available in Back-End, Agency Back End, Web sales and Agency Web sales.
Here we can see how to use the previously created promotion in the shopping cart.
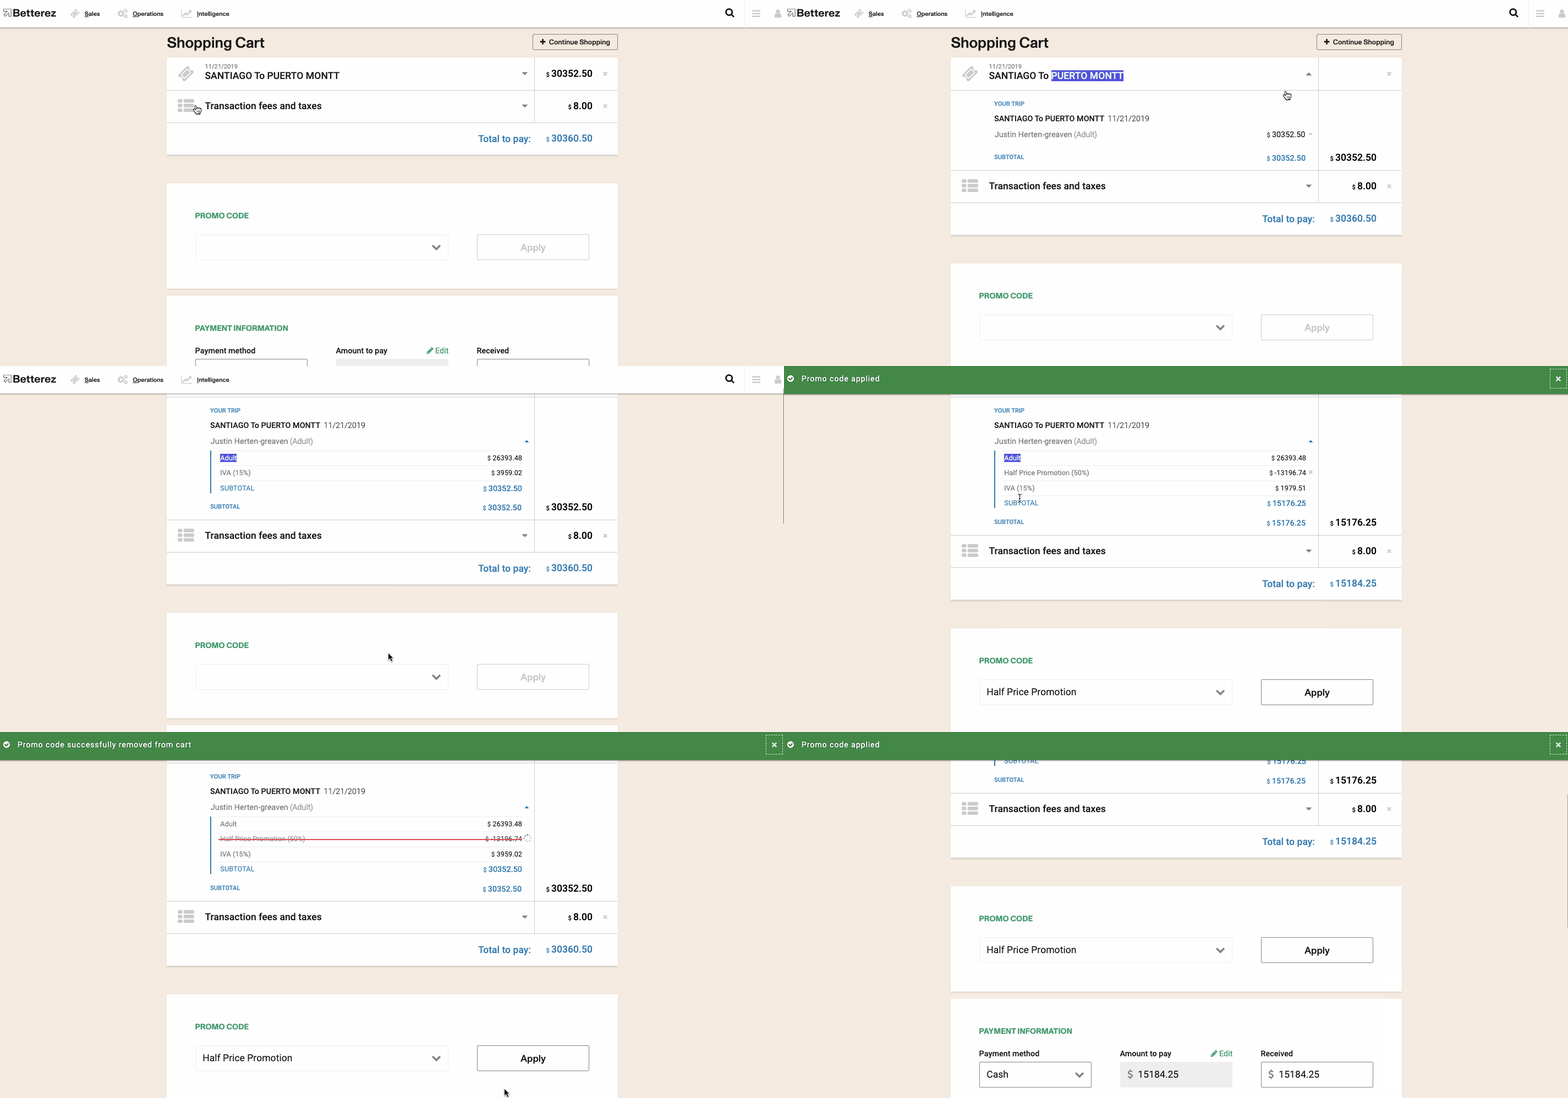
IMPORTANT NOTES ON USING PROMOTIONS:
- If the promotion was applied in error, simply clicking on the x will remove the applied promo from the shopping cart (as seen in the .gif above).- It is possible to apply multiple promos in the same transaction/shopping cart.
- Our promo code setup is designed to respect the lowest hierarchy rule (i.e. Product -> Type -> Route) first within the list of constraints. For example: if a customer configures the promo to be of type 'Roundtrip', but also to apply for a specific route, then the discount will only apply to the leg of the journey that is within the designated route (when choosing a round-trip transaction) rather than applying to both legs. This is because the return leg is part of a different route, and therefore a new promo rule needs to be created to discount both legs.
16: Product Lines
To start selling on the Betterez platform and depending on which Betterez products you will be selling, you will need to create a new product line(s). First, navigate to Admin -> Product Lines. In the New Product Line screen click +Add new then select the product type.
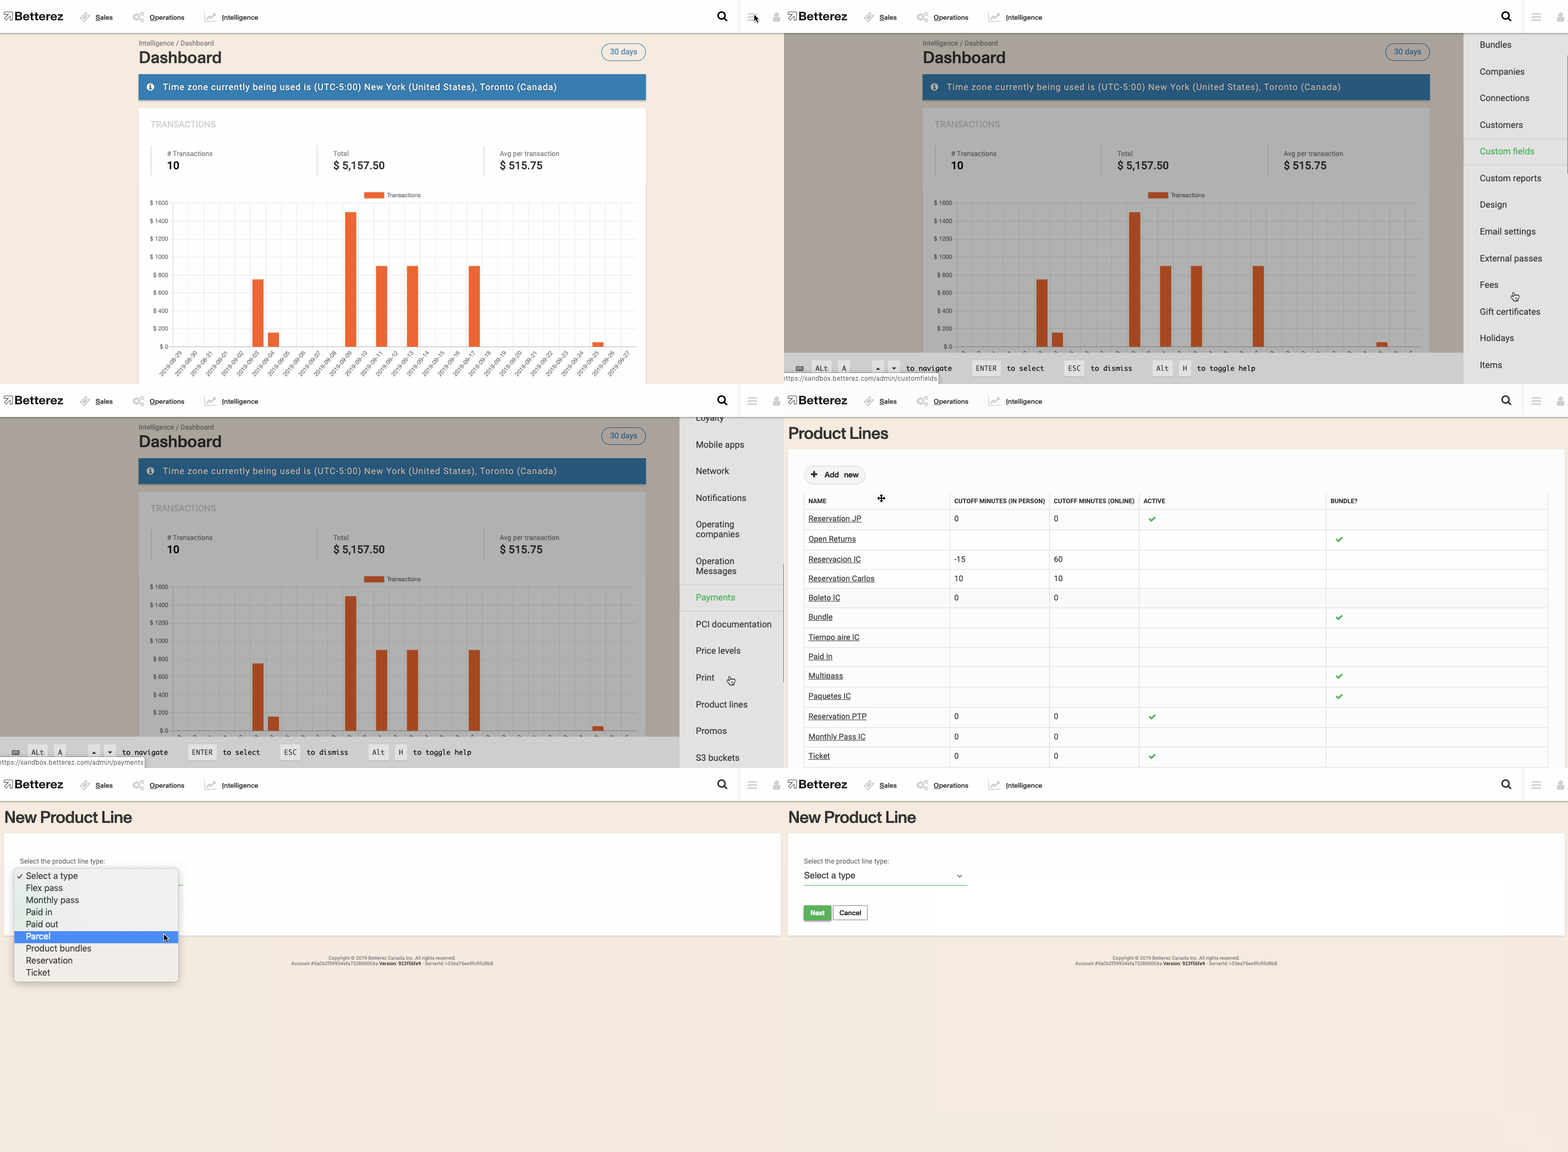
Here is a summary of what each product type does:
- Flex Pass -> Create a convenient and economical way for passengers to travel from certain origins and destinations with a pass that con be configured for specific periods of time and used to make reservations in advance.
- Paid in items -> This product is used if to sell ancillary items from your back office such as food, pillows, blankets, earphones, etc.
- Paid out items -> If an operator has expenditures and would like a shift to balance, paid out items are used.
- Parcel -> Sell parcel movements on your trips.
- Product Bundles -> Offer passengers discounts for multi-trip booklets.
- Reservation -> (Most commonly used Betterez product) Sell a ticket for a specific trip (date and time) with a specific, scheduled, origin and destination.
- Ticket -> Sell an open-ended ticket that provides a fixed origin and destination, but provides flexibility for when a passenger travels.