Page summary
Schedules
There are two different ways you can create a schedule for a route.
You can go to the route details page and click on the Schedules tab to go to the list of the schedules for that route and click on the Add new button (or edit an existing schedule, clicking on it's name).
The second form is to go to the schedules page directly using the Admin > Sales inventory > Schedules menu.

In the schedule list you can filter schedules for a given route if you wish.

To create a schedule, you can either click on the Add New button

Or you can choose to copy an existing schedule.
![]()
If your account has non-modifiable schedule fields configured in Operation Settings, when copying a schedule, those selected fields will be disabled and cannot be edited in the copied schedule form. This ensures that important schedule attributes remain unchanged during the copy process.
When copying a schedule with non-modifiable fields configured, those fields will appear disabled (greyed out) in the form and cannot be modified. For example, if fields like "Name", "Time", "Days of the Week", or "Holidays" are set as non-modifiable, they will be locked in the copied schedule form:

On the New schedule screen you will need to add the following details:
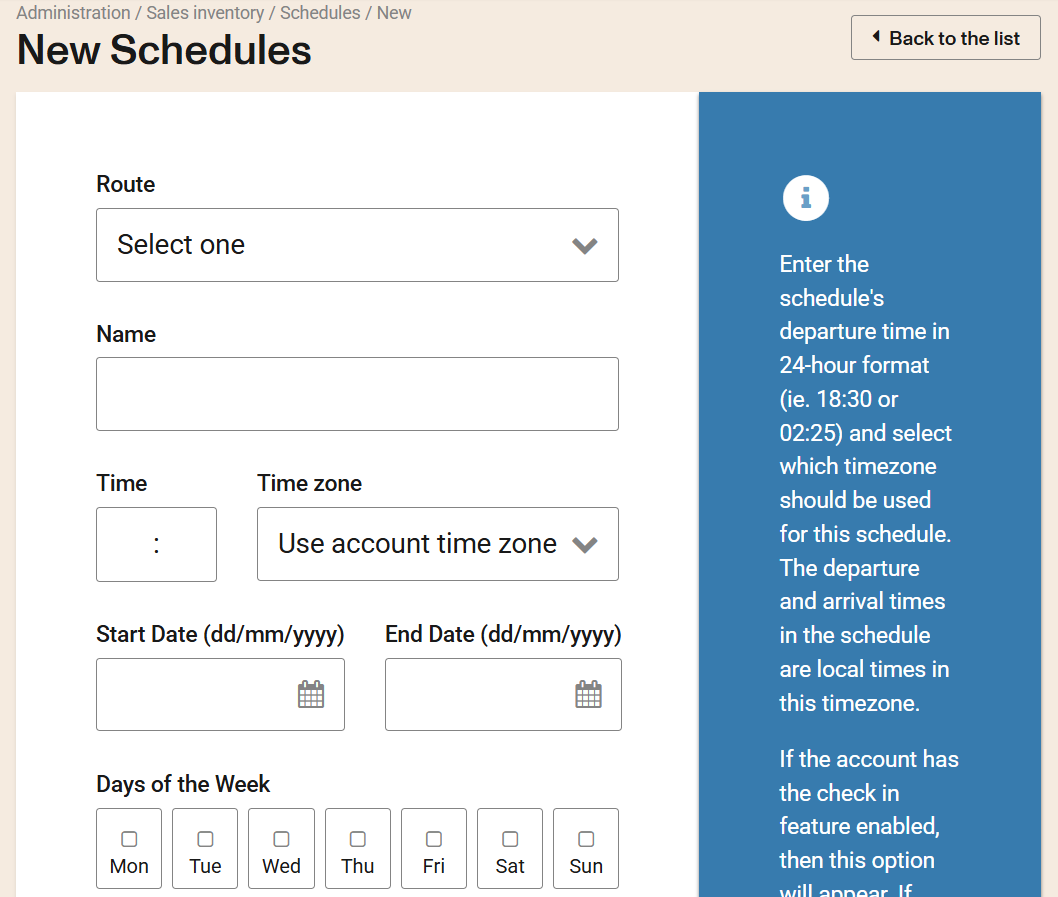
Basic information
Route: Select the route to add a schedule to. When editing an existing schedule, this field is read-only.
Name: Enter the schedule name. It is always useful to develop a consistent nomenclature for your schedules.
Time: Enter the schedule departure time in 24-hour format (e.g. 18:30 or 02:25). Times are based by default on the account's time zone, but may also be set according to the time zone of the first station in the itinerary. Use Update legs automatically when available to propagate a new start time to all legs.
Time zone: Select the time zone on which the schedule will be based. "Use account time zone" bases the schedule on the account time zone; "Use time zone of first station" uses the first station's time zone to be displayed in the sames flow.
By default schedules use the time zone of the account. If at least one schedule is required to use the time zone of the station (vs the time zone of the accoun) it is required to enable this configuration in the account settings so it shows the drop down at the schedule level.
Start date and End date: Enter the date range for which the schedule is effective.
Days of the week: Select the days of the week on which the schedule runs.
Holidays: Choose whether the schedule is affected by holidays: Included, Excluded, or Only. See creating holiday schedule to define holidays for your account.
Check-in: If the account has check-in enabled, this option appears. When selected, check-in is required in the sales flow for all manifests under this schedule.
Extra run: When selected, marks the schedule as an extra run.
Labels, brand and operations
Labels: Create or select labels (with colours and names) to tag tickets and other items.
Brand: Select and associate the appropriate brand.
Schedule for RMS: If your account uses RMS integration, you can link this schedule to an RMS schedule for reporting.
Operated by: If another company operates this schedule, select that operating company. The name and tax ID will appear on the printed ticket.
Amenity group: Assign an amenity group.
Travel route: If travel routes are configured, select the route type (e.g. Highway) that applies to this schedule.
Vehicle type: When vehicle types are configured for your account, select the type of vehicle for this schedule (e.g. Bus, Shuttle, Van, Train, Ferry, Tram). This is optional. The vehicle type is used in:
- Manifest API — When you get or update a manifest, the response includes a
vehicleobject with the schedule’s vehicle type (when set). - Webhooks — The
schedule.createdandschedule.updatedpayloads include avehicleproperty; manifest webhooks (manifests.created,manifests.updated,manifests.edited, etc.) also includevehiclewhen the schedule has a vehicle type. - Trip search results — Each segment in the trip result has a
vehicleproperty (_idandname) when the schedule (or manifest) has a vehicle type, so you can show vehicle type per segment in your sales or booking UI.
Schedule group: Select a group if this schedule belongs to one defined in the station configuration.
Default manifest status: Defines the initial status of the schedule: Published, Paused, Planned, Canceled, or Operations. When Published and fully configured, the itinerary is available for sale. Other statuses prevent sale; associated manifests inherit the status when no tickets have been sold.
Tax exempt: When enabled, indicates the schedule is tax exempt according to your account rules.
Control class: If your account uses control classes and you have permission, you can assign a control class to this schedule.
Seating and capacity

Vehicle: Assign a specific vehicle (physical unit). Vehicles must be created first; the user needs read access to "/operations/manifests/changeseatmap". This is separate from Vehicle type above, which describes the kind of vehicle (e.g. Bus, Shuttle) rather than a specific unit.
Seatmap: If the seatmap is already associated to the inventory (or the account uses the new version), the seatmap defaults accordingly. If the seatmap is associated to the selected vehicle, it can also default from that.
Capacity: Enter the capacity. If a seatmap is selected, capacity defaults to the seatmap’s capacity.
Each fare type has a different capacity limit:
You can specify the capacity limit for each fare type you have associated to the route.

If a seatmap is selected, the schedule's capacity is determined by the seatmap. For greater control, you can still set the capacity limit and add standing passengers.

Integrations
External ID: Optional identifier for external systems or integrations. Shown when the account uses schedule integrations.
Rebound
Rebound links a child schedule to a parent so it can dispatch automatically when the parent’s trip start time begins. Select the route and schedule to link as the rebound (child) schedule.

Legs
Create the different legs of the schedule with the appropriate departure and arrival times of each leg. Its important that if you wish to create a break at a stop, you can adjust the end time of one leg and the start time of the next, ex. arrive 10:45 and depart at 11:00 for a 15 min break.
Click Save to save your schedule.

Generate Legs
This button works for creating or editing legs from a schedule using all the stations of the route and starting with the time already defined and giving time gaps from station to station as defined in the segment information or a default of one hour.

It will also take in consideration wait times added to the route if those exist.
First, when creating or editing your schedule, make sure you already have the start time defined.

If the time has not been defined, when clicking on the “Generate legs” button, it will pop up this message:

Once the time has been defined, go to the Legs section and click on the button “Generate legs”

You will be able to select what stations you want to include in the new schedule based on the route the schedule is associated with.

Now you have all the stations configured in a schedule with an hour gap from each other that you can also edit.

Once saved the schedule will appear in the UI on the Edit Route page. From this screen, the schedule can be deleted (provided no seats have been sold on a manifest yet), edited, viewed or select a copy of the current schedule to create another one and generate further changes.

Finally, your schedule will not be found in the trip results if there is no price in the Fare Table. If you are going to use _Point to Point pricing method, you can set pricing right here in the Fare table section.
Since you have already added the stations which will be consider the Origin and Destination for each section of your trips, these will show on the Fare Table and you would only need to add pricing for each segment in the fare triangle. In order to learn how to add a fare table, click on our documentation to *Create a Fare Table
When creating or editing a Fare table we can set a range of selling dates (travel dates are set by schedule validity dates) in which the assigned fare table will take effect. You can start selling prior to the validity of your schedules as long as your fare table's "Effective date to" includes the validity dates of the schedule. If it doesn't you wont be able to sell. Ex: Schedule validity dates are Jan 1, 2030 to Jan 31, 2030. If your Fare table dates are from today to Dec 31, 2029, you wont be able to sell. Your fare table dates would need to be from today to Jan 31, 2030 to be able to find trips.
If enabled in your account, you will also be able to set up different tables for currency, seat classes, or fare classes.

If you are using Journey Pricing pricing method and assuming you have *uploaded your Journey Pricing CSV, your schedule is now ready for selling!
Add a new station in between existing stops of an active schedule
If you want to add new stops to a live schedule, follow the steps outlined below.
You can add a station and insert it in any section of the schedule. It would require modifying departure and arrival times in some cases.
In this example, we will be adding a new stop, (Montreal), at the begining of the schedule which will requiere to modify the starting time of the trip also.

Navigate to Admin > Sales inventory > Routes and select the route to be modified. Add the new stop in the station list, by clicking the pencil icon in the 'Route details' section.

The station must already be created in ordert to add it to the route. Once you have added the stop, click Add to add the station to the route.

You can then drag and drop the station in the order it should go.

Then Save and a message will pop-up notifying you that a new station will be added to the fare table. Click Accept.

Next, click on the Schedules tab to go to the schedules page

By default the system will show the active schedules. If you want to search for inactive schedules you need to click on on Show Filters.

Then adjust the filters accordingly.

Once you have your schedules resuls, click on the respective schedule id to modify it.

If you want to change the start time of the schedule, you can do so and the system will as you if you want to automatically update the time on all legs. By clicking on the button the system updates all legs according to the new start time respecting the time between departure from and arrival to each station.

Review the legs and times and make sure that the legs are connected, there cannot be jumps between them. Make sure the arrival time to a destination is later than the departure time from origin in each leg. If you have the arrival at destination prior to the departure of the origin station in a leg the system will take this as if the journey goes into the following day (since it can't go into the past) and this will make the trip an overnight trip.
You may use the map to double check the station locations and order as well.

Next click Save.
If you want to restrict that schedules always include the origin and destination of the route they belong, which means all the stations that are part of the Route and in their order, you need to enable this feature:
Go to Sales inventory/settings

So if you are editing a scheduled, and the following message pops up, means this feature is enabled:

To stop restricting it, you just have to disable it
In order for the new stop to be visible in the sales flow, you need to add a fare for all the stops it connects to. Click Fare Table and add the desired fare to the newly created empty cells.

Dont forget to click save.
You have now successfully updated your schedule.

If you want to change seatmaps or capacity, you need to do this kind of operation: expire + create a new schedule.
If you update the first leg and the new starting time for the schedule, it will update the manifests automatically.
The capacity for the schedule should be the same than the capacity in the seatmap, otherwise it will break exceptions.
If the station you are trying to remove has tickets sold in it, it wont allow you to delete it. It will show a message "The schedule can't be updated, it has existing tickets associated with it"
If you have more than one fare table (with different different effective dates) make sure the price is also showing in the first available fare table (even if expired) as well as your current fare table or it wont show trips to and from that station.
Troubleshooting / Common Issues
- When you have multiple fare tables, additional system restrictions are set. If you get an error message when trying to add new prices, try temporarily setting different effective dates, so that no tables have overlapping dates. Then make the price updates.
- If you want to change seatmaps or capacity, you need to do expiry the schedule first and create a new schedule (see below)
- If a trip is showing its arrival on the following day instead of the expected one, please check your schedule configuration. If the departure time on a leg is "earlier" than the arrival time, the system will consider a layover time of almost 24hrs.
Example:

- The capacity for the schedule should be the same than the capacity in the seatmap, otherwise it will break exceptions.
Expiring a schedule
During operation, there are exceptional events that may require you to do changes to one or more schedules. In this article, the process of expiring an old schedule to create temporary new ones will be described.
- Identify the schedule you want to change and click on edit.
- Change the expiration date as required. i.e. 3 days from today.
Until this point, the configuration will restrict any additional purchases after the expiration date. This will help to avoid more booked tickets. The next step is to move the tickets that are past the new expiration dates to the new (temporary) schedule.
- Create a new schedule with the corrected times and DOW.
- Important: The same O&Ds from a ticket must be available in this new schedule for you to be able to move it successfully.
- Go to the old expired manifests (on the 5DO) and select the now expired schedules

- Move the old tickets to the designated schedule. Consider that if there are several tickets under the same transaction, you can move them all at once.

If you want to change seatmaps or capacity, you need to do this kind of operation: expire + create a new schedule.
If the purpose of the expirtation of a schedule is to change stations, as you are not going to use one, be sure that all prices in faretables related top that specific station are deleted.
Each time you name a schedule, we suggest to use a unique name so they can be differentiated from others (even expired schedules).
The capacity for the schedule should be the same than the capacity in the seatmap, otherwise it will break exceptions.