Page summary
- Setting up the account
- Scanning workflows and modes
- Scanning workflows
- Trip Selection workflow
- Simple workflow
- Scanning modes
- Offline mode
- Online mode
- Trip Selection Settings
- Scanning Mode
- Visible Trips
- Only show trips assigned to the user
- Accept reservations boarding mid trip
- Accept boardings with equal or lesser value
- Cross product redemptions
- Accept open tickets for the reverse O & D
- Accept reservations for the reverse O & D
- Pre-select station based on GPS location
- Ticket Movements
- Open ticket scanning
- Scan validations
- Errors vs warnings
- Fare validations
- Check-in validations (since v7.23.0)
- Scanner app sales (since v7.2.0)
- Scanner app location tracking
- Parcel Scanning Working Flow
- Enabling Parcel Scanning Working Flow for the scanner
- Ticket unredeem
- Creating a valid NFC tag for a Pass
- Creating an NFC Pass with NFC Tools
- External passes
- Supported Validations
- Fallback codes
- Flex passes
- Setup
- Supported Validations
- Scanning Flex Passes
- Redeemable items (RI)
- RI Setup
- RI Supported Validations
Scanner account settings
Setting up the account
To use the scanning app for the first time it is necessary to configure the following items in the account via back office:
- Navigate to Admin -> Users to edit the user that will be using the app and update the display name, first name, and last name if it has not already been completed.

- Navigate to Admin -> Scanning to complete the configuration of scanner workflow & modes, preferences, validations, passes, and location. Click any of the previous links for more information on each topic.
Now the account is configured to use the scanning app!
Scanning workflows and modes
To see these options go to Admin -> Scanning section in back office.
Starting with v9.x.x Scanning workflows and modes have been merged into one single way of operating, so this settings will be ignored when using scanner v9.
Scanning workflows
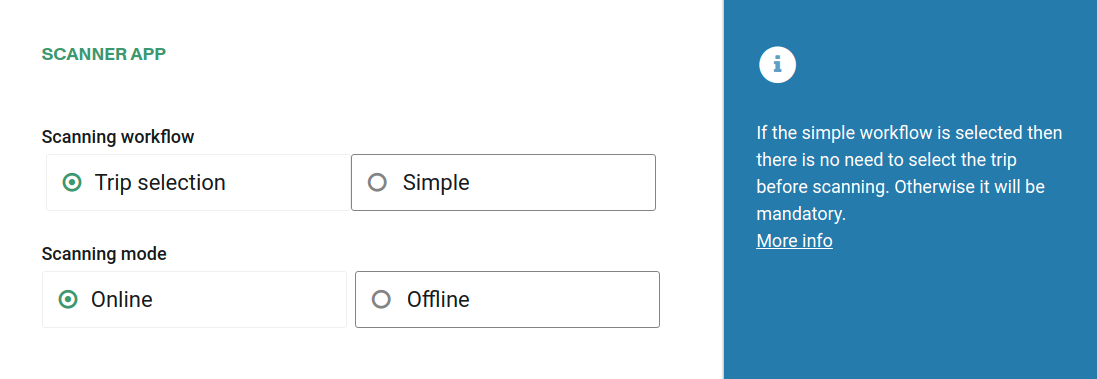
There are two different scanning workflows, one is the Trip selection workflow and the other is the Simple workflow.
Trip Selection workflow
If this workflow is selected, in order to be able to scan it will be mandatory to select the trip first. After selecting the trip it will be possible to scan the following:
- tickets from the ticket product type.
- tickets from the reservation product type.
- passes.
- fallback codes.
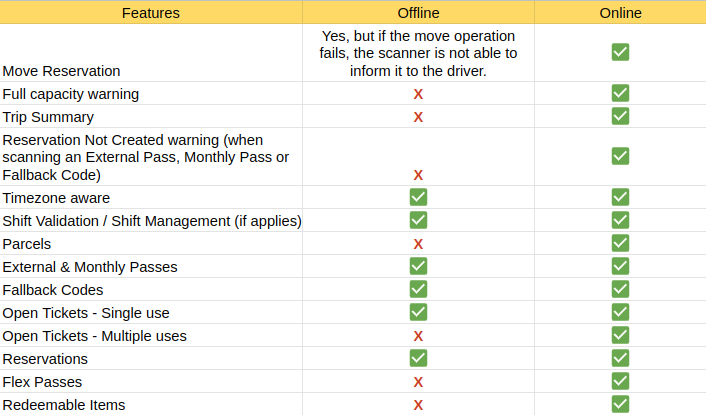
- parcels. since v4.0.1 (online mode only)
- monthly passes. since v4.1.4
- flex passes. since v5.11.10 (online mode only)
- Sell tickets from selected products on manifest without seatmaps since v7.2.0 (online mode only)
- Redeemable items since v7.15.2 (online mode only)
With this workflow it is also possible to enable all the validations depicted in the next section Scanning validations.
This workflow is supported in online or offline mode.
Keep in mind that some features are not available in offline mode. For a quick reference please check the following table:
Simple workflow
If the simple workflow is selected then there is no need to select the trip before scanning. The user simply logs in, taps on Scan and will be able to scan the following:
- tickets from the ticket product type.
- tickets from the reservation product type.
- tickets from the event product type.
- tickets from the commuter pass product type.
- parcels. since v4.0.1
It is not possible to use scan validation when using Simple workflow, except for the Fare validations which are available in either Simple or Trip Selection workflow.
Online mode is the only available mode for this workflow.
Scanning modes
There are two available modes: Offline and Online.
Offline mode
This mode can only be used with the trip selection workflow. An Internet connection is not needed to be able to scan, however, it will be necessary to download the data first (trips, tickets, passes and fallback codes) using Internet connectivity. After scanning, Internet will also be needed to upload all the redemptions.
Online mode
The online mode can be used for the trip selection workflow and it is the default mode for the simple workflow. With this mode an Internet connection is required for each scan so it is not necessary to download data or to upload the redemptions.
Trip Selection Settings
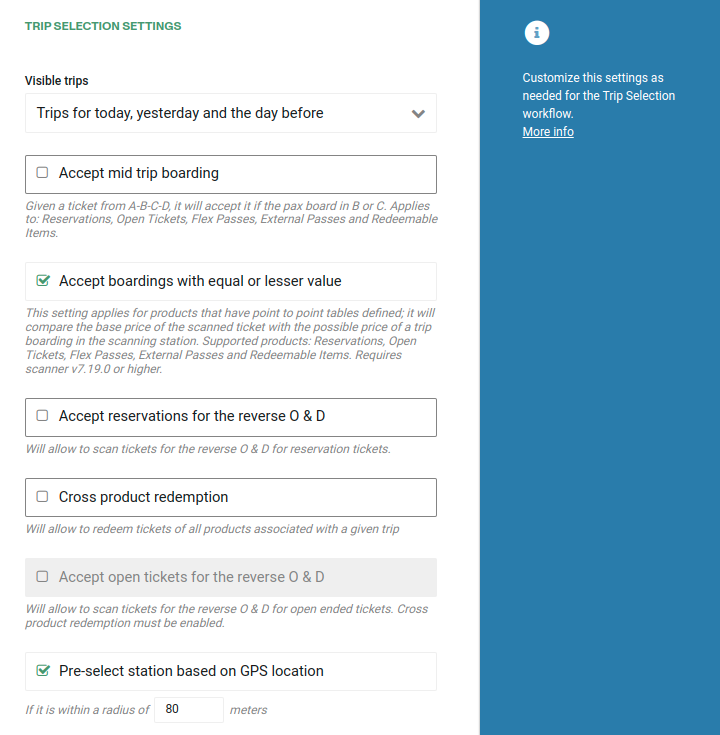
To see these options go to Admin -> Scanning -> Scanner App section in back office.
Scanning Mode
This option allows the user to select offline or online mode.
Visible Trips
This option allows to select trips on the scanner that may be started 1 day ago (or more) and are still on the road.
Only show trips assigned to the user
If set, the user will only see the trips assigned to him/her. Unless the user has the setting "Can see all trips in drivers app" enabled under admin/users.
Accept reservations boarding mid trip
With this option if we have a ticket from A to D in a route that is A-B-C-D and the passenger boards in B or C then the redemption will be valid.
Accept boardings with equal or lesser value
By enabling this option, the passenger can board before or after the expected station as long as the price is same or lower.
Cross product redemptions
This option will allow to redeem tickets of all the products associated with a given trip. For example, if we have a reservation product associated to a given trip and we also have a ticket product associated to it then we will be able to redeem the tickets related to the ticket product.
Accept open tickets for the reverse O & D
This options will allow to scan open tickets for the reverse O & D. Cross product redemption must be enabled.
Note: Open ended tickets only works in online mode
External Passes, Flex Passes and Redeemable Items always allows reverse O & D, regardless of this setting.
Accept reservations for the reverse O & D
This options will allow to scan reservations for the reverse O & D.
External Passes, Flex Passes and Redeemable Items always allows reverse O & D, regardless of this setting.
Pre-select station based on GPS location
When working on trip selection workflow the station selector will pre-select the station based on the current location of the device.
If it does not preselect the station it could be for one of the following reasons:
- The radius that it uses to look for near stations is too short (or none has been set). It could be changed from back-office under admin --> scanning --> Pre-select station based on GPS.
- The device could not retrieve the current location. In general this error is temporary.
Location retrieval only works when the app is in foreground, i.e, If the user switch to other app, or the screen goes off, Android may pause the scanner app to free device's resources. Also if the scanner app is closed by the user it will stop sending location updates.
Ticket Movements
Ticket movements happens when a ticket that has an assigned schedule is scanned on a different one. i.e scanned on a different schedule or same schedule but different date.
It also may happen withing the same schedule if passenger onboards at a different station (and settings allows this).
Keep in mind that ticket movements are related to the following validations: Validate Trip, Validate Date, Validate O&D.
Validate Trip
Whenever the schedule on the ticket doesn't match the one in the selected trip:
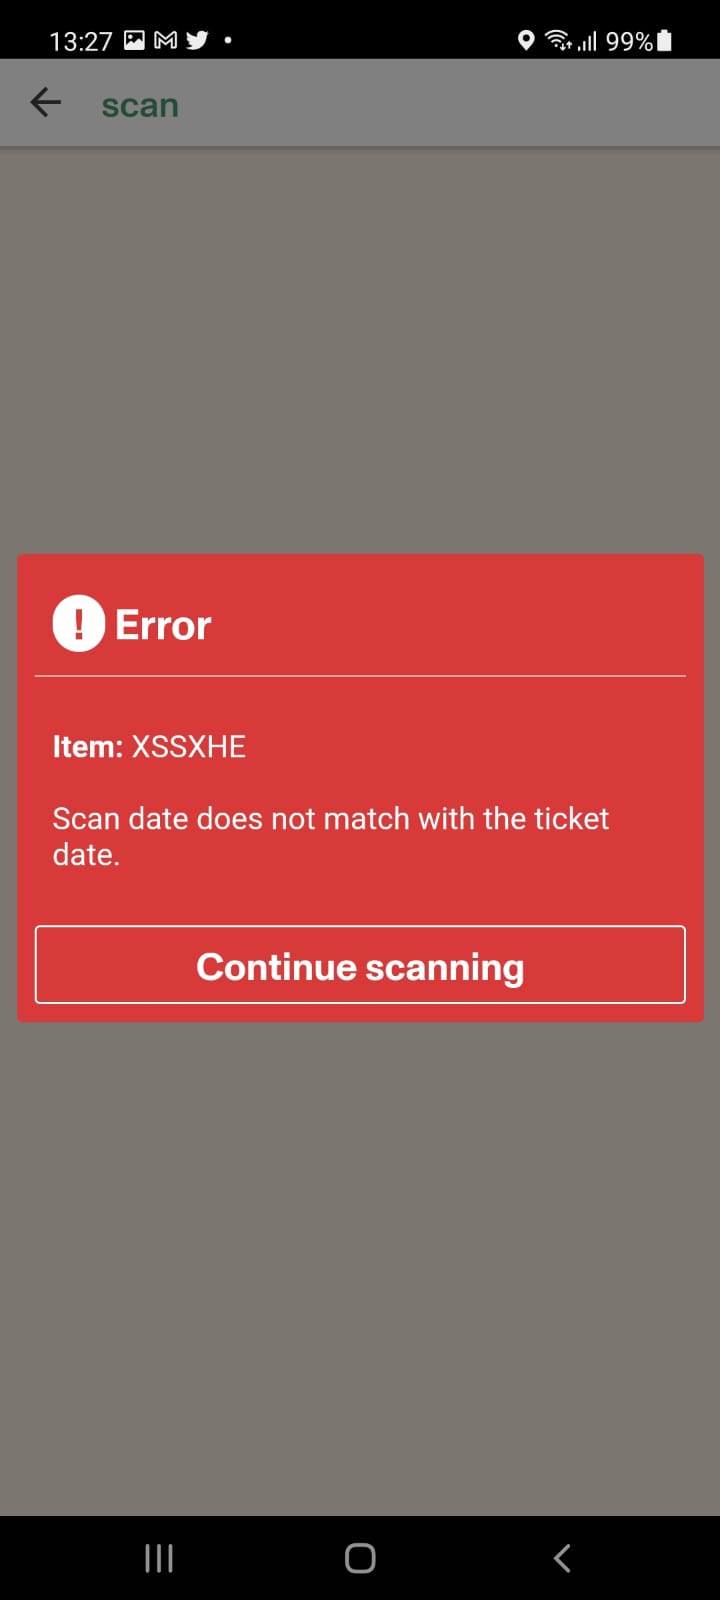
- Enabled - Error: It is not possible to scan the ticket.
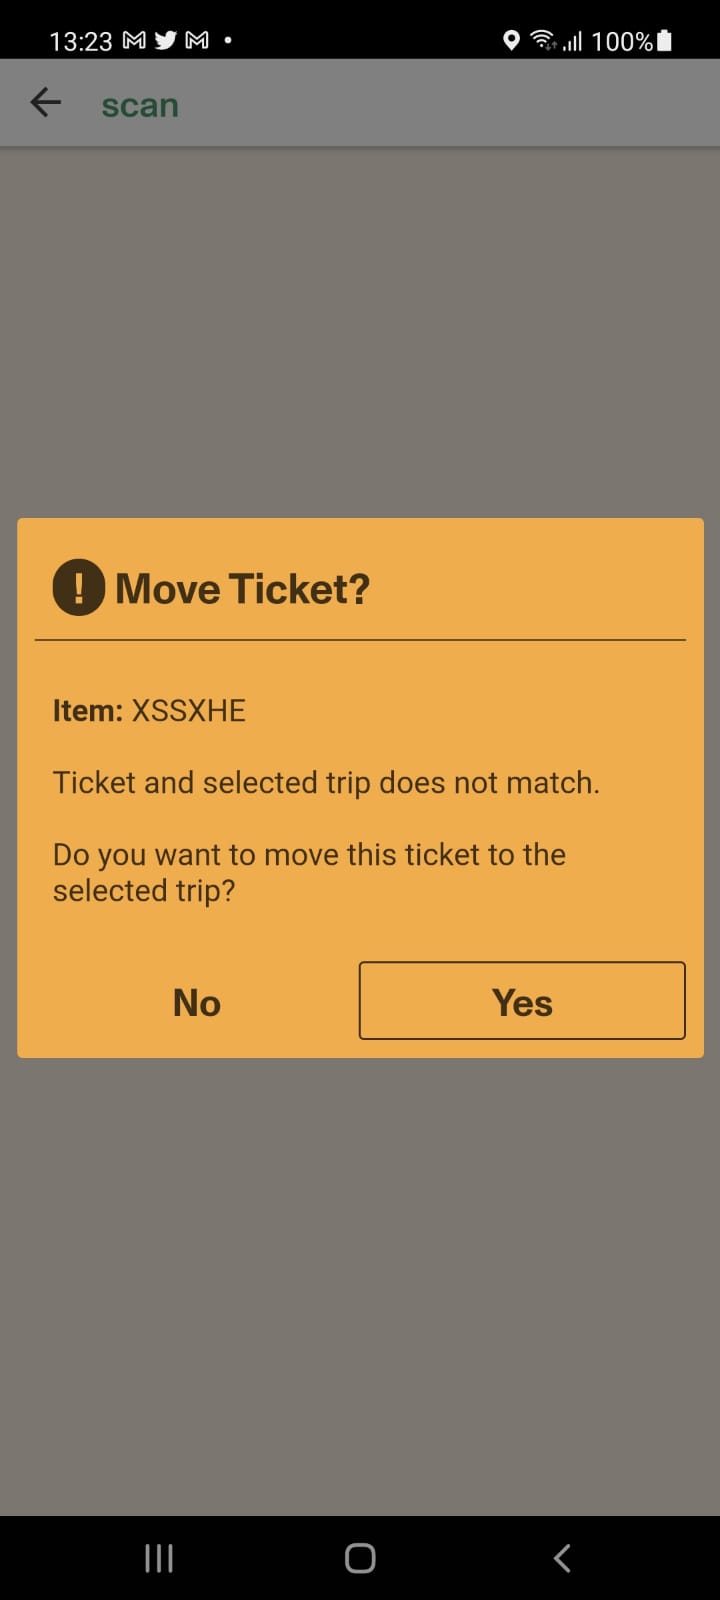
- Enabled - Warning: The driver will be asked if they want to move the ticket or not.
- Disabled: If the movement is possible the system will do it without asking.
Validate Date
Whenever the date on the ticket doesn't match the one in the selected trip:
- Enabled - Error: It is not possible to scan the ticket.
- Enabled - Warning: The driver will be asked if they want to move the ticket or not.
- Disabled: If the movement is possible the system will do it without asking.
Validate O&D
Whenever one of the stations on the ticket doesn't belong to the current trip:
- Enabled - Error: It is not possible to scan the ticket.
- Enabled - Warning: The driver will be asked if they want to move the ticket or not.
- Disabled: If the movement is possible the system will do it without asking.
Open ticket scanning
Open tickets do not have a manifest assigned. However, when scanned they will get the proper manifest assigned to them.
In the case the manifest uses seatmaps, the first available seat will be assigned to the ticket and showed in the scanner app.
Scan validations
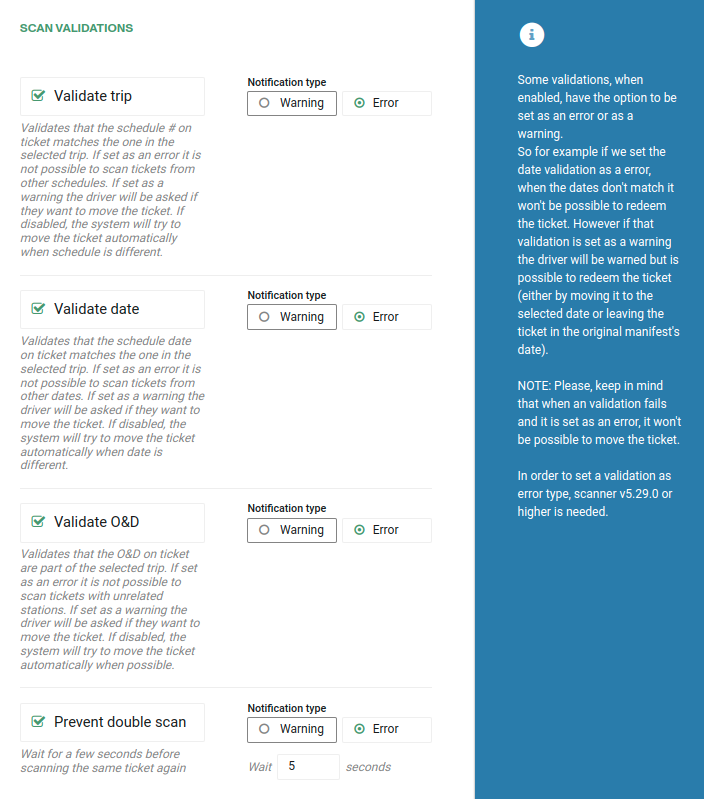
To enable the different scan validations navigate to Admin -> Scanning -> Scan validations section in back office.
In this section you will find the following validations:
Validate trip: Validates that the schedule # on the ticket match the selected trip. This validation is available for the trip selection workflow.
Please, read Ticket Movements section to understand how this validation relates to movements.
Validate date: Validates that the date on the ticket match the selected trip date. This validation is available for the trip selection workflow.
Please, read Ticket Movements section to understand how this validation relates to movements.
Validate O&D: Validates that the O&D on the ticket are part of the selected trip. This validation is available for the trip selection workflow.
Prevent double scan (for open tickets with multiple uses): This validation will warn the person scanning if it scans accidentally twice the same ticket in a short period of time. This validation is available for the trip selection workflow with online mode.
Errors vs warnings
Some validations, when enabled, have the option to be set as an error or as a warning.
So for example if we set the date validation as a error, when the dates don't match it won't be possible to redeem the ticket. However if that validation is set as a warning the driver will be warned but is possible to redeem the ticket (either by moving it to the selected date or leaving the ticket in the original manifest's date).
NOTE: Please, keep in mind that when an validation fails and it is set as an error, it won't be possible to move the ticket.
By default all validations are warning type.
Validation set as warning:
Validation set as error:
Fare validations
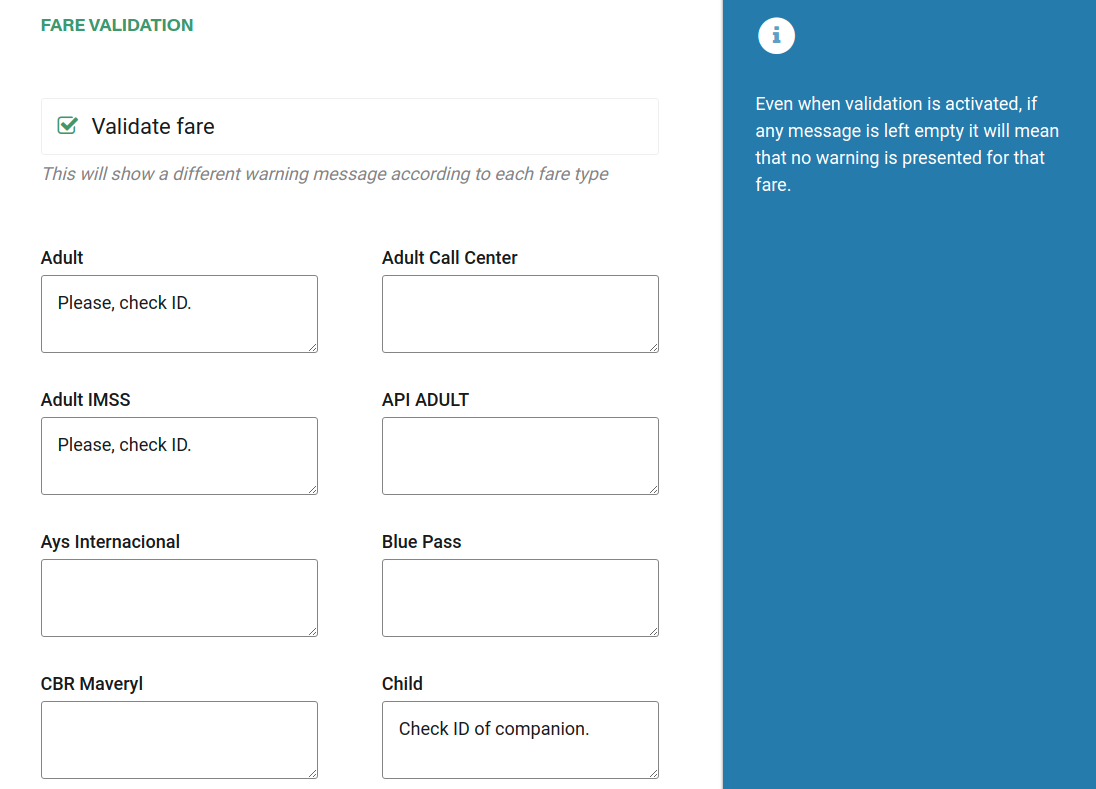
Validate fare: This validation will warn the person scanning with the custom warning the user creates for the ticket fare. In this section the user is allow to create custom warnings for each fare and that custom warning will be displayed if a ticket with that fare is scanned. This validation is available for any workflow.
Check-in validations (since v7.23.0)
Validate check-in status: This validation allows to set a custom message that will show up a different message according to the check in status of the passenger when scanning the ticket.
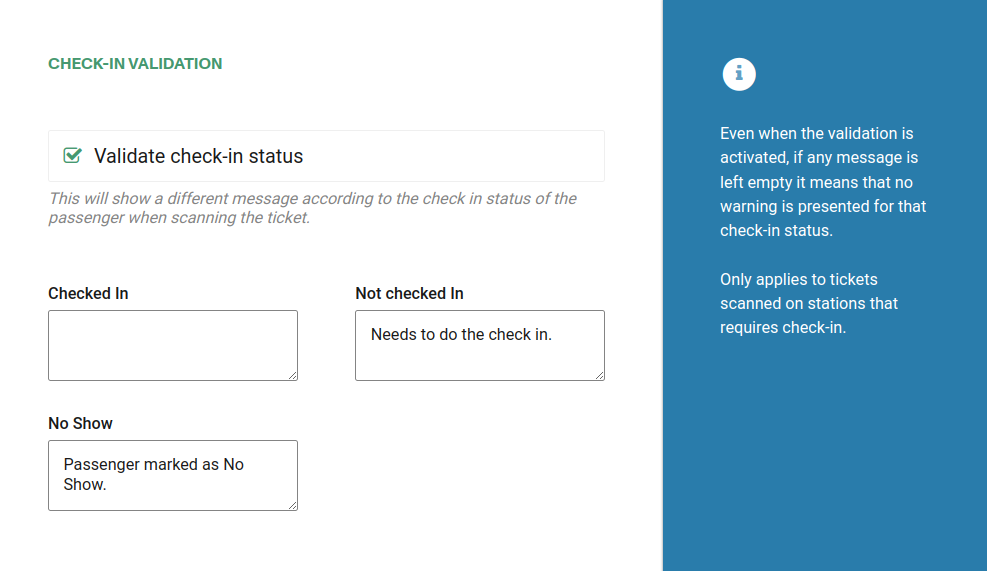
Even when the validation is activated, if any message is left empty it means that no warning is presented for that check-in status.
Only applies to tickets scanned on stations that requires check-in.
Scanner app sales (since v7.2.0)
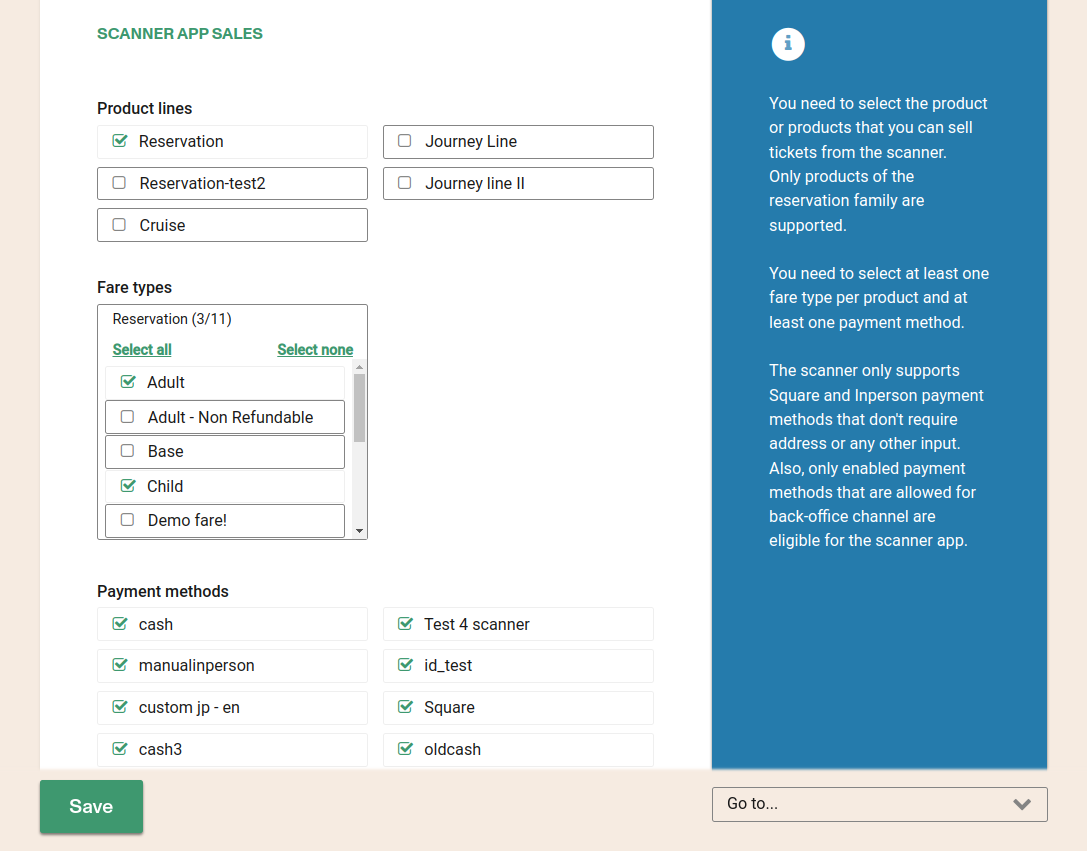
The first step to start selling in the app is to configure the following in backoffice (under admin/scanning)
Products
You need to select the product or products that you can sell tickets from the scanner. See below supported product families.
Only products of the reservation family & paid in items are supported.
Fares
You need to select at least one fare type per reservation product.
Payment methods
You need to select at least one payment method. See below supported payment methods.
The scanner only supports Square and InPerson payment methods that don't require address or any other input.
Also, only enabled payment methods that are allowed for back-office channel are eligible for the scanner app.
If you need to configure Square payment method, please follow this guide.
Scanner app location tracking
To start using Scanner location tracking please configure the feature as follows:
In Backoffice go to admin/scanning and scroll to the bottom until you find the section: Scanner app location tracking
![]()
Note: If you do not see this option, please talk with support since this is a premium feature.
Now, select the proper values for:
- Start location tracking when trip begins: If enabled, as soon as the driver selects a trip the app will start tracking the position. It will only stop tracking when trip is unselected or when we detect that last station was already passed at least 5 minutes ago.
- Capture frequency (in seconds): How often the app collects the current position.
- Transfer frequency (in seconds): How often the app sends the captured position to the servers.
- Use Betterez server: Select this checkbox if you want to use the Betterez Location server for handling location updates.
- Use Custom server: Select this checkbox if you want to your own Location server for handling location updates.
Once the feature is properly configured, please proceed to enable it in the device as explained here.
Location updates may work with less frequency than the one set when the mobile app is in background (closed or another app is on the screen). That happens when Android or iOS needs to save device's resources.
Parcel Scanning Working Flow
Remember that in order to be able to login to the scanner the system must know your name and surname, so please, if you haven't set it yet, proceed with this on back-office first.
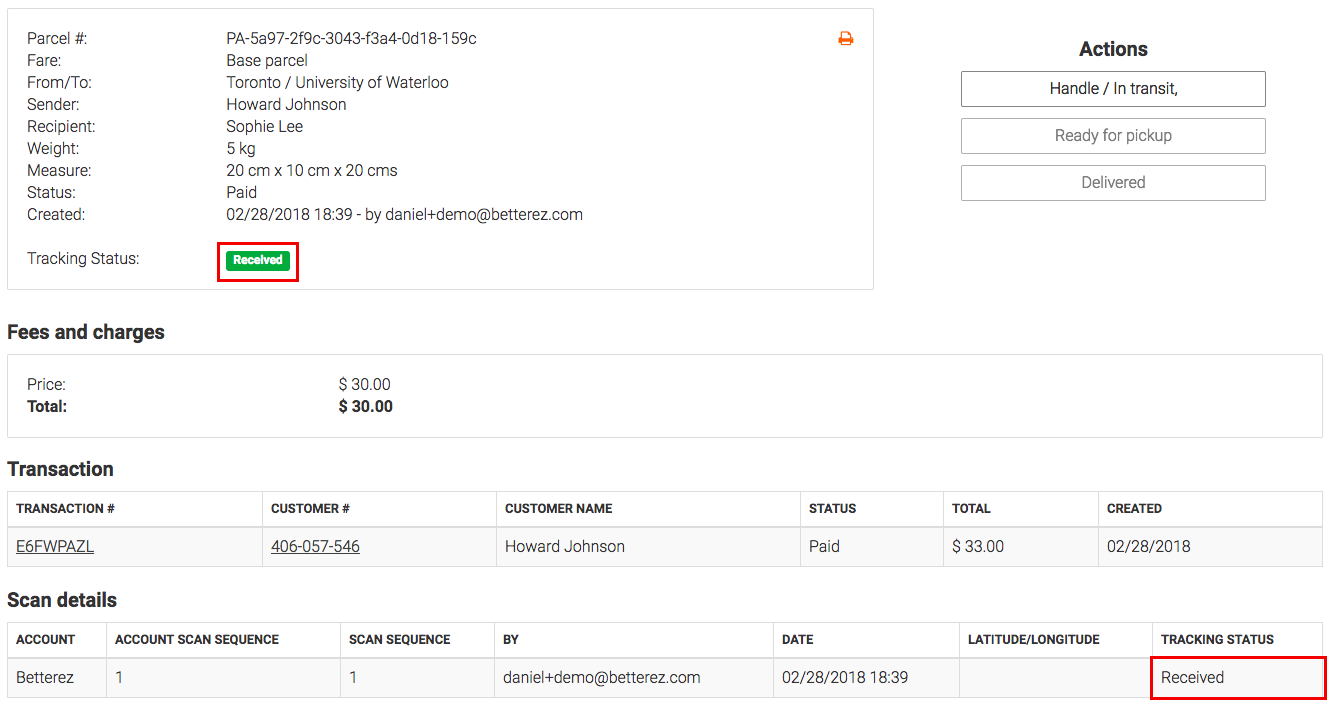
After finishing the parcel transaction, there will be a 'Received' tag generated automatically.
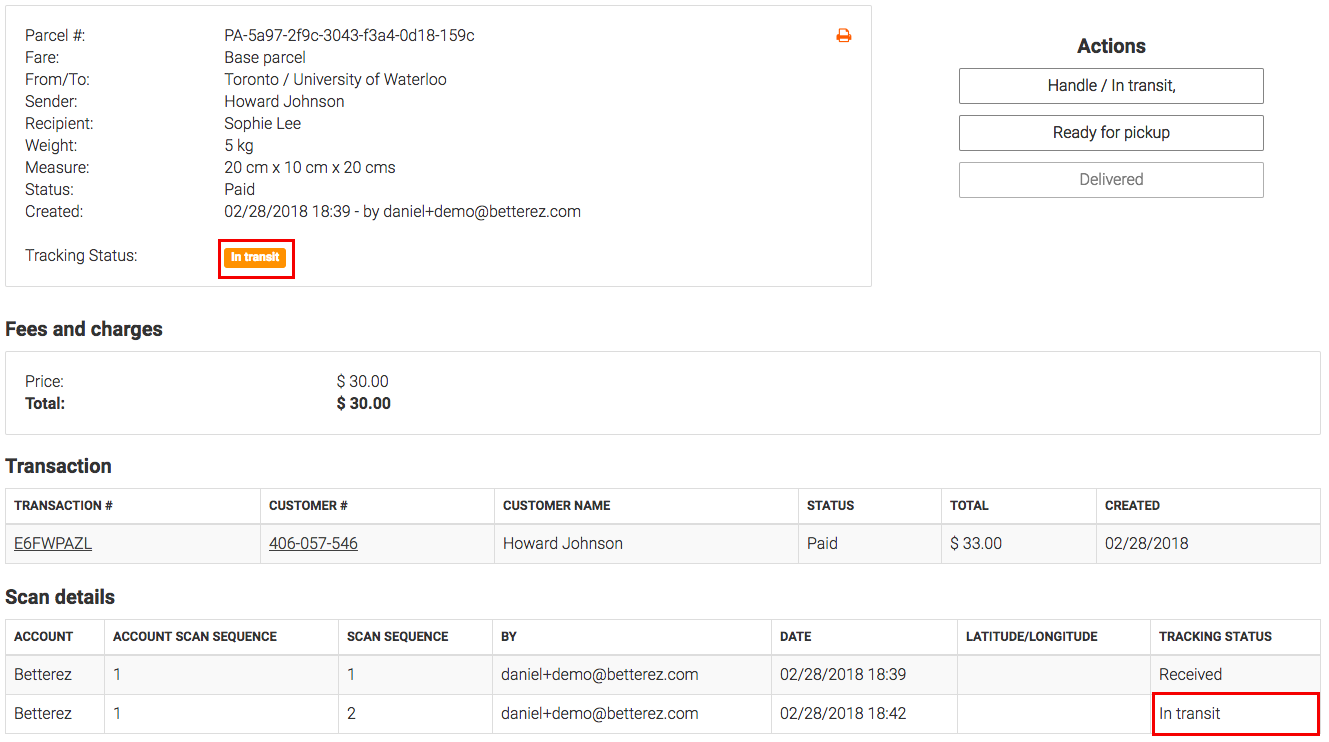
Once the barcode on parcel ticket has being scanned, the status will update to 'In transit' in back-office, and an 'In transit' status will be created under 'Scan details' everytime when there is a scanning taking in place. Back-office staff can also change the parcel status by clicking the button under 'Actions' field.
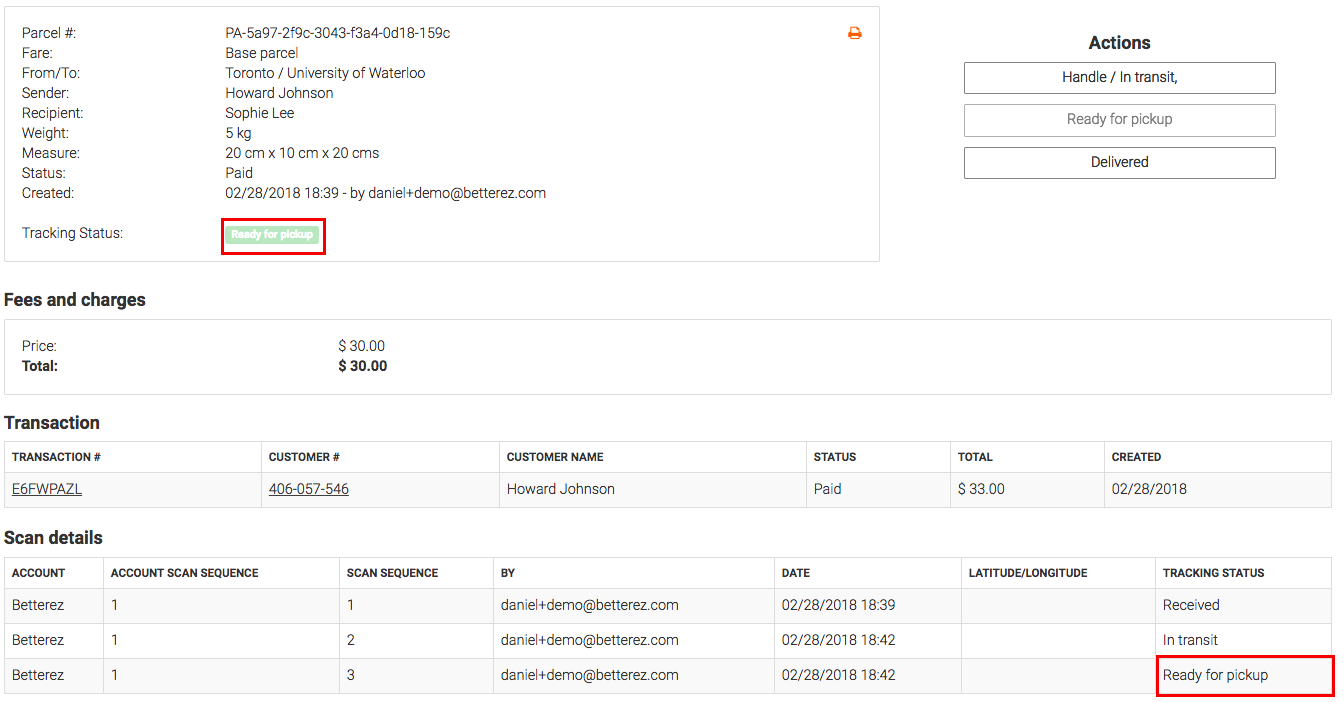
When the parcel is arriving at the processing office, the status can be changed to 'Ready for pick up' by clicking the button under 'Actions' field. And it can also be reverted to 'In transit' if something happens.
'Delivered' Status can be created when customer pick up the parcel or it has been delivered just by simply clicking the 'Delivered' button located under 'Actions' feild.
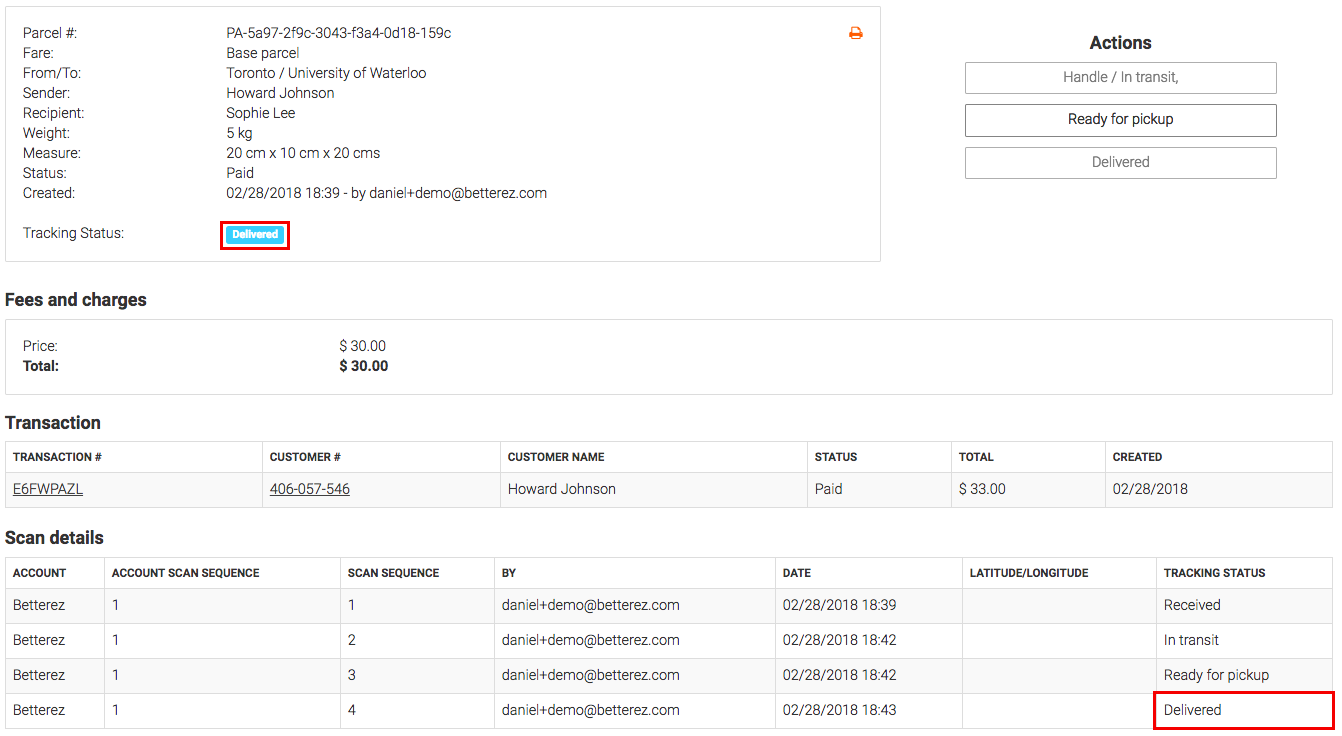
The status sequence will be 'Received' - 'In Transit' - 'Ready for Pickup' - 'Delivered', and all the status can be reversed to the previous one except to 'Received' status.
The parcel scan history can also be found under 'Intelligence' - 'Parcel Scans Report'
Enabling Parcel Scanning Working Flow for the scanner
The same flow described above for backoffice can be enabled for the scanner by going to admin/scanning and scrolling to the Parcels section
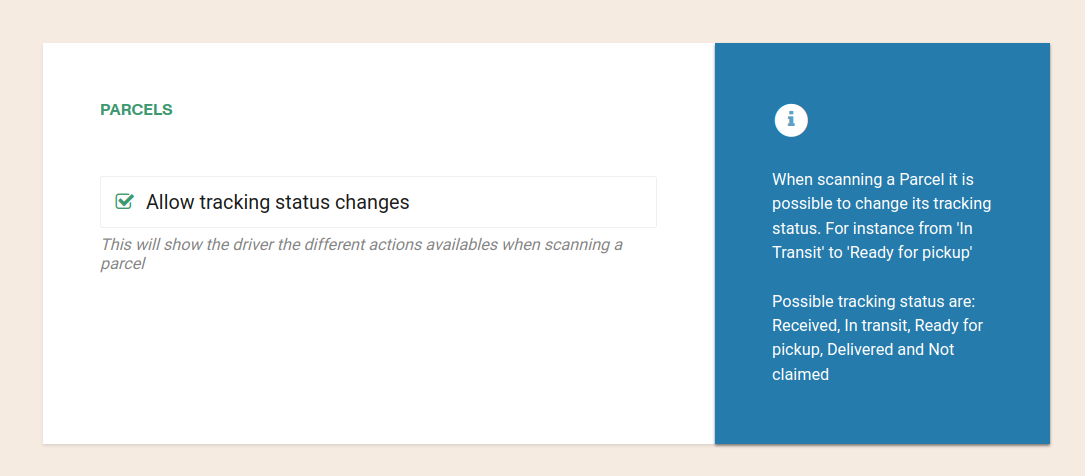
This feature is available on scanner v8.4.1 and above.
Ticket unredeem
Users can unredeem reservations from the manifest page in the scanning app. In order to enable this, scroll down in the Administation > Scanning page until you reach the UNREDEEM RESERVATIONS section:

To allow any user to unredeem reservations from the manifest in the app, check the Allow unredemptions option.

To allow only certain users with an assigned role to unredeem reservations from the manifest in the app, make sure to check the Allow only for specific roles option. Then, select the roles to which you want to grant this permission.

The settings configured in the UNREDEEM RESERVATIONS section are effective only within the app and do not alter or override the role-based permissions set for the backoffice.
This setting applies to scanner app version v9.16.0 and higher. In earlier versions of the app, all users have the ability to unredeem reservations.
Creating a valid NFC tag for a Pass
NFC only works for the trip selection workflow.
NFC tags should be encoded and as MimeType records with the following information.
- MimeType: btrzscanningapp/passnumber
- PayloadASCII: {passNumberGoesHere}
Some encoding software may refer to MimeType as ContentType
The application was tested with tags of type NTAG216 and NTAG213
Some examples of software that can be used to write the information on the NFC tag:
Creating an NFC Pass with NFC Tools
If you choose to use the NFC Tools software, please follow this steps:
1 - Open the app and go to write --> Add a record --> Data
2 - Complete the following and click OK:
Content-type: btrzscanningapp/passnumber
Data: {yourPassNumber}
External passes
Remember that in order to be able to scan external passes, the system must know your name and surname, so please, if you haven't set it yet, proceed with this on back-office first.
To setup external passes, follow these instructions:
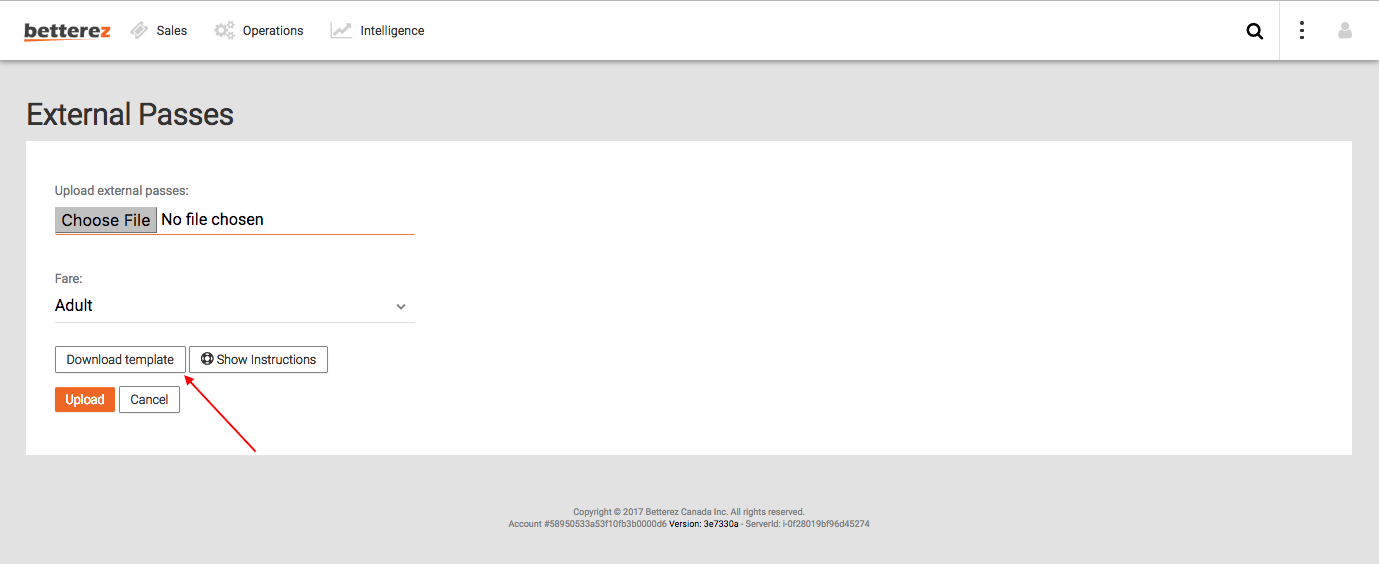
- On the main page, click the ‘admin’ icon on the top right-hand corner of the page, and locate ‘External Passes’ in the drop-down menu
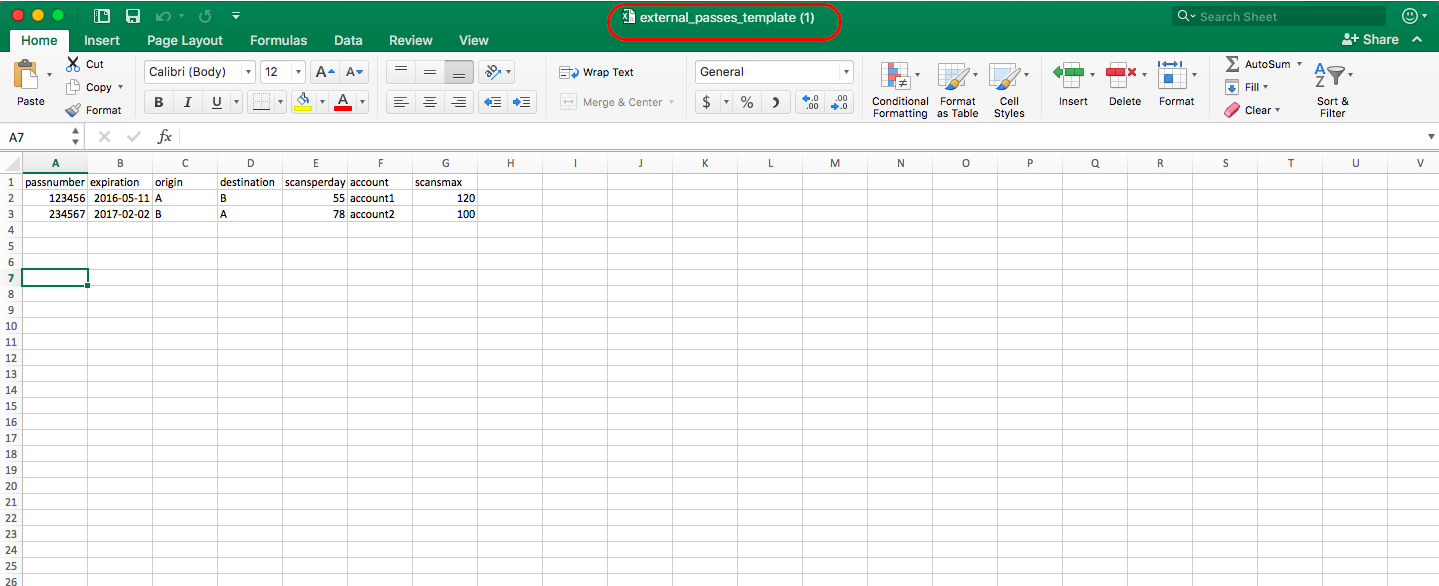
- Once on the ‘External Passes’ page, click ‘Download Template’. This will download a .csv file that has a table
- On the ‘External Passes’ page, click ‘Show Instructions’, and you will be able to see a description for what’s needed in each column of the table. Operators would need to setup a pay on account numbers beforehand. In order to do this, go to ‘Payments’ option under the ‘admin’ drop-down. Select ‘pay_on_account’ and follow the instructions there.
- Once the external pass template is filled up, upload the .csv file back onto the system
Keep in mind that each template is for a specific fare type. If you need two fare types, for e.g. ‘Adult’ and ‘Children’, then you will need to create two separate tables and upload them individually.
Supported Validations
When scanning an external pass, some validations have place in the scanner. Those validations can be configured by the admin.
Validations at account level
The following validations can be configured under Admin / Scanning in backoffice. Please note that these configuration affect all products.
- Accept tickets on cheaper trips: If set, the user can get into the bus at any station that is between the origin and destination set in the External pass.
Additional validations that can not be configured
- Reverse O&D: All External passes allow reverse O&D scanning.
Fallback codes
Remember that in order to be able to scan fallback codes, the system must know your name and surname, so please, if you haven't set it yet, proceed with this on back-office first.
Take advantage of this QR code based system to generate scannable IDs, to identify and sort tickets from multiple sources. These unique codes essentially organize tickets as soon as they’re validated, which in turn makes the back-end accounting and reconciliation processes more efficient.
To setup a fallback code:
-In the admin drop-down menu, select ‘Scanning’, and scroll down to ‘Fallback Codes’
-Click ‘Add new’ and fill in the required details. Note that a pay on account needs to be created prior to setting up a code. In order to do so, go to ‘Payments’ option under the ‘admin’ drop-down, and select ‘pay_on_account’; then follow the instructions listed there.
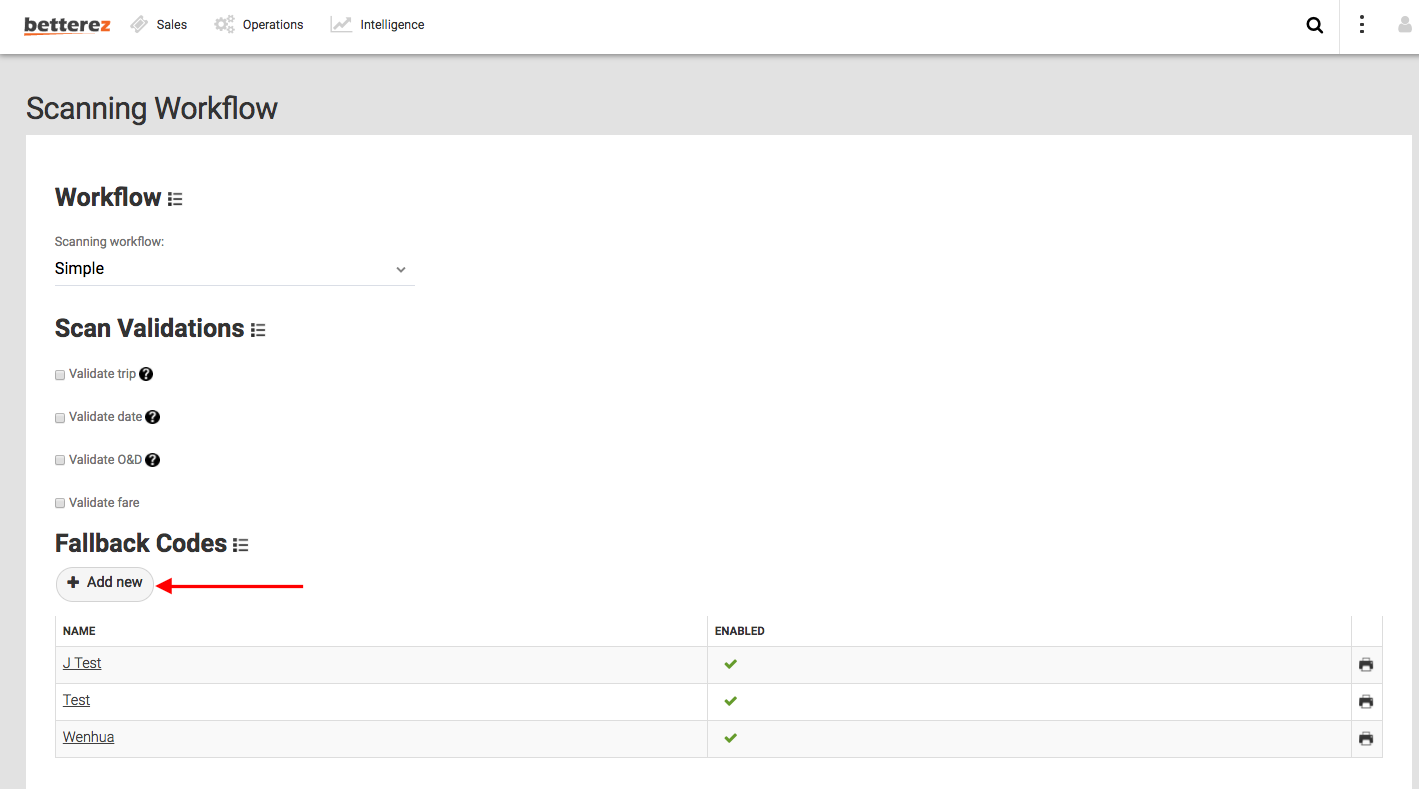
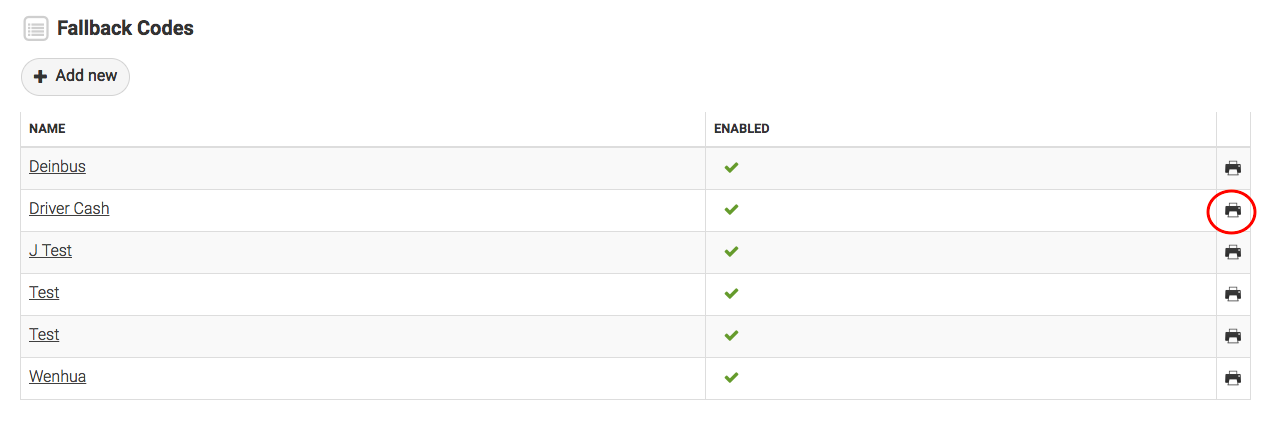
-Click ‘Save’, and click the print icon on the right hand side to get the associated QR code
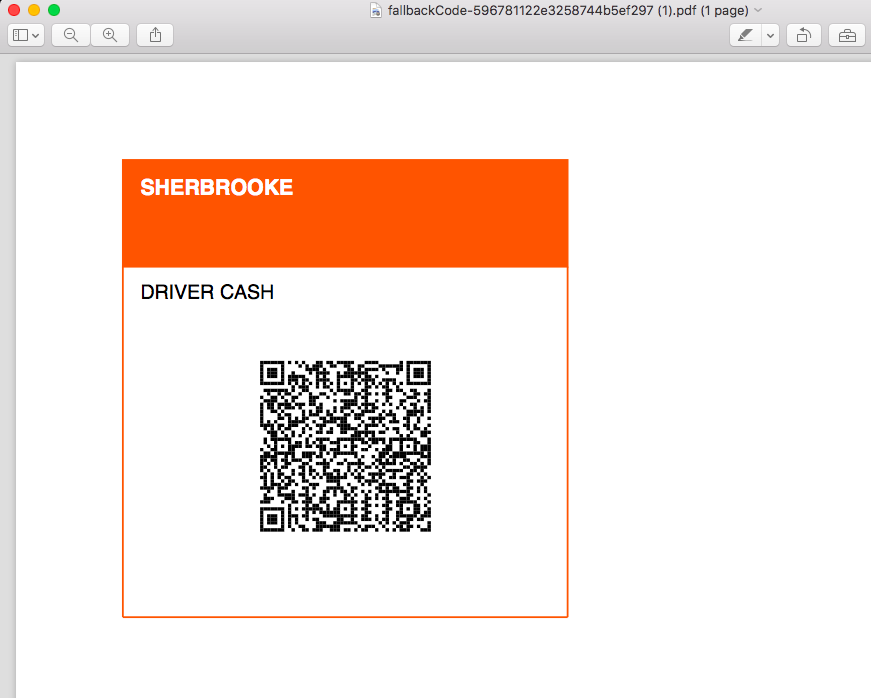
-This QR code can then be printed or scanned on a mobile phone. To scan, the workflow has to be set "Trip selection" under Admin > Scanning
Flex passes
Setup
Before using Flex passes, please, make sure you have already configured the products and the special payment method for Flex passes. The following links will explain how to do it.
- Create the Flex pass products
- Create the Flex pass payment method
- Under Admin / Scanning, please make sure these options are set:
- Scanning workflow: Trip selection
- Scanning mode: Online
Supported Validations
When scanning a flex pass, several validations have place in the scanner. Those validations can be configured by the admin.
Validations at product level
The following validations can be configured in the product page
- Valid month
- Usages per day
- Usages per trip
- Max number of uses
- Number of total days to use the flex pass
- Expiration days
- Request Id
- Restrict passengers
- Avoid overlapping times in different trips
- Network wide: This can be set in the pricing type of the product and for the scanner will mean if the passenger can get into the bus on any station or not.
Validations at account level
The following validations can be configured under Admin / Scanning in backoffice. Please note that these configuration affect all products.
- Accept tickets on cheaper trips: If set, the user can get into the bus at any station that is between the origin and destination set in the Flex pass.
Additional validations that can not be configured
- Reverse O&D: All Flex passes allow reverse O&D scanning.
Scanning Flex Passes
Remember that in order to be able to login to the scanner the system must know your name and surname, so please, if you haven't set it yet, proceed with this on back-office first.
When the passenger buys a Flex pass it will be emailed with the Flex pass QR to be used when on-boarding. This can be used as any other scannable ticket.
Internally, an actual reservation is generated when the user scans a Flex pass. That reservation will have a transaction paid with the Flex pass payment method and a amount of $0. Also this reservation is used for capacity calculations and Ridership reports.
Keep in mind that the reservation part is invisible for the passenger when used with the scanner. All the passenger will see is the Flex pass.
Redeemable items (RI)
RI Setup
Before using Redeemable items, please, make sure you have already configured bundles as explained here.
RI Supported Validations
When scanning a redeemable item, some validations have place in the scanner:
RI Validations at product level
Currently, any validation or configuration at product level has no effect when scanning a redeemable item with the scanner app.
RI Validations at account level
The following validations can be configured under Admin / Scanning in backoffice. Please note that this configuration affect all products.
- Accept tickets on cheaper trips: If set, the user can get into the bus at any station that is between the origin and destination set in the redeemable item.
RI Additional validations that can not be configured
- Reverse O&D: All redeemable items allow reverse O&D scanning.