Page summary
- List (manifest summary)
- Filters
- List information
- Manifest details
- Manifest header
- Manifest overview
- Manifest overview details
- Maximum Load (Max Load)
- Manifest with sequence number
- Manifest capacity and seatmap
- Comments
- Notifications
- Capacity exceptions
- Audit Trail
- Manifest status
- Passengers list
- Assign users to the manifest
- Considerations and troubleshooting
- Timezones
- Manifest Modifications Without Open Shift
- Create extra schedules
- Email Notification for Passenger Movements
Manifests
Navigate to operations>manifests.

List (manifest summary)
The list of manifest is a summary of possible trips with capacity, load and redemption information.
This is a very resource intensive list and can take several seconds to show the results in the screen. When possible use the 5 day outlook instead.
Filters
You need to start by selecting a date range and a product.
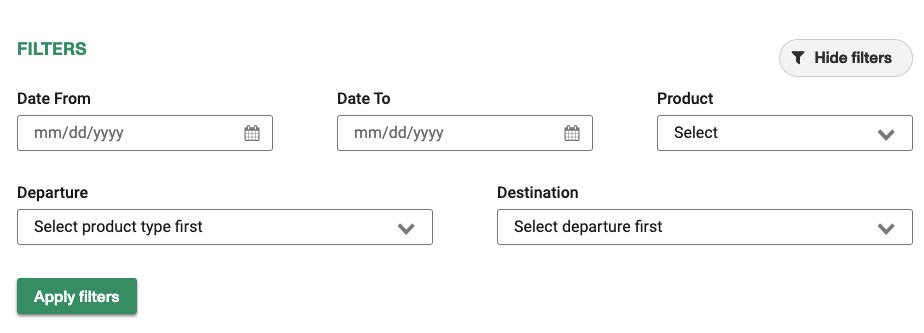
If you only have one product the product filter will not be in your view.
Optionally you can also select a departure station and a destination station.
You can only select a destination if you select a departure station first.
List information
The list will show manifest sorted by time by default. You can re-sort clicking the grid columns.

You will see the manifest name, the departure time, the date for the manifest the current capacity, the maximum load and how many tickets have been redeemed in the manifest.
You can open the full manifest by clicking in the name.

You can also print the manifest by clicking the print icon.

You can only print manifest with bookings on them from this UI.
Manifest details
There are a few ways to get to the manifest details.
The preferred way is to use the 5 day outlook and click in the desired manifest.
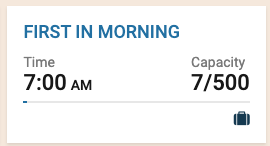
Another option is to click the manifest name from the manifest list.

A third option is to click in the travel date on the ticket details page.

Manifest header
Depending on schedules and account configuration the header of the manifest may be slightly different.
We will show below the different variances, if you don't see some of the options in your account, it's because they are not enable.
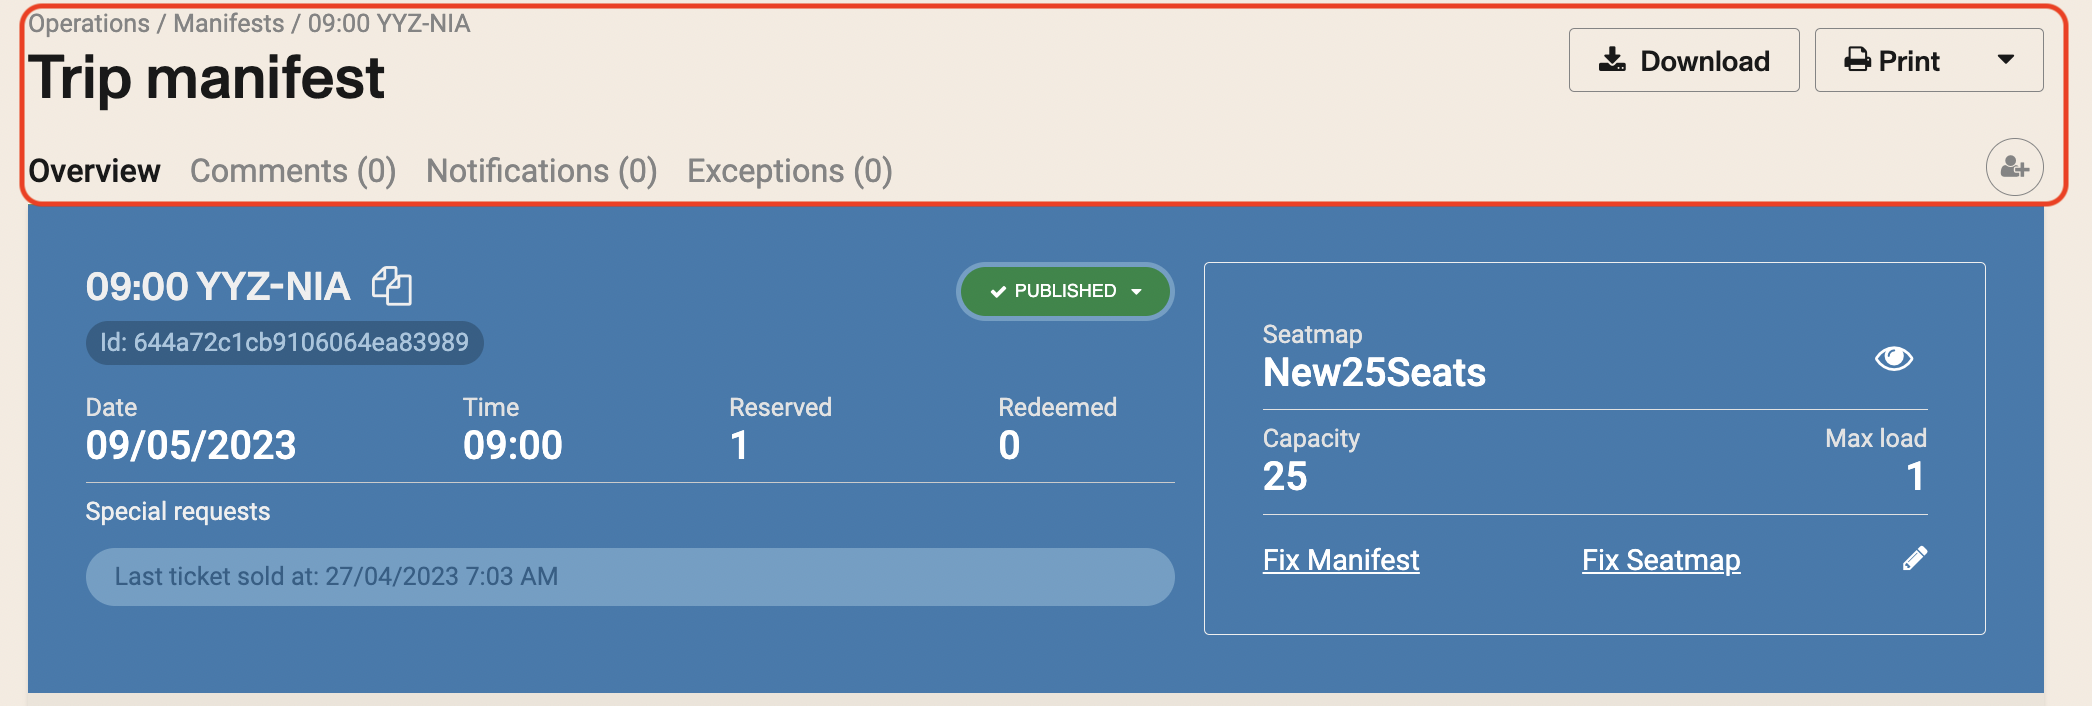
At the top of the header you can see a few tabs:
- Overview displays the current view
- Comments If your user has permission to see the comments you will see this tab.
- Notifications If your account and your user has notifications enable, you will see this tab.
- Exceptions If your account and your user has manifest exceptions (capacity) enable you will see this tab.
Manifest overview
You will see the following information and actions.

Name of the schedule associated to the manifest (in this case 09:00); effective date and time for the manifest, (this correspond to the date and time the vehicle starts it's journey).
Once a manifest is created, either by editing capacity, adding a comment, making a booking on it or adding a capacity exception, the manifest name will not be changed even you edit the name of the schedule.
Reserved indicates the total number of tickets in the manifest, while redeemed represents the number of tickets redeemed (already travelling) in the manifest.
Below the capacity information we can see if there are tickets with SSRs booked and the qty.
If there are no SSR we will see:

If there are Special request booked we will see the id and the qty for each one booked.

There is the date for the last booking (if there are any bookings) for that manifest

The right side of the overview is a bit different depending on the use of seatmaps and/or vehicle assignment.
Manifest overview details
Without seatmaps
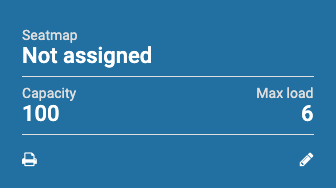
In this case (the simple possible details), you will see there are no assigned seatmap, the total current capacity and the maximum load.
Maximum Load (Max Load)
The value indicated in the Max Load field represents the highest number of passengers on board when departing from a station at any point in the itinerary, according to the manifest. This number may be the same at multiple stations if the maximum passenger count remains consistent at different points in the route.
For example, in the following case, the Max Load value is 21 because when the bus departs from Canmore (Northwinds Hotel Canmore), it has 21 passengers on board, and no other station in the itinerary has a higher passenger count at departure.
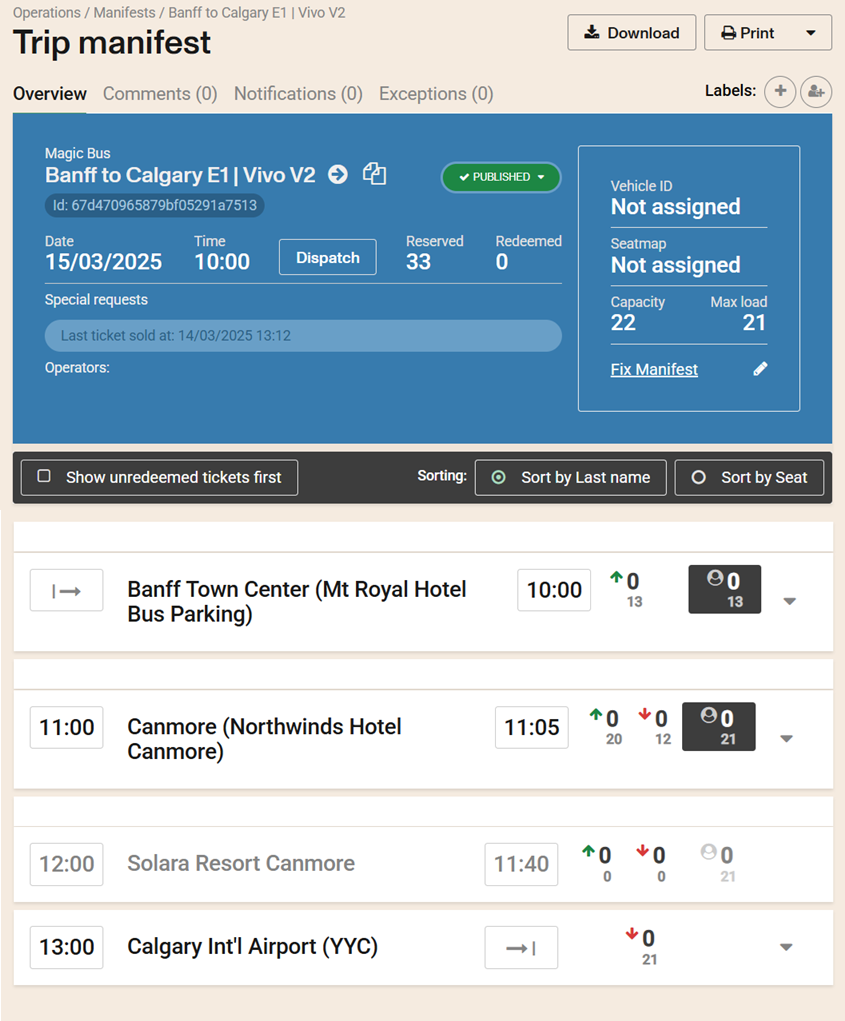
At the bottom you have to buttons to print the manifest and to edit the capacity of the manifest.
With seatmaps and not vehicle
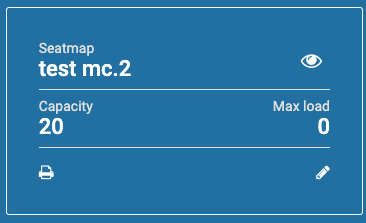
Very similar to the previous option but in this case you see the seatmap name and an icon besides it that will show the seatmap if clicked.
To hide the seatmap you can click in the same icon or in the x at the top of the seatmap display.
With seatmaps and vehicle
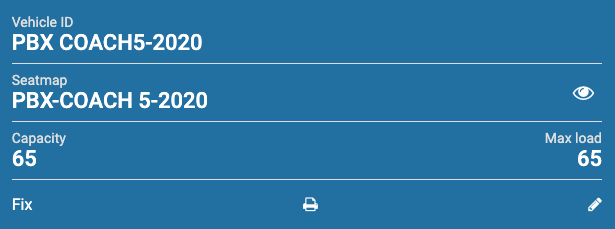
In this case you will see the vehicle ID as well as the seatmap name.
This particular account also has FIX manifest enable, see more details below.
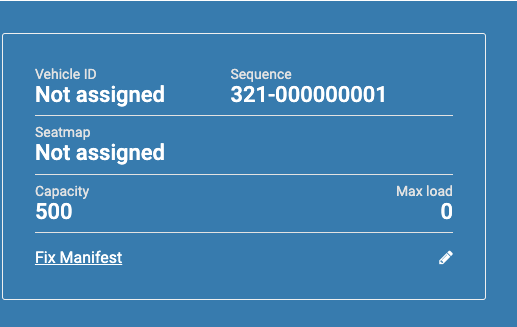
Manifest with sequence number
The sequence number will be create the first time a user is assigned to a manifest.
The first station of the manifest needs to have a series and a sequence configured to be able to create the sequence for the manifest since the sequence number will be generated based on the first station.
If a sequence number is available it will be shown as below.
Once a sequence number is assigned to a manifest removing and adding new users will have no effect on the sequence number.
Manifest capacity and seatmap

Clicking on the pencil will allow you to change the capacity of the manifest.
No seatmap
If the manifest doesn't have a seatmap you will see a single field with the current capacity that can be changed.
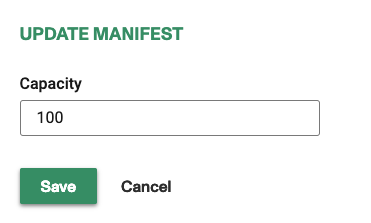
If you'd like to have the capacity for all future trips updated, then you should do so by changing the capacity in the actual schedule, however, changing the capacity of the schedule won't come to effect to any manifest where: (1) A booking has been made on the legacy schedule. (2) The manifest capacity has been changed. (3) A comment has been added to the manifest.
Seatmap
If the manifest has a seatmap but not an assigned vehicle, you have two ways to change the manifest.

You can enter a new lower capacity without modifying the seatmap.
This can be confusing during the booking flow but is useful to block further sales in a manifest, just change the capacity to the 0.
If you try to change the capacity to a higher capacity of the allowed by the seatmap you will see the following error.

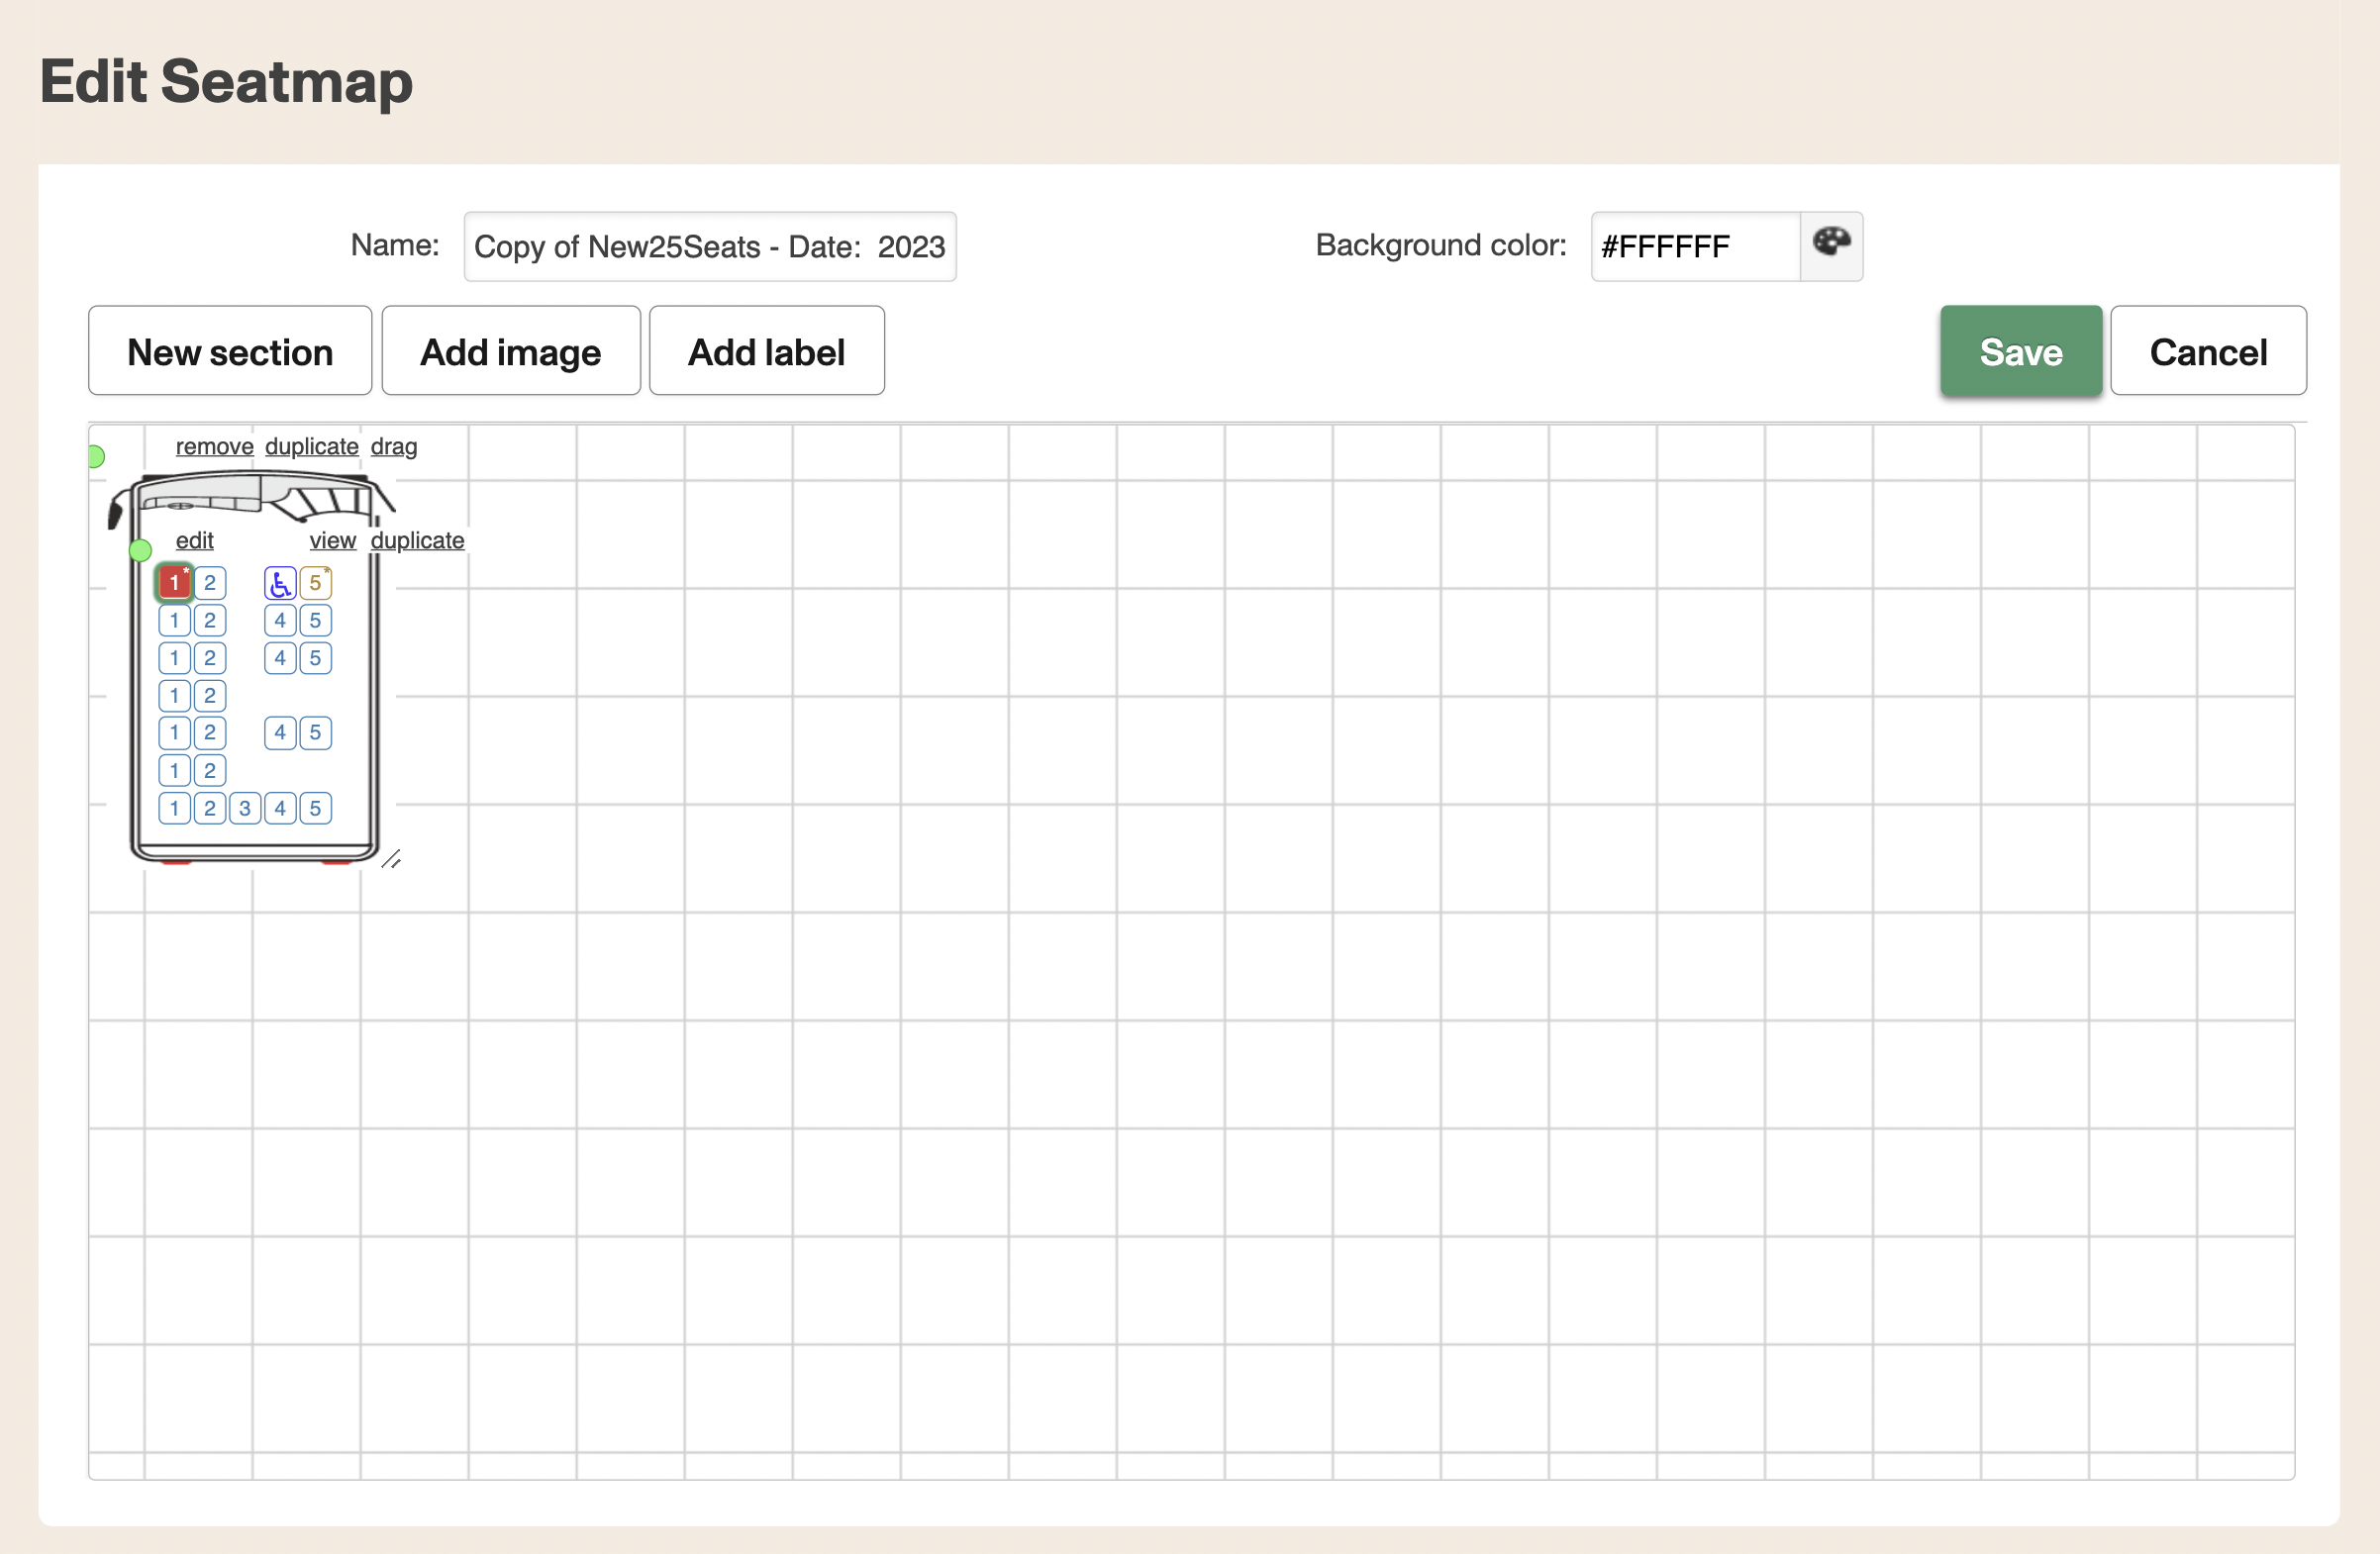
You can also change to a higher capacity bu to do so you will need to edit the seatmap, to do so click in the pencil icon besides the seatmap name.
Accept the warning message and you will be redirected to the edit seatmap page.

Save the changes on the seatmap and the new capacity will be reflected in the manifest.
Vehicle
If your manifest has a vehicle assigned, the recommended method to change capacity is to change the assigned vehicle to a different vehicle associated with a different seatmap (with more or less capacity), select a new one from the vehicle list.

The system will try to re-assign the seats as best as possible. If the new vehicle/seatmap has less seats than already sold, you will not be able to change it.
You can still change to a lower capacity using the capacity field and entering a new capacity, but is not recommended.
This can be confusing during the booking flow but is useful to block further sales in a manifest, just change the capacity to the 0.
If you need to reduce capacity but there are already tickets sold that block the change, you can move those tickets to a different manifest.
Seat reaccommodation by preferred seat
If a manifest requires maintaining the same seat positions when changing vehicles between two seatmaps with different capacities, the Enable seat reaccommodation by preferred seat option must be enabled in the Operation Settings section.
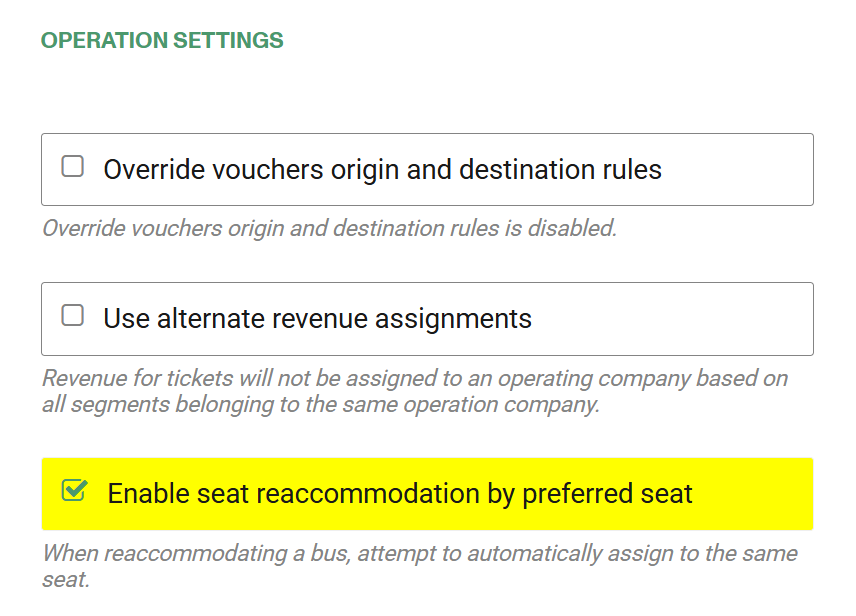
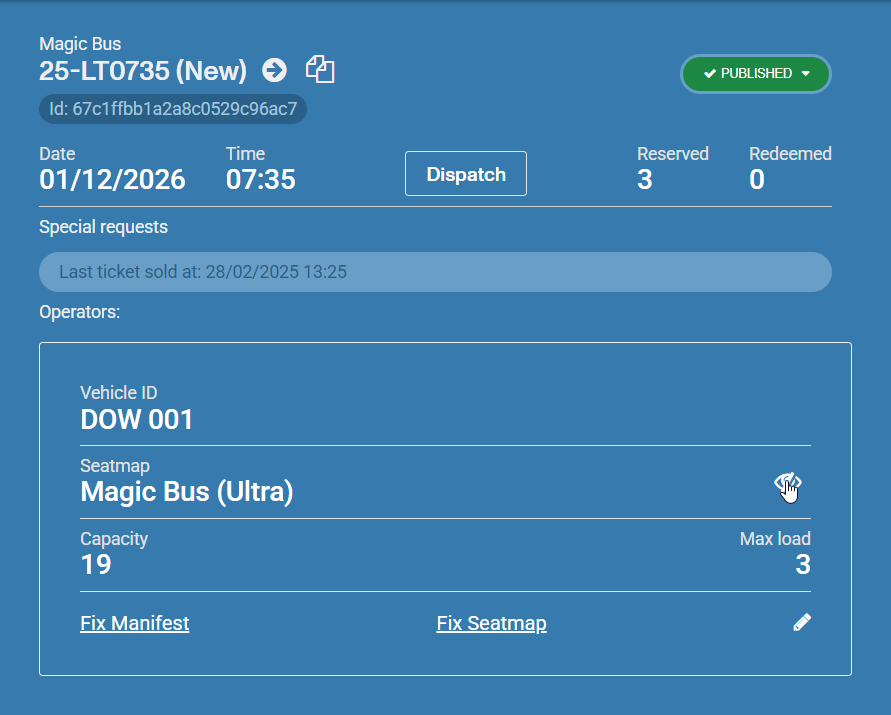
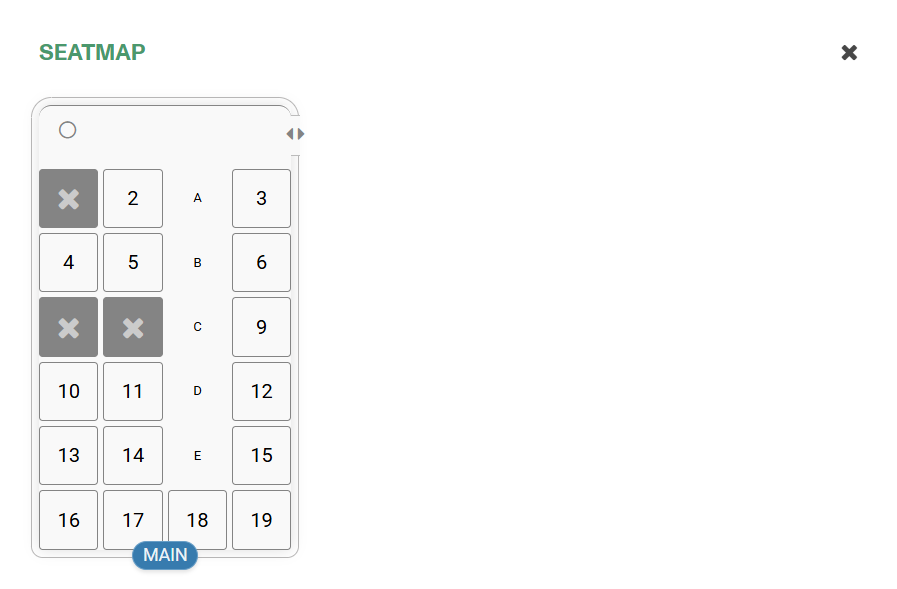
Once this option is enabled, go to the desired manifest and click on the eye icon to view the occupied seat positions in the current seatmap.
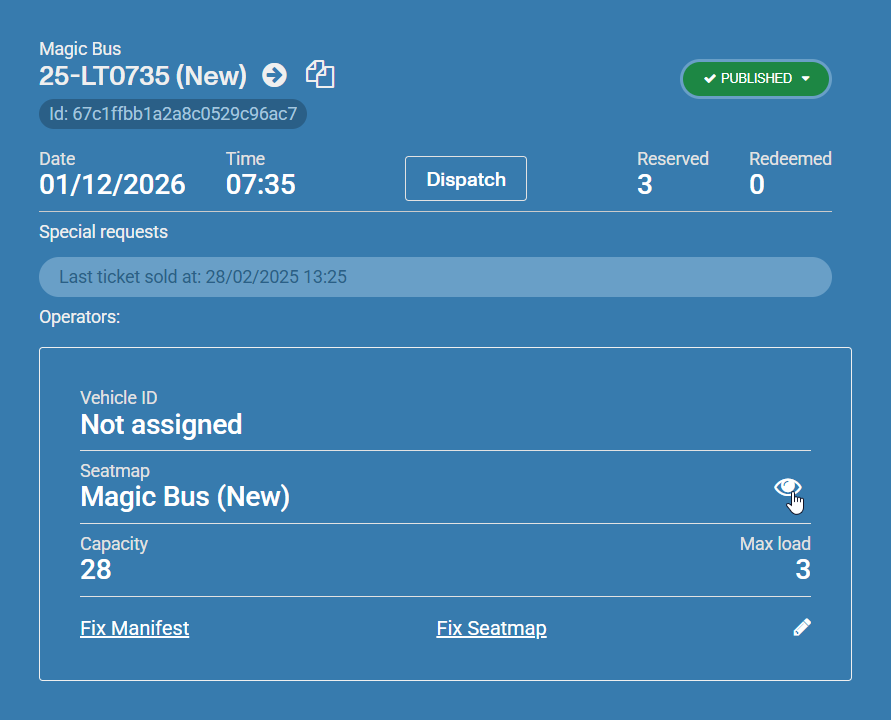
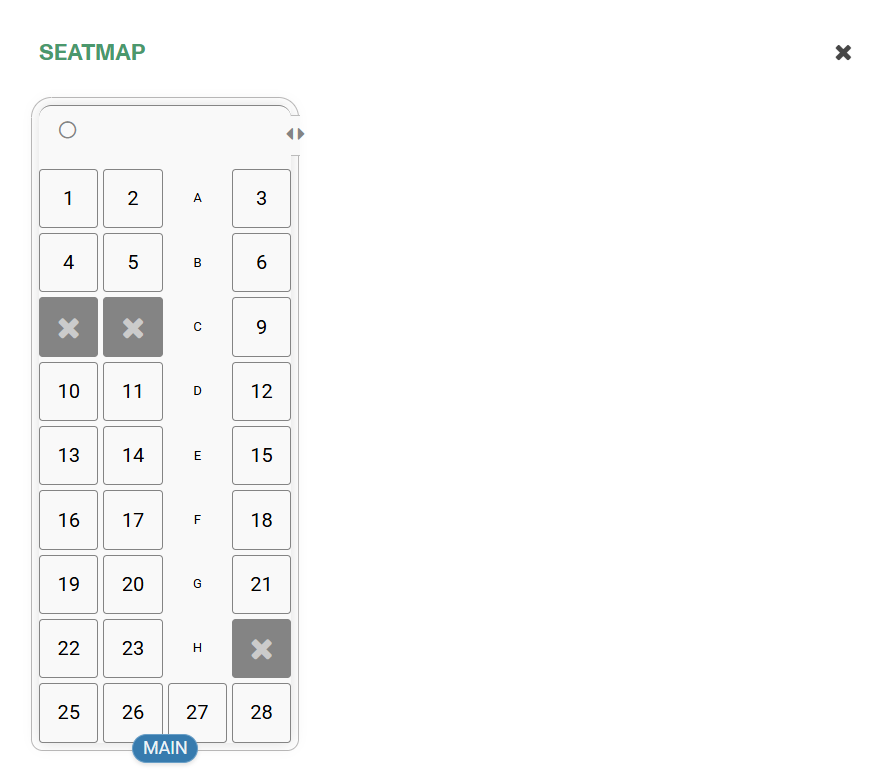
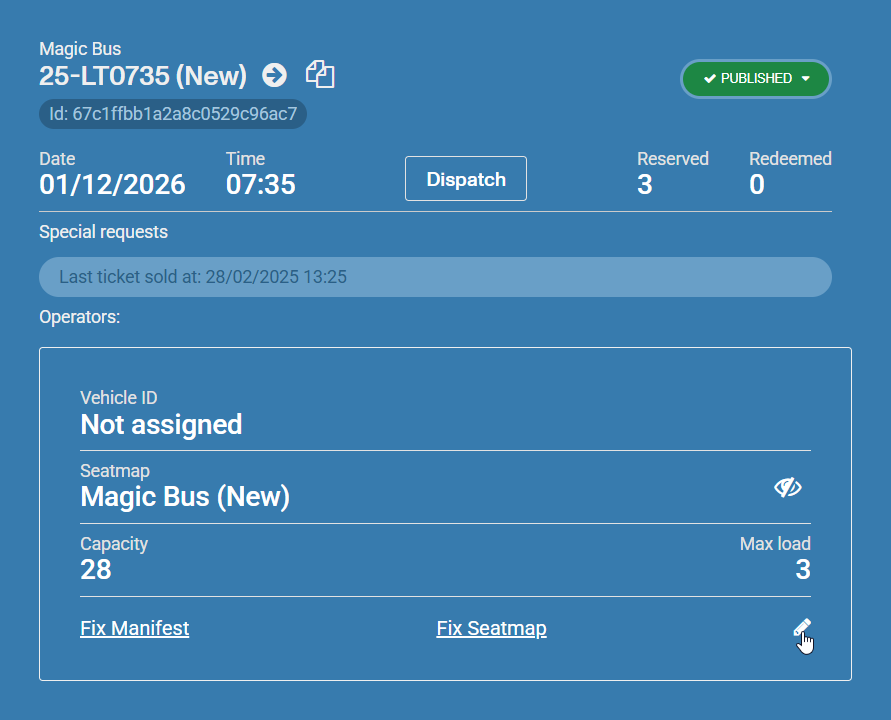
Then, click on the pencil button to start the change process.
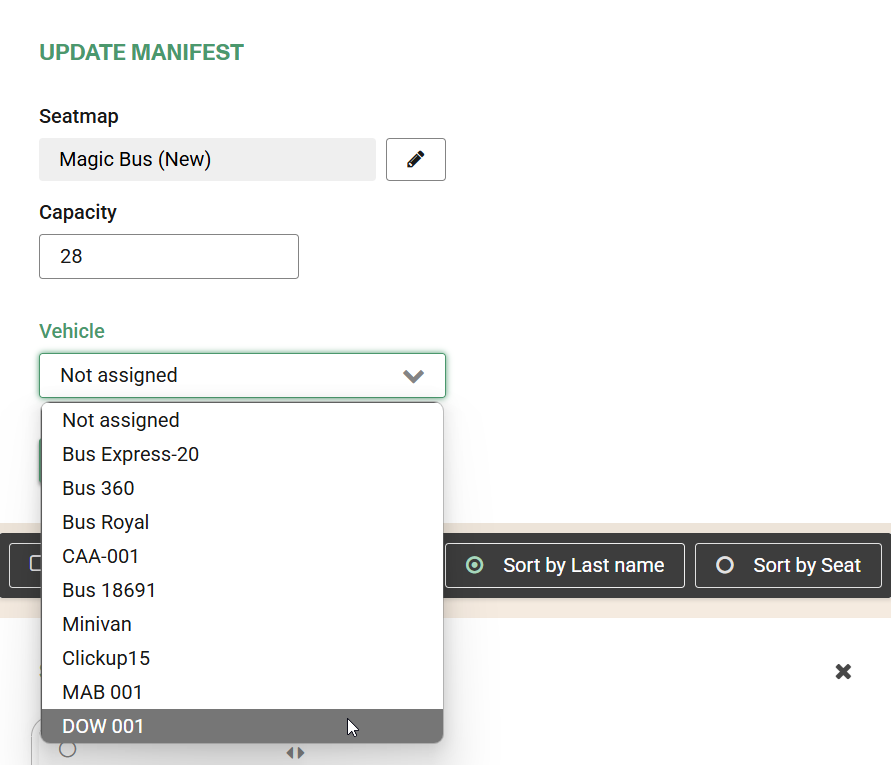
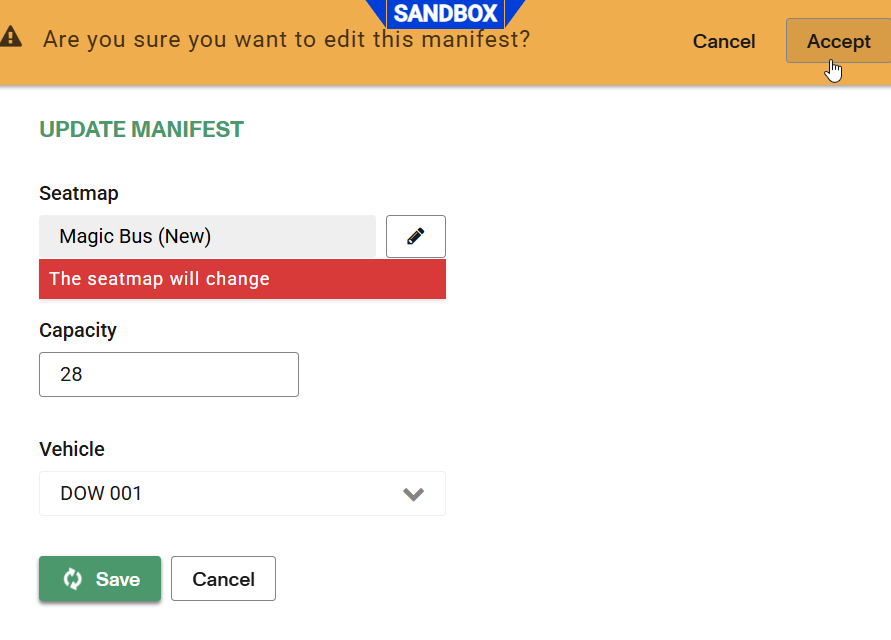
Next, in the Vehicle field, select the license plate of the new vehicle with a seatmap and a different capacity that will be assigned to the manifest. Then, click the Save button to save the changes.
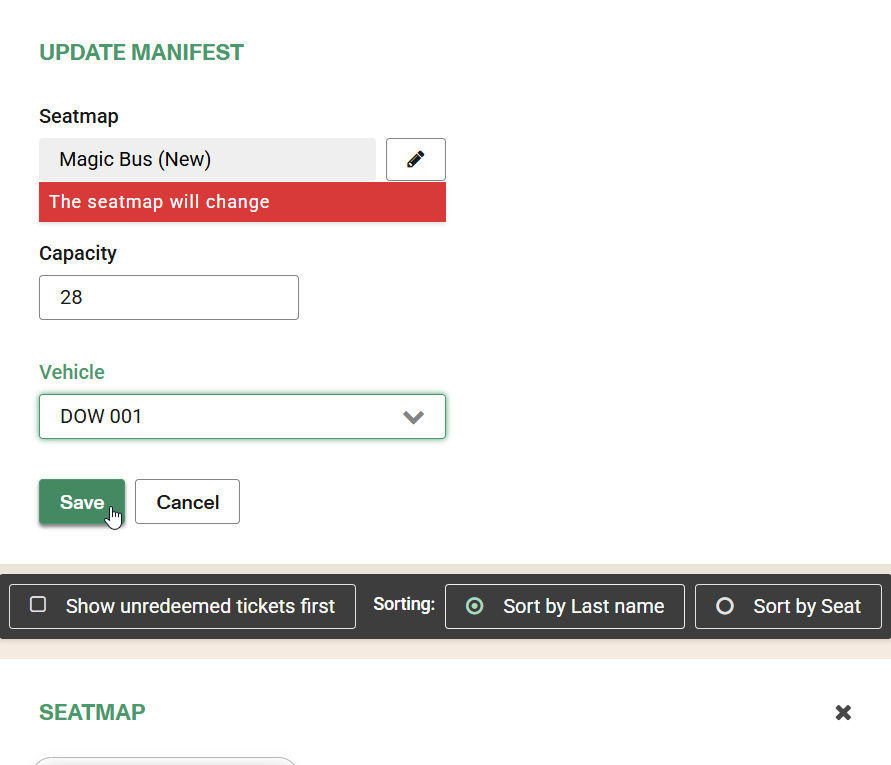
Then, a notification appears at the top asking whether the manifest should be edited. The Accept button must be clicked to continue.
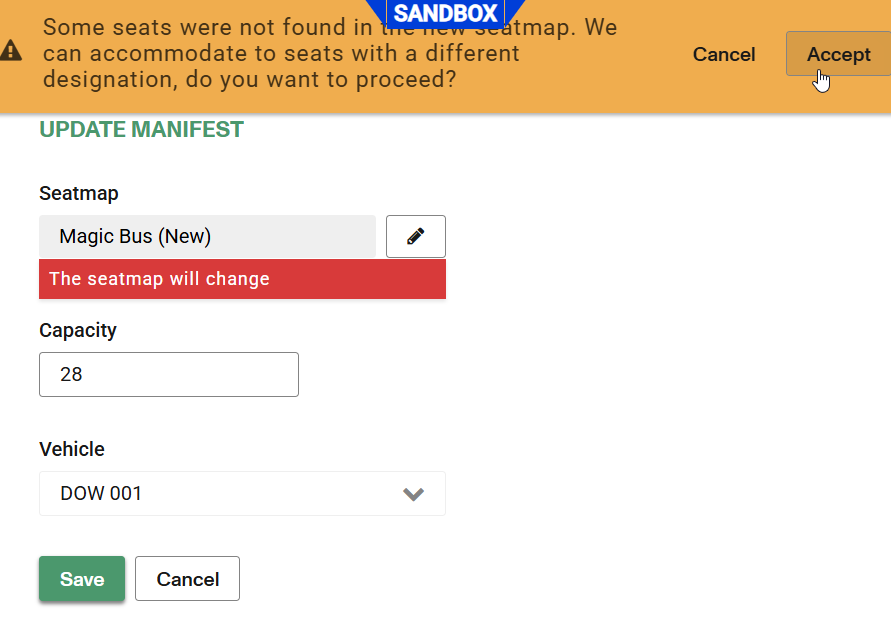
Next, another notification appears at the top indicating that some seats were not found in the new seatmap and asking whether those seats should be reassigned with a different accommodation. Therefore, the Accept button must be clicked again to continue.
Finally, after refreshing the page to apply the changes, clicking on the eye icon to view the occupied seats in the new seatmap will show that seats 7 and 8 remain in their position since they were available in the new seatmap. On the other hand, seat 24 from the previous seatmap has been reassigned to seat 1, as seat 24 does not exist in the new seatmap.
Seat reaccommodation by preferred seat logic
The preferred seat reaccommodation logic will focus on keeping the same seat number in the new seatmap. If the same seat number is not available, seats will be reassigned starting from the first available position in ascending order. This logic also applies to seatmaps with different sections.
If in the new seatmap the same seat number appears in a different column or row, this will not affect the logic — only the seat number is considered for reaccommodation.
Comments
If you have the correct permissions you can see and edit/add comments to the manifest. Click the comments tab and you will see a textarea where you can enter or edit the existing comment.

In this case there are no comments in the manifest so you can enter the desired comment and click the submit button.
If there are comments, those comments will be shown in the text area the next time you click the comments tab.

Notice that the comments tab now shows the number (1)
Notifications
There can often be disruptions to services or specific operational updates that require notifications to customers. The manifest email notification is available to provide live email messages to customers (NOT passengers) who have purchased tickets in a given manifest.
In order to enable this feature, please send an email to sales@betterez.com for assistance.
Once the feature is enable for you account and the permissions granted to your user you will see a Notifications tab.
Click the tab to see the notifications sent to the customers and/or to send new notifications via email (depends on the permissions granted to the user).

You can use the form to compose a new notification. Enter the subject and the content for the email that the customers will receive.
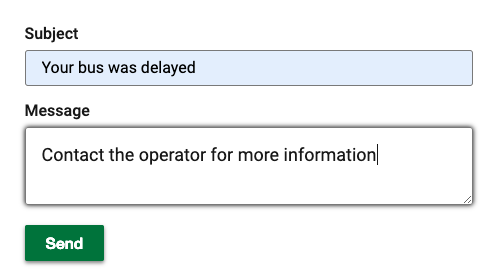
The email will be sent from the email that was configured (and validated for) when configuring your account sending ticket confirmations. If this email is not configured properly, the notification will not arrive..
If the account is properly configured (all the permissions are correct and the email is properly configured) you will see a success message and the notification will now show in the right hand of the screen.

In keeping consistent with Betterez practices regarding the sending of customer facing communications, the notification will be sent to the customer's email address, not the passenger's email address. It is the responsibility of the paying customer to forward the message on to any applicable parties that may be affected by the email message.
Capacity exceptions
You can use capacity exceptions to change the capacity of a trip in between stations, to something different than the actual manifest capacity.
You can use this feature to stop people from booking in some segments of a given manifest.
This kind of exception only affects the single O&D selected. The rest of the O&Ds within the Manifest will keep working as usual.
When adding capacity exceptions we recommend you add comments to the manifest.
Start by clicking the Exceptions tab (if you don't see the tab, your user doesn't have access to this feature).

Click the Add exception link and you will see two combo boxes to select the Origin and destination to create the capacity exception for.

You can add as many exceptions as needed.
To remove a exception, click the red arrow to the right of the row.

You will receive and error if you try to create a capacity exception between two stations and the number of tickets already sold is higher than the new capacity.

The new capacity has to be higher or equal to the highest number of tickets already sold between those two stations.
If you are moving a passenger from a manifest to a manifest that uses capacity exceptions, the move may only be completed if the capacity exception permits. For example, consider a schedule that goes from A-B-C-D. If you want to move a passenger that is travelling from B-D on Manifest A to Manifest B, but Manifest B has a capacity of 2 for point B to point D and there are already 2 or more passengers travelling from A-D, it will not allow the move and will give an error that there are "No more seats left in some part of the trip".
Audit Trail
There is a function for you to view the audit trail of manifest changes.
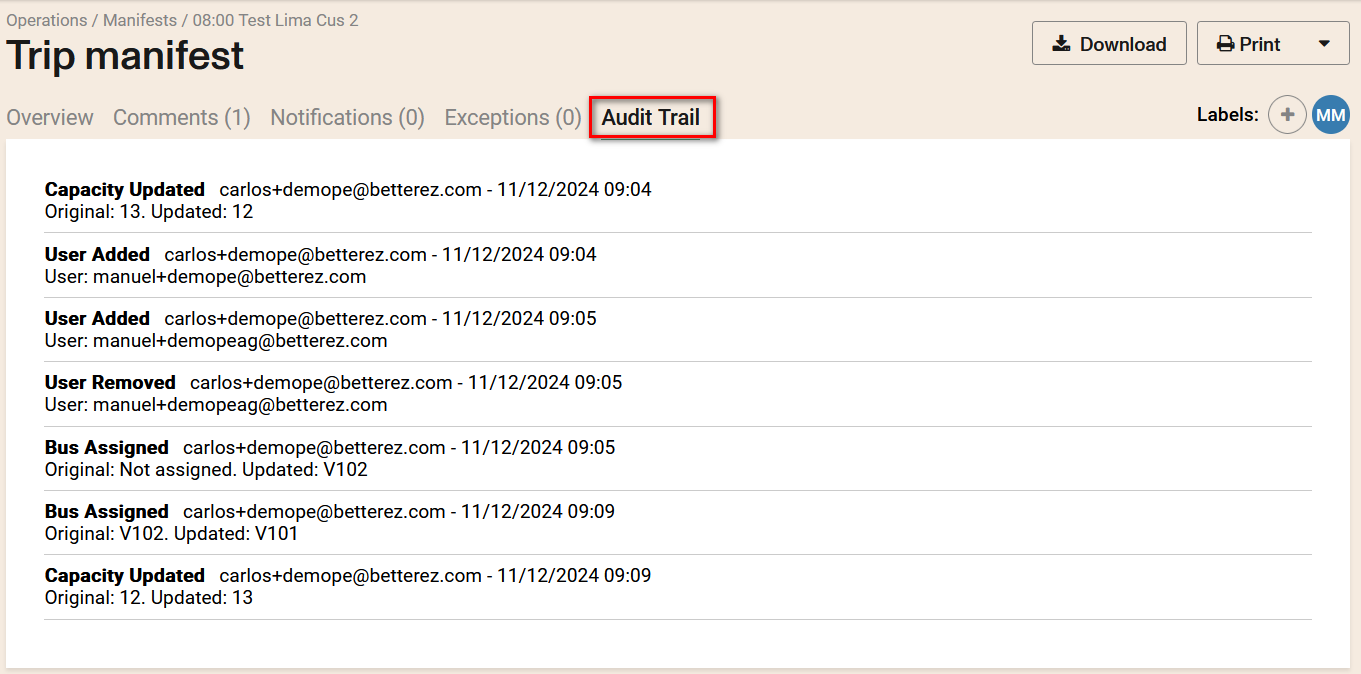
The following records will be displayed:
- Capacity Updated
- User Added or Removed
- Bus Assigned
- Seatmap Updated
- Status Updated
- Ticket Changed,Moved (unrestricted), cancelled
- Ticket Marked As No Show
- Check-in Status Updated
Manifest status
There is a feature for you to have control over your schedule inventory.
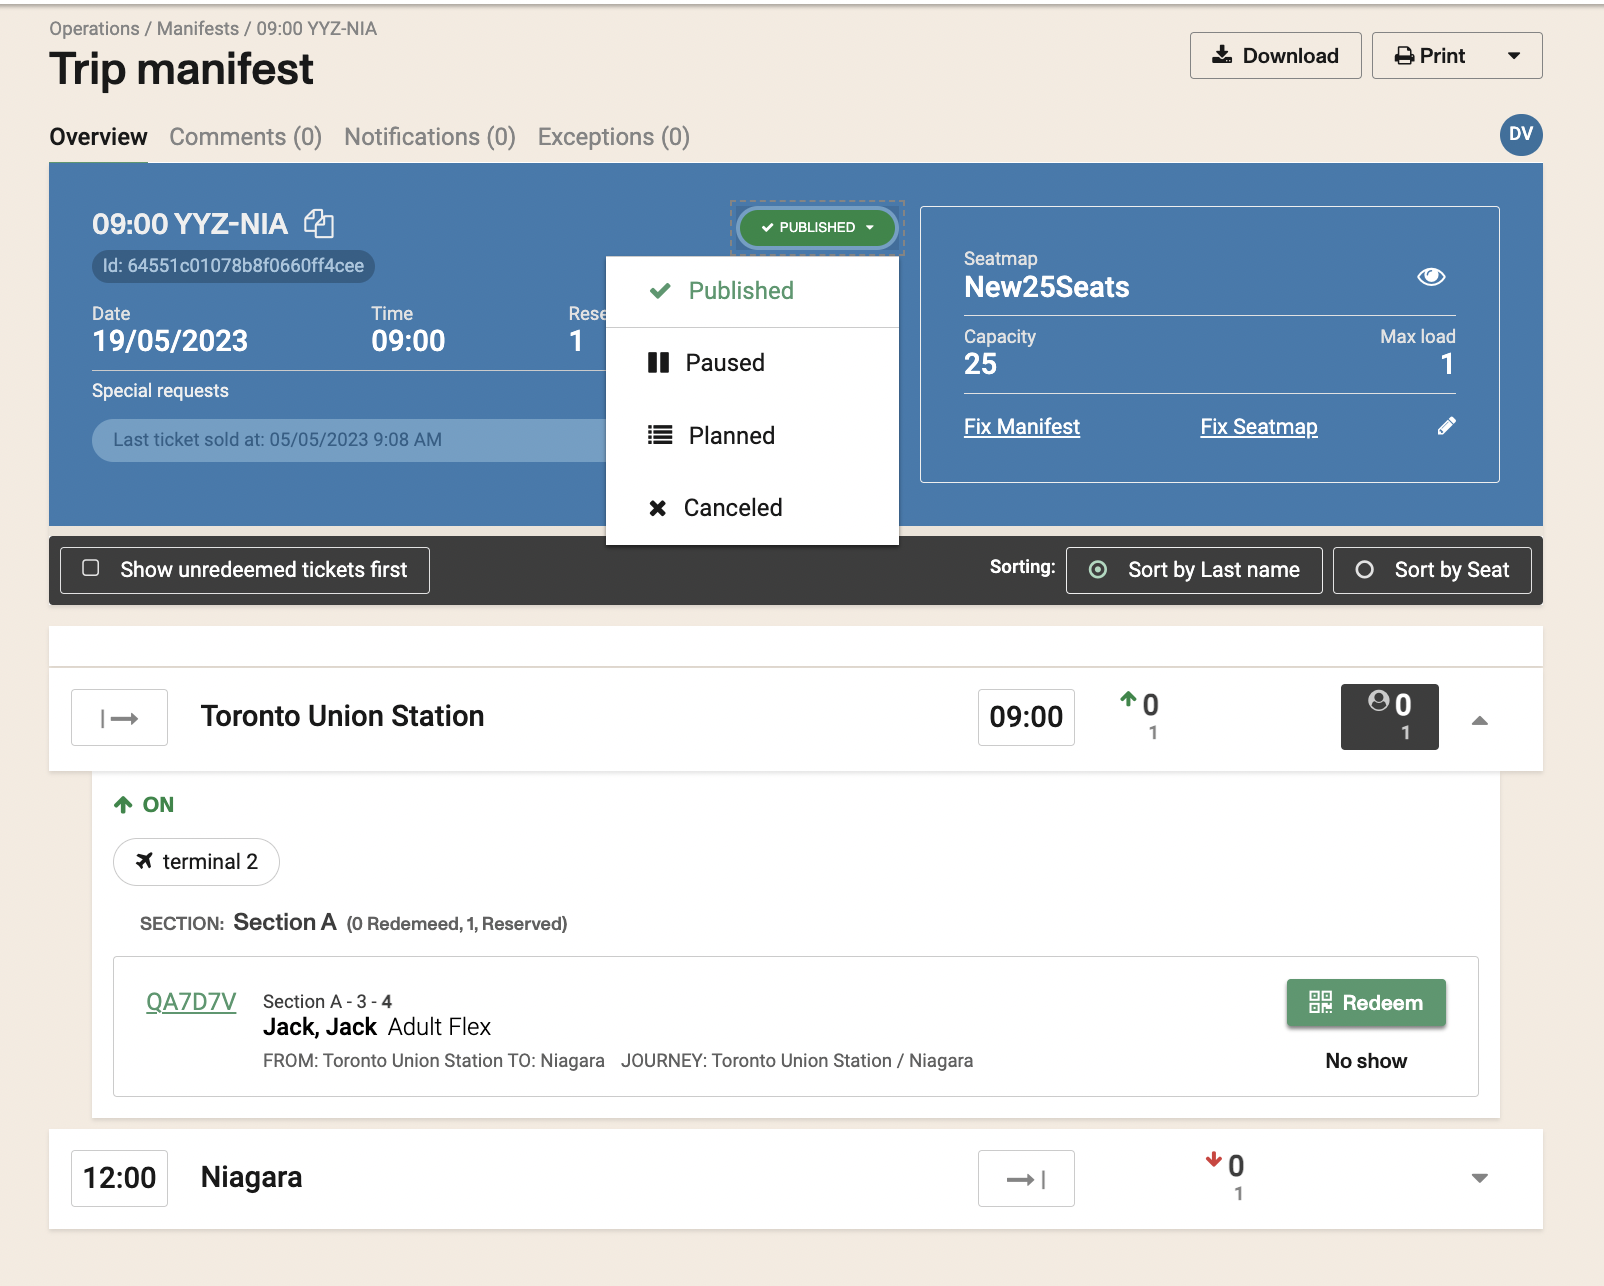
On the upper part of your manifests you have button where you can set your schedules to one of the following 4 statuses:
Published: These will be your regular schedules showing for sale.
Paused: These would be schedules that for some reason or another you want to stop sales on. Either for a period of time or permanently.
Planned: These are schedules you want to have ready to set to published depending on the demand.
Cancelled: These might be schedules that because of any reason you might not want to run anymore.
Operations: Use this status if a vehicle is moving from one location to another, and you want to track the drivers, but accept no passengers.
These statuses will show on your 5 Day Outlook for a quick vew of your schedule inventory and its different statuses.
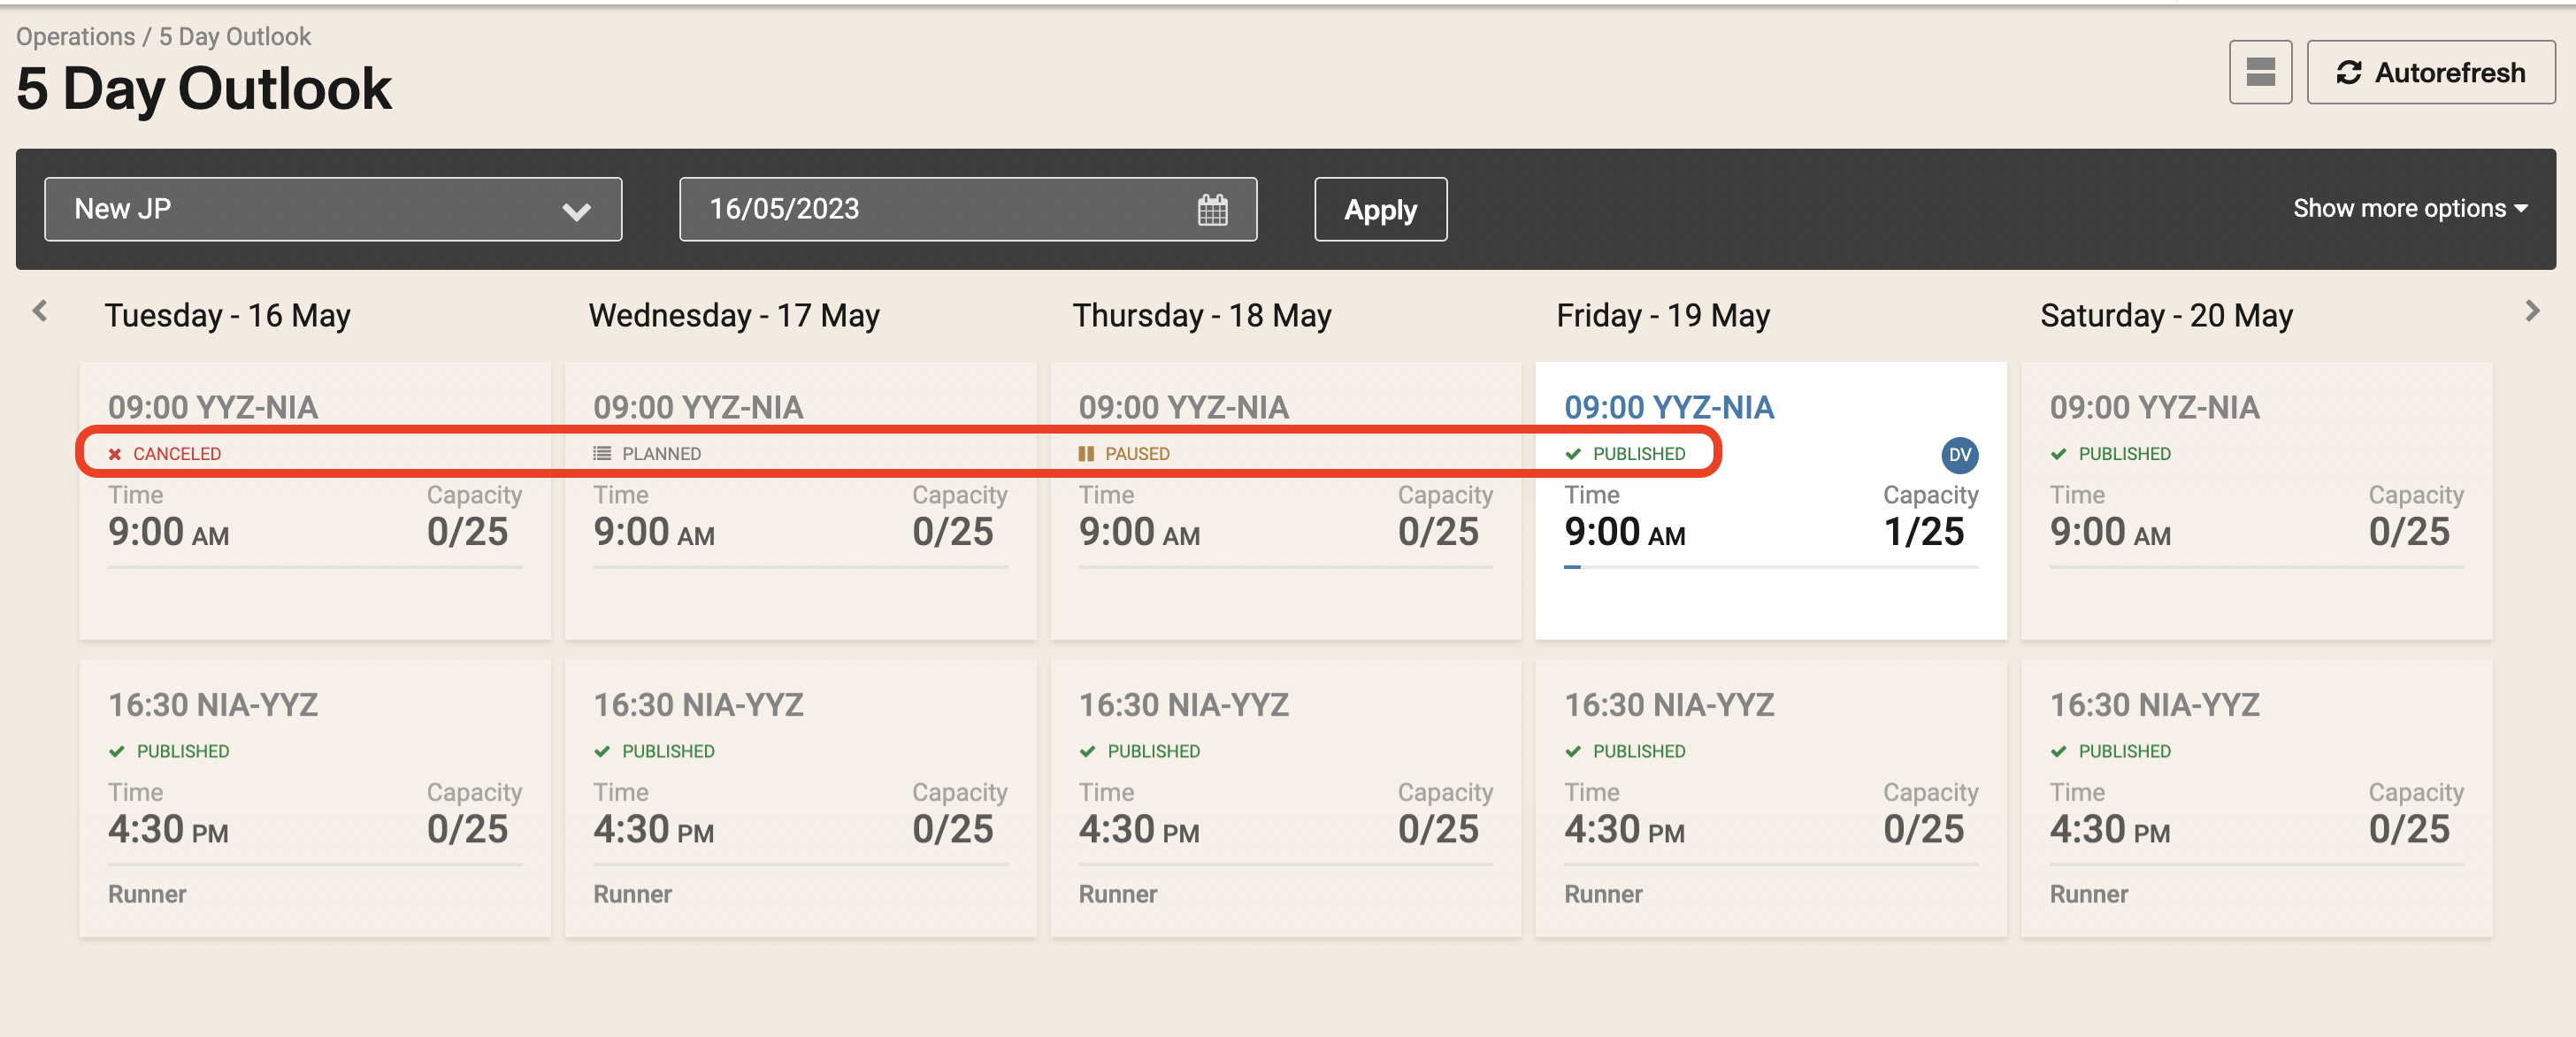
You can set these statuses back and forth based on your operation. -info Manifest statuses don't affect the ability to redeem, unredeem, change, or cancel tickets.
Passengers list
Below the manifest head you will see a filter to select how you want to sort and show the tickets in each station and below there is the list of all the stations in the manifest.
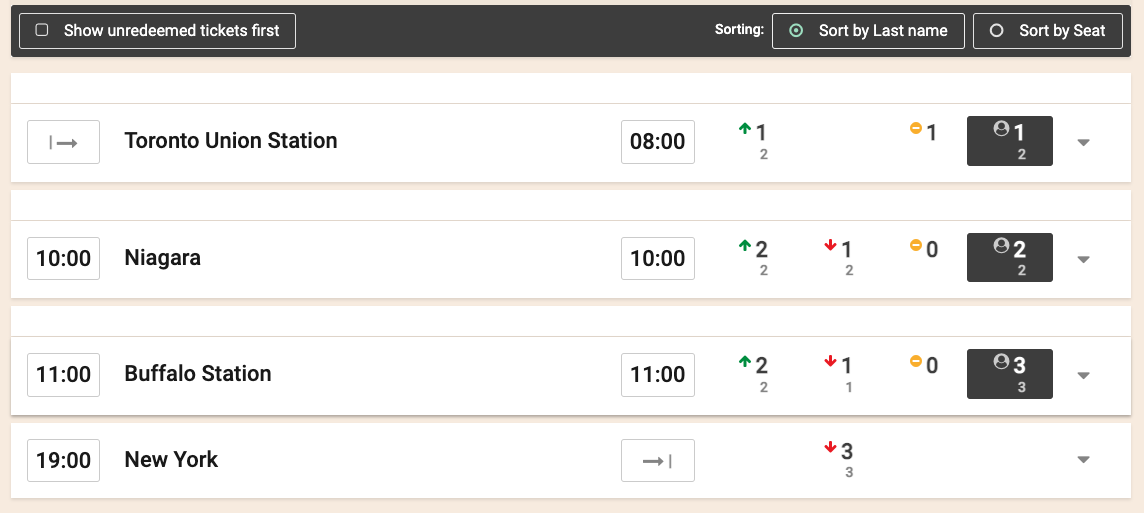
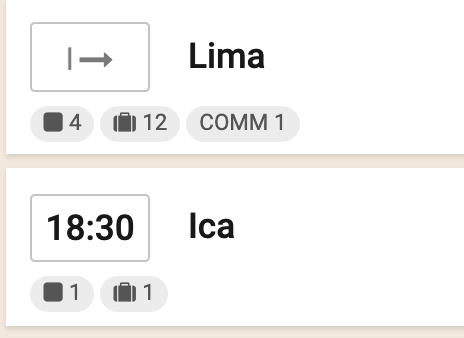
Each station contains the following information (in the order that appears).
Arrival time (time that the vehicle arrives at that station.)

Station name

Departure time (time that the vehicle departs from that station.)

Number of passengers boarding at the station (green arrow). This has two counts. The number above (number in larger font) indicates the actual number of passengers that have already redeemed their tickets at that station. It would be the redeemed minus the no show (or unredeemed tickets). The number below (number in smaller font) indicates the total number of passengers that there should have boarded in that station if they all had redeemed their tickets.

Number of passengers un-boarding at the station (red arrow). This has two counts. The number above (number in larger font) indicates the actual passengers that had already redeemed their tickets at some prior station and are actually getting off at that station. The number below (number in smaller font) indicate the total number of passengers that there should have unboarded at that station if they all had redeemed their tickets (if there were no no shows).

Number of No-Shows (yellow icon with a minus sign). This is the number of passengers that should have boarded at that station but are yet to redeem their tickets, which means that they are at the moment no show and their tickets remain unredeemed. This option is usually disabled by default, but you can enable it yourself under Admin > Account > Manifests

Load in the bus at that station (Number of passengers currently in the bus at that specific station). This has two counts. The number above (number in larger font) indicates the actual number of passengers that are assumed to be physically on the bus at that moment. The number below (number in smaller font) indicate the total number of passengers that there should have been in the bus at that moment if they all had redeemed their tickets.

The only stations that are slightly different are the first and last station. In the first station there is no arrival time or un-boarding passengers, and in the last station there is no departure time or boarding passengers.
You can expand each station clicking in the arrow at the right to see the details regarding boarding and un-boarding passengers (if it applies).

You can see a list of boarding passengers. In the case of the image the ticket was not redeemed and you can redeem it either by scanning the ticket or clicking in the green Redeem button from the manifest list. From this view, you can also tag a passenger as no-show. For more info about statuses, please go to Ticket status article
Once redeemed the display will change as seen below.
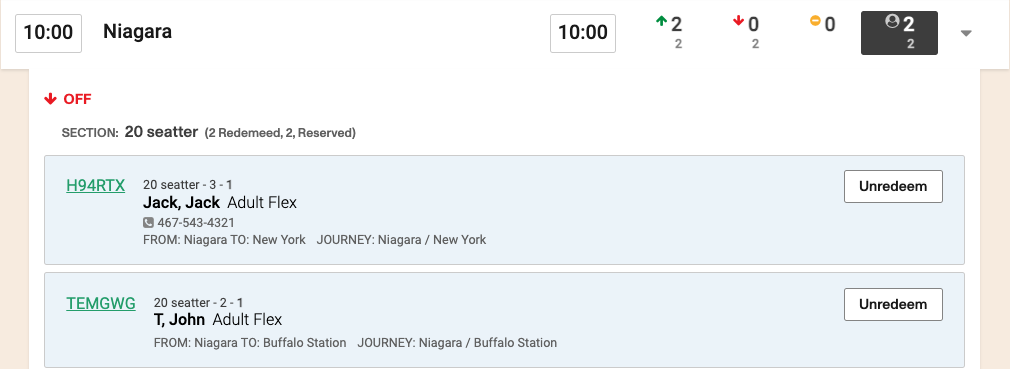
You can un-redeem a ticket clicking the un-redeem button (some rules will apply, for example the ticket can't be expired).
The passengers sort is alphabetically by last name. In the case of a manifest with seatmap, the tickets will be firstly sorted by seatmap section, row, seat and lastly alphabetically by last name.
There is also a list of passenger un-boarding the vehicle at the station.

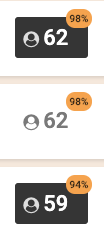
If a station is full you will see a pill indicating 100% of occupation over the station load.

Before the station is sold out you can see indicators of high load as well.
If the option is enabled in Admin > Setup, you will be able to see the number of no-shows in the passenger list (next to the yellow icon).
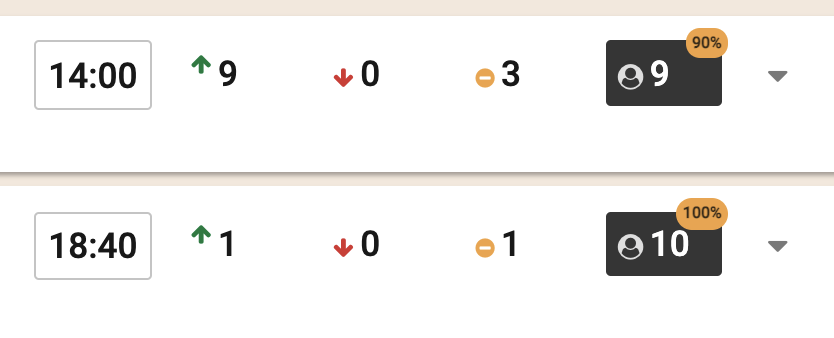
Also if enabled in Setup, you will be able to see the number of SSRs boarding in each station.
Assign users to the manifest
Users can be assigned to the manifest using the user avatar selector on the top right corner. By doing click over the names listed the user selected will be marked as assigned to the manifest. In order to be able for this action the user must be setted as assignable in the user option section.
![]()
Considerations and troubleshooting
Timezones
The manifest time, together with departure and arrival times will be defined by the account timezone.
This will NOT be affected by the shift location of the user (as per Jul 2025 tests).
Local station times are shown in the sales flow and in the scanner app.
Assigned users are highlighted in the list and can be removed from the manifest by clicking over the name.
![]()
Manifest Modifications Without Open Shift
A user responsible for dispatch or manifest adjustments may need to perform operational tasks across multiple stations. Instead of requiring them to open a shift per station, the system should validate their access based on the assigned shift locations, not the opened shifts. They should be able to dispatch or edit manifests that originate from any of those stations, without opening a shift.
Operational Control Rules:
An open shift is not required to perform manifest actions.
The user must have the origin station of the manifest assigned under their Shift Locations (in Admin > Users > Shift Locations).
The system must not require the user to have an open shift at that station to execute these operations.
The following actions are allowed under this control:
- Dispatch manifest.
- Change manifest status.
- Change bus assignment.
- Change capacity.
- Bulk move passengers
Create extra schedules
Filter by a specific day. Using the options provided, scroll to the right and select a manifest to create an additional one.
You can also review the settings in operation settings to activate the warning when a duplication is detected in the schedule. operation settings article

Email Notification for Passenger Movements
Overview: When passengers are reassigned or moved to a different schedule, communication is key. To enhance transparency and customer satisfaction, the system now allows agents to notify passengers via email directly from the movement flow screen.
Current Behavior: Previously, agents could only send SMS notifications when moving passengers to another trip or schedule. This limited communication with passengers who provided an email but no mobile number.
New Functionality: A new “Send Email Notification” option has been added to the movement process. This button appears below the existing SMS option and allows agents to easily send an email update to affected passengers who have an email address listed in the manifest.
Key Benefits:
Ensures passengers are promptly informed of any schedule changes. Expands communication beyond SMS to include email. Improves operational efficiency and passenger experience.
Where to Find It: Operations > Movement You can access the new email notification option on the Movement Flow screen, directly below the SMS notification button.