Page summary
Payment Providers: Stripe Terminal - Set Up
Setting up the Terminal payment provider, 'stripe_terminal' payment method
Configuring your Stripe account
If you haven't already create an Stripe account and open a developer account with the same login.
Login into your Stripe development dashboard and create a new application.

Once you created your customer account you will be redirect to the account dashboard.

Get your Stripe credentials
You can find your secret key in your Home

or by going to Developers > api keys

Save the secret key that you will need it to configure the stripe terminal in Betterez.
Configure Stripe webhooks
Go to Developers > webhooks

You will be redirected to the Webhook dashboard

Once there you need to create a new destination by clicking in + Add destination. You will need to complete a wizard. First you will need to select the events you want to listen to, here you need to search for the word terminal and select the three results as shown in the picture.

In the second step, select Webhook endpoint

And finally you should add the betterez url shown in your stripe terminal payment method.

Make sure to enter the proper notification url for "YOUR" account and not the one in the image above.
Give the webhook a descriptive name for example, terminal-checkout, fill the url using the information from the stripe_terminal payment method and create the destination.

Get your Stripe webhook key
Go the setup page of the webhook you just created and save the signing secret, you will need it to finish the configuration of the stripe terminal payment method.

Setting the Stripe terminal payment type
Navigate to admin>payments scroll to find the stripe_terminal payment type and click in the name. You can find more information about the 'stripe_terminal' method in the sales flow article

Once on the Edit payment method screen the user will be required to configure the following fields:
Display Name The name you would like displayed in the shopping cart list of payment methods.
Enabled If checked, this payment method will be available for those sales flow channels it'll be configured.
Sort Order The higher the number, the lower in the list of payment methods this payment method will appear.

Require address on Back end If checked, this payment method will require the address of the customer in the back end sales flow.
Require address on Web sales If checked, this payment method will require the address of the customer in the web sales sales flow.
Refundable and Changeable If checked, tickets purchased with this method of payment will be refundabled or changeable.
Include in the deposit totals If checked, this payment type will have documentation that is necessary to include with seller shift deposit before closing a shift.

If Allow to combine is checked, the payment method can be combined with any other payment method on the payment form. You can also set a list of payments which can't be part of that combination:

Make sure to select only the Back end channel since this method requires a Stripe terminal to be installed and it will not work in websales.

You should also configured the parameters for the payment method to allow it to connect to the Stripe gateway and receive webhooks from it.
In the Secret key field you should enter the value saved before, described in the get_stripe credentials section
In the Webhook signature key enter the values saved before in the get your Stripe webhook key section.
Make sure to check the Wait for payment completion setting, the flow with Stripe will not work properly if this setting is off.
Copy the Webhooks URL as displayed in the right blue panel and double check is the one you used when setting up your webhook above

Maximum waiting time: Indicates the time Betterez will wait for the payment to be processed. After that time the referenced payment will expire. If the calculed expiration time exceeds the trip departure, then the payment will expire in the trip departure time.
If the sale time exceeds trip departure time, then the payment will expire from that moment plus maximum waiting time.
This parameter override the default behaviour.
The image below show three differents scenarios: before the trip departure time, near trip departure time and after trip departure time.
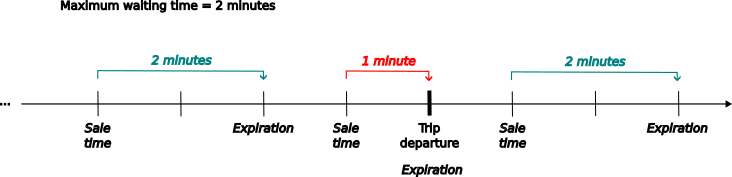
NOTE: Negative values have not effects.
Trip departure time offset: This value apply when the sale is made near of the trip departure time and override partially maximum waiting time behaviour.
If the sale is made between trip departure minus this offset, the expiration time will be set from that moment plus the offset. This feature set a time window where the system extends the expiration time beyond the trip departure. Also, it allow made sales after trip departure.
The next image shows two sales made within of time window.
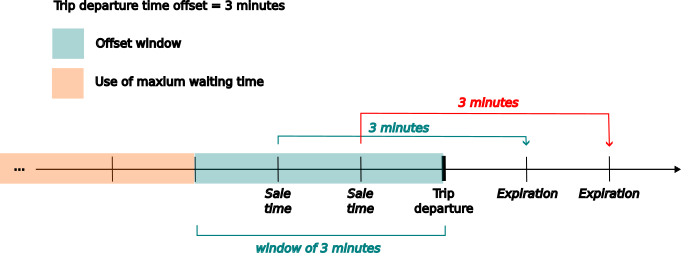
NOTE: This option only works if "Maximum waiting time" has been set. Negative values have not effects.

If your account has custom subdomains you can also configure the domains this payment method will be available for.

Click Save to save your configuration settings.